Tag Archives: celebration

Windsor Wedding Cake

11 Apr

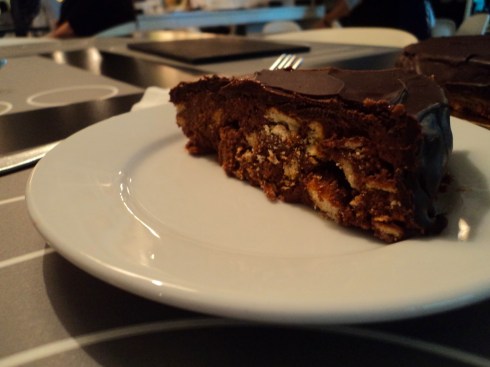
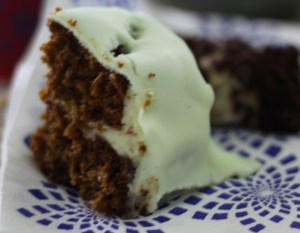
A slice of nostalgia ... and deliciousness!

So, just to make clear … I am not a royalist. I am not particularly interested in the upcoming wedding of William Windsor in the UK, nor am I excited to see what dress his bride will wear. But no one could escape the fluffy news pieces about the nursery tea cake that William requested as his Groomsmen Cake for the upcoming nuptials. May be we needed a break from the devastation of Japan or the multiple uprisings around the world. I’m not sure.

But what I do know is this: the cake sounded intriguing. And when my beloved GoddessMoments sent out a request asking for someone to make her the cake, I thought … Ooh, Id love to do that! So I promised her a cake and I got to work doing a bit of research.

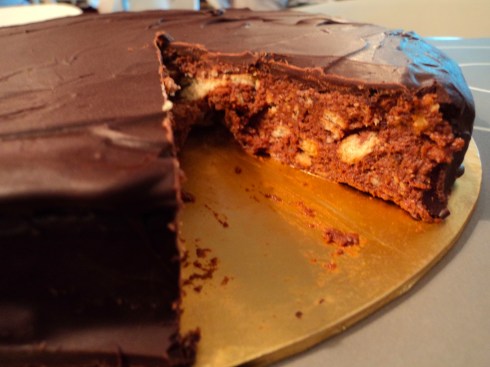
This refrigerator cake (there is no baking) was apparently a favourite tea time cake when William was a child, and according to former royal Chef Darren McGrady, is also a special favourite of the Queen. Its a simple cake – chocolate and tea biscuits are its main components, but there are several versions out there which also incorporate fruit and nuts. I have already written about my dislike for mixing the purity of chocolate with fruit and nuts – I find it muddies the waters.

I found online two main recipes – one by Nigella Lawson that incorporates dried fruits and nuts and uses condensed milk as the sweetener. The second is attributed to Chef McGrady, and uses sugar instead, but is pure chocolate. I loved the idea of using condensed milk so I did a bit of a mashup and evolved my own recipe. I think its delicious – simple and satisfying, tasting of tea biscuits and chocolate.

Please do use an organic egg in this recipe – because even though the heat of the chocolate “cooks” the egg, its probably not fully cooked. Use a pasturised egg, or omit entirely if you are worried. Add dried fruits and nuts if its your thing … and give it time to firm up in the fridge before gilding with its final bath of pure chocolate.

I hope you enjoy this recipe – during the wedding of William and Catherine – or to celebrate your own life! 🙂

Makes 1 9-inch cake. Please keep refrigerated.

  • 1 packet McVities Rich Tea biscuits
  • 1/2 cup (1 stick) butter, softened
  • 3/4 can (about 1 cup) sweetened condensed milk, thickened and cold from the fridge
  • 1 tsp vanilla extract
  • 16 ounces (6 + 8) best quality bittersweet chocolate (at least 72%)
  • 1 egg
  • Pinch of salt

Prepare a 9 inch cake tin (if you have a spring form pan it is best, but not absolutely necessary) by lining it with parchment paper and buttering well. Set aside.

In a large bowl, crush the Rich Tea Biscuits with your fingers. You want an interesting mix of almond sized pieces and crumbles. Set aside.

In a stand mix, whip the butter until it is light and fluffy, and then whisk in the sweetened condensed milk until fully incorporated. Beat in the vanilla until just combined. Set aside.

Pour boiling water into a saucepan, and set a small metal bowl over. Melt 6 ounces of chocolate in the small bowl, until completely liquid. Using a fork (and with the bowl still set over the hot water), whisk in an egg. The chocolate mixture will “seize” – this is OK, just work very quickly.

Pour the chocolate and egg mixture into the butter, and whisk well to combine. Pour the butter-chocolate mixture directly over the biscuits, and fold well. Pour the cake “batter” into your prepared cake tin and refrigerate, covered, for at least 3 hours or overnight.

Once the cake has had time to mature in the fridge, melt the remaining 8 ounces of chocolate, and allow to cool for about ten minutes.

Once the cake has solidified, use a sharp knife to loosen the edges, and turn out onto a cake rack. Set the rack over a baking sheet. Remove the parchment paper from the top of the cake and use a spatula to smooth any rough edges.

Pour the melted chocolate over the cake, and smooth the sides with a spatula. Refrigerate (either on the cake rack or transfer to a serving plate) for at least another 2 – 3 hours.

Serve with a very sharp knife to hack the cake to pieces!

Note: You can flavour this cake with all sorts of things. Whisky comes to mind – or peppermint essence. Fruit and nuts would also work if youre so inclined.

Enjoy!

A Rainbow Birthday Cake for Ms Yangie!

9 Apr

AngelKitten has been a regular helper, co-cook, co-conspirator and dreamer in my kitchen. It started out as an expression of interest on AngelKitten’s part to learn how to cook … but it has evolved into a friendship forged by food, and a sisterhood defined by how we balance each other. She is a perfectionist – specific and exacting, designing the most delicate and beautiful visual elements for my food. I am a little more … Aries in my approach. I cook with great passion, and my food is usually delicious – but I have been known to be a tad disorganised and messy. AngelKitten records everything I do (many of the recipes on this blog come from her handwritten notes), and when we brainstorm, she is the one who designs, sketches and keeps notes.

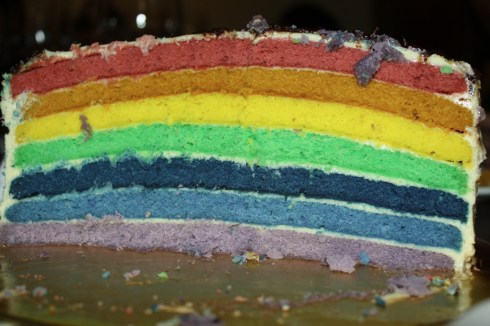
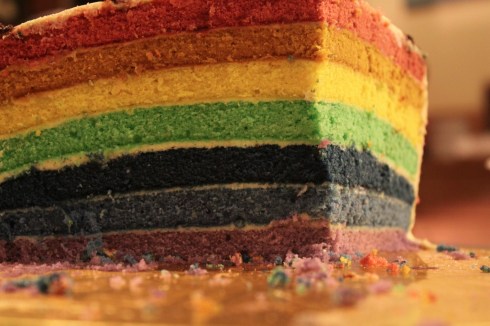
One of the cakes that AngelKitten has always wanted to make was a rainbow cake – thin layers of vanilla cake, coloured in the seven shades of the rainbow. We were considering it for our Princess Doll Cake, but ended up deciding it would be just too complex. For that cake, we stayed with the pink (!) theme, and divided the vanilla cake in half and flavoured it with fresh raspberry puree. But the idea for a rainbow cake always stayed with AngelKitten, and when her Mum’s birthday came around, she asked if we could make it.


Ms Yangie's Birthday Rainbow Cake ... but where is the rainbow?!


We adapted the recipe for the vanilla cake for this rainbow cake. You need a little more batter, so instead of doubling it, I made one and a half times as much (with a touch less baking powder). You also require loads of bowls because you will need to divide the batter into seven. We followed the colours of the rainbow as exactly as possible – purple, indigo, blue, green, yellow, orange and red. We used Wilton gel colours because we wanted to achieve a very bright rainbow, though I think, with a little care, you could easily create a more pastel, but just as beautiful rainbow with IndiaTree colours.

You also need a lot of time. This cake takes seven bakings of 10 minutes each, and we only used two cake pans – so there was quite a bit of washing, cleaning, and cooling in between. We iced the cake with a vanilla bean cream cheese icing and AngelKitten made a chocolate ganache to pipe the decoration and birthday wishes. Yangie (AngelKitten’s Mum) had been wanting a rainbow on her cake, and when she received a pure white iced cake, kept asking, where is my rainbow? When she cut into the cake, and found this gorgeous rainbow, she was thrilled. And I was delighted with being able to help AngelKitten create such a wonderful gift for her beloved Mum.

Ahhh there it is! Rainbow Cake reveals itself!

Rainbow Cake

Makes 1 9-inch rainbow cake (7 layers)

  • 4 1/2 cups superfine or cake flour
  • 3 1/4 tsp baking powder1 tsp salt
  • 1 1/2 cups (12 oz) butter, room temperature
  • 3 cups sugar
  • 6 eggs
  • 2 tbsp (or more) vanilla (I used 3 large vanilla beans and 2 tbsp vanilla essence)
  • 1 1/2 cups milk

Preheat your oven to 165C (325F) and line two 9 inch cake pans with parchment paper. Spray the cake tins with non stick spray or use some softened butter. Set aside. Have seven bowls at the ready, along with gel or liquid food colour, and toothpicks.

In a small bowl, sift together the flour, baking powder and salt, and set aside.

In an electric stand mixer, cream together the butter and sugar until light and fluffy. Add the eggs one at a time, and then add the vanilla. You should have a creamy batter, but dont worry if it looks a bit curdled – it does that sometimes!

Fold in (dont beat in) the flour mixture, alternating with the milk.

Divide the batter evenly into the seven bowls. Begin dying the batter, starting with the violet/purple hue. As soon as it is dyed to your liking (and remember it does get a little darker in the oven), pour the batter into a prepared baking tin, and smooth with a spatula. The layer will be very thin. Bake for ten minutes, or until a toothpick inserted into the cake comes out clean, and it springs back lightly when pressed. Remove the layer from the oven, cool on a cake rack for about ten minutes, and then remove from cake tin by turning onto cake rack. Keep the parchment paper on the bottom of the cake as it cools. Repeat with the remaining six layers, prepping your pans as you go.

When the first layers have cooled sufficiently, begin to ice the cake (you will be icing and baking all at the same time! Multitasking is fun!). Centre the first layer of cake on a cake plate. Use the parchment paper to help you move the cake layer around – lift the layer into your hands by turning the cake rack over, and shift the layer over to the cake plate by carrying it on the paper. Use the first of your seven bowls of frosting, and frost the top of the cake, and the sides lightly. Repeat with the remaining layers, using the parchment paper to help you centre the cake layers on top of each other.

Once you have iced all the layers, frost a thin layer of icing along the top and sides. Place in the fridge for ten minutes (this is called the crumb icing – and helps you achieve a smooth final layer of icing), and then finally ice a thicker layer of vanilla cream cheese frosting over everything.

Serve to the delight of your family and friends!

Gorgeous and Dramatic

Vanilla Cream Cheese Frosting / Icing

  • 1 cup butter, softened
  • 2 cups cream cheese, softened
  • 1 cup icing sugar
  • 2 tbsp vanilla essence or 1 – 2 vanilla beans

In an electric stand mixer, beat together the butter and cream cheese until light and fluffy. Make sure the two are completely combined and no lumps or bumps remain – this may take up to five minutes.

Remove the bowl, and sift the icing sugar over the butter-cream cheese mixture. Beat again until fully incorporated, adding the vanilla to taste as you go.

Divide the frosting into seven bowls (we reused the batter bowls) and ice the rainbow cake as above.

O’Gourmet Food Hall Trifecta of Ginger Cake

4 Feb

Everyone loves ginger cake. I certainly havent met a ginger cake that I didnt like, even those slightly stodgy, heavy ones. Its the magical melding of ginger and dark sugar, of molasses and heat that creates layers of flavour. Ginger cake is complex. Its a full frontal experience because the spice perks up the taste buds, while the richness and sweetness tease the palette. I have always loved ginger cake, but when I got a whiff of the Bentong ginger available at O’Gourmet Food Hall, I knew I wanted to try my hand at remaking it anew.

Bentong ginger is considered the best in the world. It is fresh, crisp, stark and sharply spicy, but it has undertones of sweetness. O’Gourmet Food Hall has organic, locally grown and incredibly fresh Bentong ginger. The scent assails you as soon as you peel the root. The firmness of the ginger, the clarity of the flesh, and the taste. Absolutely gorgeous.

I decided I wanted to make a ginger cake with this particular varietal, but I wanted to add more depth to it if possible. I found some ginger curd which has a more muted caramel deep throbbing hum of ginger to it, and some beautiful fresh ground ginger powder which adds a musky beat. A trifecta of ginger in one cake. Would it be too much? Turns out, if youre careful and you add the fresh ginger in stages, you can find a balance of taste that is close on perfect. Add to that the dark tones of brown sugar and molasses, fresh organic eggs, and a frosting of cream cheese and fresh vanilla bean. Sublime. Happy making. And amazingly easy.

Do note that if you want a very simple ginger cake, you could just halve the recipe and leave out the frosting. You will then have what is more like a tea cake, still stunningly gingery but a little more sedate and less full on. If you cant find ginger curd, leave it out, but do try and find the freshest, crispest, firmest ginger you can, and use organic ingredients as much as possible.

For a two layer cake (serving 12 people… or more!)

  • 3 cups organic pastry flour
  • 2 tsp baking soda
  • 1/2 tsp salt
  • 2 tsp ginger powder
  • 3/4 cup dark brown sugar
  • 1/2 cup molasses
  • 1/3 cup treacle (or corn syrup or honey if you dont have treacle)
  • 2 – 3 tbsp ginger curd (optional but very good)
  • 2 eggs
  • 1 1/2 sticks (12 tbsp) butter, melted
  • 1 cup hot water
  • 1/2 – 1 cup fresh ginger, peeled and grated finely
  • 8 oz cream cheese
  • 1/2 cup icing sugar
  • 2 vanilla beans or 2 tbsp (or more) vanilla essence
  • 1 – 2 tbsp cream (if needed)

Preheat your oven to 175C (350F), and butter two cake tins, and line with baking paper.

In a small bowl, combine the flour, baking soda, salt and ginger powder. Set aside.

In a large bowl, whisk together the sugar, molasses, treacle, ginger curd and eggs. Set aside while you melt the butter into the hot water in a small saucepan, over medium heat.

Whisk the melted butter and water into the sugar/molasses mixture, and stir in the fresh ginger. It really depends on how strong your ginger is – so I always add 1/2 cup first, and then taste. Add more until you get a peppery almost overwhelmingly ginger taste. Remember that the heat of the oven will mute some of that sting.

Stir the flour mixture into the large bowl, and mix until just combined. Pour the batter into the prepared cake tins, and bake in the oven for 20 – 25 minutes, or until a cake tester is inserted and comes out with a few crumbs clinging to it.

Remove the cake from the oven, and allow to cool, in the pan, for about 5 – 10 minutes. Turn out onto a rack to cool to room temperature.

Meanwhile, add the cream cheese to a stand mixer bowl, and beat for a few minutes until it attains a softened consistency. Add the icing sugar, a tablespoon at a time, and continue to beat. I always like to taste the frosting at each tablespoon of sugar, because I dislike icing that is too sweet. Split the vanilla pods and scrape out the beans and add to the frosting. Beat for a few seconds more until the vanilla is totally integrated. Add a tablespoon of cream (or milk) if the mixture is too stiff.

A Trifecta of Ginger CakeCentre a cake round on a serving plate, and ice the top. Place the second cake round on top, and ice the top and sides of the cake. Refrigerate until half an hour before serving.

Enjoy!

O’Gourmet Food Hall Yee Sang Cake

18 Jan

One of the things I love about working with O’Gourmet Food Hall is that I am constantly challenged to think differently. Creating new recipes is intense, focused and fulfilling work, but the pleasure is multiplied when one has inspiring ingredients, and people, to work with.

I have enjoyed getting to know the various characters who work at O’Gourmet, and I am always interested in the new products which come in. Its wonderful to be the first to know about the sublime chili brought by hand from Kashmir, or to be introduced to an intriguing cheese.

About a month or so ago, LingCat came to me and told me that O’Gourmet was working on a Chinese New Year booklet, highlighting some of the unique food and drink of the season. She asked me to think outside the box, and come up with an special New Year dish. I love this kind of challenge, and it reflects, for me, the philosophy of O’Gourmet – unique, interesting and tasty, with a twist!

AngelKitten and I had lunch and threw around lots of different ideas, but we kept coming back to the traditional Yee Sang salad. Usually served as an appetiser, the Yee Sang is a very symbolic savoury dish, with each ingredient representing a wish for the new year. Tossed together at the table, the Yee Sang is a communal wishing for good luck and abundance.

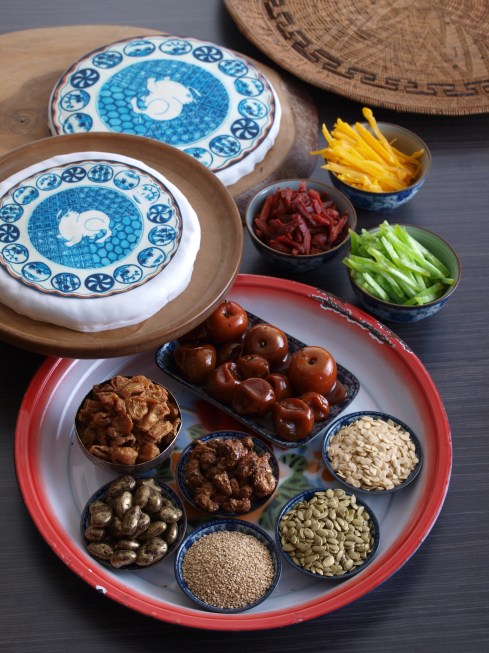
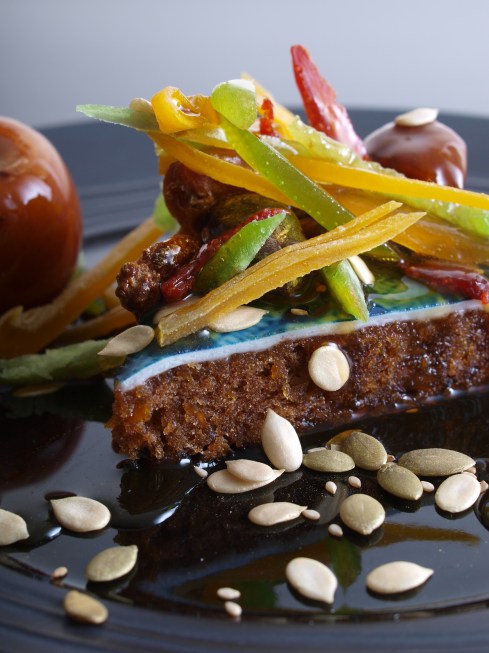
However, Yee Sang is almost always served with raw fish – not very vegetarian! So AngelKitten and I decided to up-end this salad, and turn it from savoury to sweet. What would a Yee Sang dessert look like? We wandered through O’Gourmet Food Hall and were inspired by the dried fruits and nuts, and the gorgeous miniature apples and oranges. We decided that we would create a cake that looked like a plate, upon which a “salad” of symbolic fruit and nuts would be tossed. Each element of the dish needed to represent a different hope for the new year, and after some research (and much tasting), we had our ingredients.

We were lucky enough to have the wisdom and generosity of Mama Min (an amazing baker), who introduced us to PastryPro. This professional baker’s paradise was able to print a graphic image of a blue and white china plate on a sheet of icing for us. As we are entering the Year of the Rabbit, we found a beautiful image of an old china plate, with a rabbit front and centre. And of course, since rabbits love carrots, we decided that the base for the cake “plate” would be carrot cake, with a twist. We added a scant amount of 5 spice powder (a common element in the traditional Yee Sang), and came up with a unique and delicious cake which embodied the Chinese New Year.

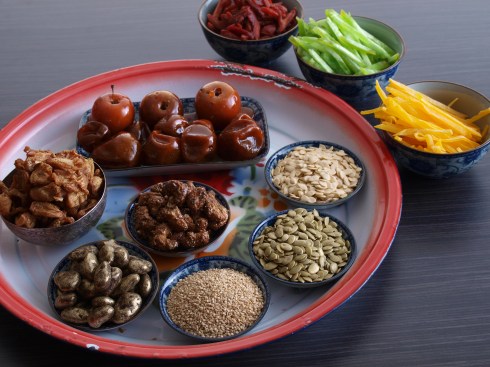
We chose our “salad” ingredients with care. Dried pomelo, mango, lychee and strawberries, as well as caramelised cashews, chocolate almonds, winter melon, pumpkin and sesame seeds. I also candied some tiny Japanese apples, and caramelised some beautiful little oranges. AngelKitten spent ages painstakingly painting the dried fruits and nuts with gold powder, and I baked, candied and caramelised. We rolled fondant, applied our beautiful printed icing sheet, and sat back and sighed with happiness.

We brought our Yee Sang Cake to the brilliant Ping and Partner whose photographs grace this page. And when we finally saw the recipe in print, it was a feeling that cant be described … pride, happiness, satisfaction. In the end, we created a stunningly beautiful (and very delicious) version of the traditional Yee Sang.

Both AngelKitten and I would like to wish everyone a prosperous and happy Year of the Rabbit!

If you would like the recipe, please pick up a copy of O’Gourmet Food Hall’s “Traditions and Reunions” booklet at Bangsar Shopping Centre, or download the pdf by clicking on this link.

Please note that all images on this post are copyright O’Gourmet Food Hall, and may not be reproduced without written permission.

Hot Fudge + Port Pear Chili Jam

30 Dec

So yes, I am in a saucy mood. I have been cooking a lot recently, but not new recipes. And its been one of those weeks (months?) – first my phone died, and then my hardrive on my laptop got fried. I am lucky in that I have the means to deal with these issues (new phone on the one hand, and my old laptop on the other). But its been a frustrating time, and I havent felt a whole lot of inspiration.

But a stroll through O’Gourmet certainly helped! Mr. Kumar (the manager) was so excited to show me some chili powder from Kashmir – hand carried back to KL. It was like nothing I had ever seen before – rich, deep burnt orange red, and almost wet … with a scent that had so many layers to it I cannot even begin to describe, but I will try. Soft, mellow, with a sharp tinge… hauntingly musky with a long profound beat of heat and sun and spice. Gorgeous. Stunningly sensual. I had to cook with it – and suddenly, inspiration arrived!

I decided to make a chili ice cream (the recipe for which I will post tomorrow). But this was to be not just a singular ice cream, but an ice cream sundae. Hot fudge sauce (with dark bittersweet chocolate and melted Scottish fudge) and a chili jam – with a base of port and pears – at once sweet, hot and boozily beautiful. I felt that these sauces would elevate and intrigue – and would provide the perfect foil for the cold creamy ice cream. AngelKitten suggested we get some caramelised pistachios to top the sundae. What a combination of flavours and tastes! I couldnt wait to get started.

These two sauces would of course be just as magical on their own (the hot fudge sauce is particularly simple to put together) or combined over chocolate or vanilla ice cream. If you can, though, try the whole package. Its quite a few pieces of cooking work – but if you break it all down, and prepare in advance, its actually a doddle!

Hot Fudge Sauce

Makes about 2 cups of hot fudge. This can be served warm, or made in advance and reheated just before serving. Use the best quality chocolate and fudge you can find.

  • 450 – 500 g (1 lb) vanilla fudge
  • 1/2 cup cream
  • 250 – 300 g bittersweet (at least 70%) chocolate, chopped
  • 1/2 teaspoon Maldon or other sea salt

Grate the fudge into a large saucepan. Add the cream and stir a little.

Add the chopped chocolate, stir, and add the Maldon salt.

Place the saucepan over a low heat, and melt the chocolate into the fudge, stirring all the while. Make sure that the fudge too has been completely melted into the sauce.

Serve warm, or store, covered, in the refrigerator for up to 2 weeks. Reheat before serving.

Port Pear Chili Jam

Makes about 2 cups of jam.

This jam is quite loose. It pours like a sauce, but it also depends on how long you cook it – the less liquid left, the more “jammy” and thick it becomes.  If you do not want to use port or another alcohol, substitute with grape juice.

  • 9 pears (I used 3 each of D’Anjou, Bosc and Conference), peeled, pared and roughly chopped
  • 1 + 1 tbsp pear balsamic vinegar (if you cannot find this, try using pear or apple juice or even some apple cider vinegar)
  • 1 cup port wine (or grape juice)
  • 1 tsp best quality (Kashmir if you can find it) chili
  • 1 tsp chili flakes
  • 1 tsp mustard seeds
  • 3 – 6 tbsp dark brown sugar
  • 1 tbsp cinnamon
  • 1/2 tsp salt
  • 1 tbsp best quality (25 year old) balsamic vinegar
  • 2 tbsp honey (I used leatherwood honey)
  • 1 tbsp vanilla bean paste or vanilla essence

Peel, core and chop the pears. As you work, place the pears in a large saucepan, and toss them with 1 tbsp of the pear vinegar.

Measure out the pour wine and add to it the remaining 1 tbsp pear vinegar, chili, chili flakes, mustard seed, 3 tbsp of brown sugar, cinnamon, salt and balsamic vinegar. Stir well to combine, and pour over the pears.

Place the saucepan over high heat, and bring the mixture to the boil, stirring well.

Once the mixture comes to the boil, lower the heat to medium, and add the honey and the vanilla. Allow the mixture to simmer, uncovered for at least an hour. The jam will thicken and become much darker in colour. Taste and add a little more brown sugar if you feel you need to up the sweetness of the jam.

Give it a stir every so often. Allow to simmer until it is a thickness that you prefer. I like it a little liquid because I am using it as an ice cream topping … but! If you want to make it into a proper jam, just cook it for a little longer.

This can be served warm or at room temperature, and will keep, uncovered in the fridge for up to 2 – 3 weeks.

Apologies for lack of photos – still dealing with loss of hardrive!

O’Gourmet Truffled Macaroni and Cheese

6 Dec

I love macaroni and cheese, the beautiful pasta, coated with a creamy blanket of cheesy indulgence. The crispy top, making way for a melting interior. Whats not to love? Well, some varieties of mac and cheese are plainly unappetising, made from over processed, pasturised ingredients that have all the life and soul taken out of them (once youve seen that orange glow, you will never forget it!). I wanted to make a different kind of macaroni and cheese – a sensuous, indulgent meal, ripe with scent, taste, texture and balance. This macaroni and cheese is slightly wicked, a tad naughty, and very memorable. It can be served at a celebration – birthday, New Years, holidays of every kind – or just because you want to say I love you. Honestly, they will get the message!

A dish like this needs to be in part based on thought and consideration, and in part on pure inspiration. So I wandered the O’Gourmet Food Hall to see what might present itself. First under consideration was the pasta. I decided on La Collina Toscana pasta, made in Italy, and rather than macaroni, a conchiglie shape – like a small conch or sea shell. Gorgeous, naturally dried, hand crafted pasta, with a shape that has the same benefits of macaroni (the curved tubular shape catches and holds sauce well), and yet has a more elegant look to it. But of course, I dont want to be proscriptive, so use whichever pasta strikes your fancy!

I feel that macaroni and cheese can sometimes be a tad overwhelmingly rich, and I noted some gorgeously fresh organic baby spinach, so I decided to include a surprise nestled in the depths of the pasta – bright clean spinach, sauteed with white onion, and candied, caramelised garlic. I wanted to make the garlic a little differently from the original Ottolenghi recipe I used, and so decided that instead of water, I would use wine! But then, I saw Fre wines – alcohol-removed wine. Yes, honestly!

I read the taste tests, and while there is definitely something missing (the alcohol!), there is a unanimous agreement that the taste is still there… somewhat! I thought that it might be very interesting to try cooking with this non-alcoholic wine. Would you get the same taste, roundness of flavour, haunting notes of fruit and honey and sunshine, as with regular wine? I decided I would use the Fre premium white wine in the sauce, and the Fre premium red wine in creating the caramelised garlic (in place of water in the original recipe). I found that there was certainly a hint of winey flavour to the sauce and garlic, but that depth of flavour, the resonance of the wine, the layers of scent and taste, were not as fully realised. I think the next time I make this pasta, I will use regular wine, but when I am cooking for those who have issues with alcohol in their food, I would most certainly go back to the Fre. And again, if you prefer cooking with wine, please, go ahead and give in to the urge 😉

And finally, truffles. I felt that truffles added to the cheese sauce would elevate this dish into a celebratory, special meal. I looked around, and decided to layer the different truffle tastes – starting with the amazingly hedonistic truffle oil from Vom Fass, which I used to permeate everything from the spinach to the garlic to the cheese sauce. I seasoned everything with truffle sea salt, and finally, I found Himalayan truffles (tuber indicum), an inexpensive (relatively) jar of black truffles from the Himalayas. I loved these truffles. They were easy to work with, and imbued the pasta with their own truffled scent – not quite as all inclusive as European truffles, which seem to have the reach and depth of durian, but with their own nutty, dark, rich flavour.

And when I spoke to M. Sebastien in the cheese room, he suggested that I use a Brillat-Savarin (a triple cream, soft, brie-like cheese) which had been layered, and thus completely permeated, with truffles. I used organic white cheddar and a beautiful aged crumbly parmesan as well, but I promise you, when I sliced open that Brillat-Savarin, and saw the thick soft melting consistency, and smelled that unique combination of cheese and truffle… well, I wanted to rub it all over me! Incredibly luxurious and such a beautiful addition to the pasta.

This dish looks like a lot of work, and it certainly will take a couple of hours of cooking. But a lot can be done ahead of time – the garlic can be candied and caramelised in about half an hour or so, and can be stored in the fridge for about 2 weeks. The spinach can be sauteed and kept, covered, in the fridge for 3 days. Even the cheese sauce can be made the day before (though I would whisk in the egg at the last minute), and combined with the pasta just before baking. I served the dish with a simple salad of bitter arugula (rocket) and ribboned organic carrots, with a dressing of balsamic, truffle oil and soy sauce. It was a bright counterpoint to the luxury of the main course.

This truffled macaroni and cheese is worth the work and the care, the loving sourcing of beautiful ingredients. The result is a gift to the people you love, and to yourself.

Serves 6 – 8 people

Candied Caramelised Garlic (adapted from Yotam Ottolenghi’s Plenty)

  • 2 cups Fre premium red wine (or a good red wine)
  • 1 1/2 cups garlic cloves (about 2 heads – 30 cloves or so)
  • 2 tbsp + 1 tsp truffle oil
  • 1 tbsp caster sugar or light brown sugar
  • 2 tbsp best quality balsamic vinegar (I used a 25 year old balsamic from Vom Fass – it was astonishing!)
  • 1 tsp herbes de Provence or mixed Italian/French herbs
  • 1/2 tsp truffle salt (if you have it – otherwise a good sea salt is fine)

Combine the red wine and garlic cloves in a medium saucepan. Bring to the boil over medium low heat, and simmer for about 5 minutes.

Drain the red wine from the garlic cloves, reserving the red wine for later. Clean the saucepan well and dry it, and place the garlic cloves and the truffle oil into the saucepan together.

Saute the garlic in the oil for about 5 minutes or so, on medium high heat, or until the garlic has softened, released its intrinsic garlic scent, and become lightly browned.

Measure out about 1 1/2 cups of the red wine, and combine with the sugar, balsamic, herbs and salt. Pour over the garlic in the saucepan. Be careful, because it will splatter a bit.

Simmer on medium high heat for about 15 – 20 minutes, or until the liquid has almost completely reduced, and the garlic is dark red, sticky, candied and caramelised. Take off the heat, and pour over the remaining 1 tsp of truffle oil.

This candied garlic will keep in the fridge, covered for at least 2 weeks, but you will probably eat it before then! It can be an astonishing addition to salads, soups, risottos, pastas, sandwiches – just about anything you can imagine!

Sauteed Spinach

  • 2 tbsp + 1 tsp truffle oil
  • 1 cup finely chopped white onion (1 small onion or 1/2 large)
  • Truffle salt and pepper to taste
  • 3 – 4 cups organic baby spinach, washed and roughly chopped

In a medium sized pan, over medium heat, combine the 2 tbsp of truffle oil and the white onion. Saute for 5 – 10 minutes, or until the onion goes glossy, soft and shiny. You dont want it to burn, but you do want it to reach that moment just before it caramelises!

Season with truffle salt and pepper, and add the baby spinach. Raise the heat a little, and saute quickly. The spinach will turn bright green, and will release some of its liquid. This is perfect. Remove from heat, taste and adjust seasonings, and pour over the final teaspoon of truffle oil.

You can reserve this spinach for up to 3 days, covered in the fridge. It also makes a sublime side dish!

Truffled Three Cheese Sauce

  • 1 cup cream
  • 1 cup whole milk
  • Truffles – as much as you want or can afford! I used a 100 g jar of Himalayan truffles plus 2 tbsp of truffle oil plus 1/2 tsp of truffle salt
  • 3 tbsp butter
  • 2 tbsp truffle oil
  • 3 tbsp flour
  • 1 + 1 cup Fre premium white wine (or regular white wine – or even sparkling wine!)
  • 1/2 tsp (or less – to your taste) English mustard powder or Dijon mustard
  • 8 oz (about 2 cups) grated white organic cheddar
  • 200 g (about 7 oz) truffled Brillat Savarin
  • 1/2 cup grated best quality parmesan
  • Truffle salt and pepper to taste

In a medium large saucepan, combine the cream and milk. Grate over the truffles (I used a Microplane zester to shave the truffles very small and fine), and add the truffle oil and truffle salt, if using. Over low heat, warm the cream/milk/truffle mixture until it is just steaming – about 75C or 165F. Stir often. Once the mixture reaches the steaming stage, remove from heat, and let steep for at least an hour. This infusion step is important! It makes sure that the taste of the truffles is all over that sauce.

In a medium large saucepan, melt the butter and truffle oil over medium low heat. Once the butter has melted completely, add the flour, and stir well. This roux will form the basis of your sauce, so make sure that you take your time and cook it well. You want it the colour of light teak – keep your nerve. Dont burn it, but dont let it stay too pale either. I would cook for at least 5 minutes, up to 10, depending on the heat source.

Once the roux has cooked to your liking, lower the heat a bit, and add 1 cup of the white wine, whisking constantly. The mixture will immediately seize up and become very thick. Whisk in all of the steeped milk/cream/truffle mixture, and continue to whisk well. Taste. Add the remaining 1 cup of white wine, tasting every 1/4th cup or so. You dont need to add it all if the mixture becomes too heavily winey.

Sprinkle over the mustard powder or the Dijon mustard, and whisk well to combine.

Bring the heat up to medium low, and sprinkle over the cheddar. Continue whisking the sauce as you incorporate the cheddar into the mix. Taste and adjust seasonings again.

Slice the bottom rind off the Brillat Savarin, and using a teaspoon, scoop it out of its rind. Add to the sauce, and whisk well to combine.

Sprinkle over the parmesan, and whisk well, until the cheese is melted and well mixed.

Remove the sauce from the heat and allow to cool to tepid bathwater heat. Whisk in the egg yolks to enrich the sauce, and adjust for seasoning.

The cheese sauce can be made up to a day of time, before adding the egg yolks. Keep tightly covered in the fridge, and bring to room temperature before whisking in the egg yolks and assembling the main dish.

This sauce would be wonderful served as is, not baked, with angel hair pasta or linguine!

Truffled Macaroni and Cheese – Assembly

You can serve this in individual small ceramic baking pots, bake it in loaf tins (it will fill three tins), or a large enameled baking dish. Your choice – I think it depends on how and who you are going to serve! Individual pots are a very elegant presentation, but loaf tins or a large baking dish bring a casual luxury to the meal.

  • 500 g macaroni, elbow, conchiglie, or other tubular pasta
  • Truffled Three Cheese Sauce
  • Caramelised Garlic
  • Sauteed Spinach
  • Handful of Italian parsley, finely minced
  • 1/2 cup breadcrumbs (I used Panko)
  • 1/2 cup parmesan
  • A few teaspoons of truffle oil to finish

Preheat the oven to 160C (325F), and have your baking pans ready.

Prepare macaroni or other tubular pasta according to the packet directions, in a large saucepan or pot, over high heat, in heavily salted boiling water, but taste a few minutes shy of the time indicated on the packaging. I cooked conchiglie pasta, and the packet said 15 minutes. I cooked it for 11 minutes, to just before al dente.

Drain the pasta, and place in a large mixing bowl. Pour over about three quarters of the cheese sauce and stir well to combine. Taste for salt and pepper and adjust.

Place about half of the pasta in your baking pots/tin/dish. Press down to ensure that the pasta is snug. Ladle about half of the remaining sauce over the pasta. Using your hands, squeeze out the liquid from the reserved spinach, and place it in an even layer over the pasta, leaving about 1/2 inch rim free around the edge of the dish. Stud the spinach with the caramelised garlic – as much or as little as you wish, though i went easy on it. I wanted a spark of intense flavour, but I did not want to overwhelm the delicacy of the pasta. Add the rest of the pasta to the dish, and ladle over the remaining sauce.

In a small bowl, mix together the Italian parsley, breadcrumbs and parmesan, and sprinkle evenly over the pasta.

Bake in the oven for 45 minutes to an hour, or until the pasta is bubbling and hot, and a crisp, golden crust has formed.

Just before serving, sprinkle lightly with the truffle oil to really bring out the scent.

Enjoy the love.

Raspberry Tart

28 Nov

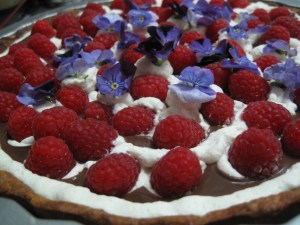
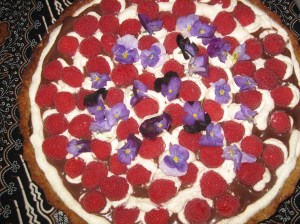
With purple pansiesThis raspberry tart is dramatic, beautiful, romantic and outrageously delicious. Its such a perfect combination of flavours and textures, and its so pretty that people smile when they see it. I love this tart, and I must give credit where it is due – it was inspired by Nathalie’s Gourmet Studio’s amazing raspberry tart, but enlivened with a few of my own happy pleasures. Specifically, dark bittersweet chocolate – and instead of a cookie crust, a pistachio crust inspired by her pistachio ice cream.

This tart is easily made (in its various components) ahead of time, and put together a few hours before serving. The combination of pistachio biscuit crust, dark bittersweet chocolate cream, light vanilla whipped cream and tart fresh raspberries is just outstanding. Crunchy, slightly bitter and nutty, creamy, chocolatey, tart, fresh, cool, bright – decadent, sumptuous, and totally sensual. Can you tell by all the superlatives how much I loved this tart? 😉

The element which brought drama and a really natural beauty to the tart were the flutters of sweet purple flowers adorning the top. My local supermarket sells edible flowers in a little packet – all different colours and they are beautiful. I picked out the purple ones – pansies I think – and together, they made for a stunningly lovely presentation. You can find information on edible flowers at the Cook’s Thesaurus and also some very pretty photographs here and here. Flowers are a wonderful way to make food look visually appealing and beautiful, and after this result, I definitely need to start using them more often!

This tart will serve 10 – 12 people. Its very rich, so you dont need huge slices.

Pistachio Crust

  • 1 cup whole pistachios
  • 2 tbsp powdered/icing sugar
  • 5 tbsp flour (plus additional if needed)
  • 1/2 tsp salt
  • 4 tbsp cold butter
  • 1 egg + 1 egg white
  • 1 tsp vanilla

Using a coffee grinder, processor, your immersion blender – or even a plastic back and a rolling pin to smack them into submission! – grind and pulverise the pistachios with the powdered sugar. The sugar will ensure that the nuts dont go over into a paste – but watch them carefully. I usually grind the pistachios in two batches of 1/2 cup each plus 1 tbsp of powdered sugar.

Put the ground pistachios and sugar into a bowl. Add the flour and salt and toss to combine. Grate the cold butter over the pistachio mixture, and using the tips of your fingers, combine very gently. You could even use a fork left in the fridge to mix everything up. This mixture can be exceedingly delicate so be careful!

Beat the 1 egg and vanilla together, and add to the pistachio-butter mixture. Combine gently and quickly until the mixture comes together into a dough. If its really sticky, add additional flour, a tablespoon at a time until it comes together, but be gentle and work quickly.

Shape the dough into a ball, and refrigerate, covered for at least half an hour.

Preheat your oven to 175 C (350F). I used a 11″ tart pan with a detachable base and non stick surface for this tart. If your tart pan is not non-stick (and really, it should be if it has a detachable base), butter the pan well. Remove the dough from the fridge, and centre it on a the tart pan. Using your fingers, quickly spread and knead and push and prod the dough so it completely covers the pan. Line the tart with parchment/baking paper, and pour in some pie weights. I use dried beans – theyre much cheaper, and they work just as well!

Bake your tart for about 15 – 20 minutes. Remove from the oven, remove the baking paper and pie weights/beans, and place the tart crust back into the oven for a further 5 minutes or so, or until the shell has lightly browned.

Remove from the oven and let cool for 3 minutes or so. Whisk the egg white with a fork in a small cup or bowl. Brush the interior of the shell with the egg white. This is a great trick to ensure that the tart crust is “water proof” and does not become soggy when you add the pastry cream!

Set aside to cool completely before assembly.

You can make the tart crust up to 1 day in advance, and store in the fridge, covered until needed.

Bittersweet Chocolate Pastry Cream

  • 1/2 cup sugar
  • 2 tbsp flour
  • 2 tbsp cornstarch
  • 2 tbsp cocoa powder
  • 1/4 tsp salt
  • 4 egg yolks
  • 2 cups cream
  • About 150 grams (1 1/2 small slab bars) best quality bittersweet chocolate – I used Lindt, broken into pieces
  • 2 tbsp butter
  • 1 tsp vanilla extract

In a medium saucepan, whisk together the sugar, flour, cornstarch, cocoa powder and salt until well combined. Whisk together the egg yolks and cream in a small bowl, and whisk into the sugar-flour mixture until you get a smooth paste.

Place the saucepan over medium low heat, and bring slowly to the boil, whisking all the while. This will take you about 10 minutes – about 5 minutes into this time, stick your thumb in the mixture. It should be like quite hot bathwater. Add the chocolate now, and continue whisking for a further 5 minutes or so. The mixture will start to steam, and bubble, and will have become noticeably thicker.

Check that the mixture will hold a line when it coats the back of a spoon and you run your finger through it. If not, continue to cook for a few minutes further, whisking all the while. It should not take that long to get there, so be vigilant! And remember, the pastry cream will thicken as it cools, so the consistency at which you take it off the stove is not the consistency it will be when you finally assemble the tart!

Remove the saucepan from the heat, and whisk in the butter and vanilla extract. Strain the pastry cream through a fine sieve, and allow to cool to room temperature.

The pastry cream can be made up to 2 days in advance, and stored, covered (with parchment paper spread over the surface for preference), in the refrigerator until needed.

Vanilla Whipped Cream

  • 1 1/2 cups heavy cream – 2 tbsp of cream removed from this amount
  • 1 1/2 tsp agar agar
  • 2 tbsp icing sugar
  • 1 vanilla pod, split, and beans scraped – or 1 tbsp vanilla essence/paste

Measure out 1 1/2 cups of heavy cream. From this amount, measure out 2 tbsp, and remove to a small bowl. Sprinkle agar agar over the 2 tbsp of cream, and set aside for a few minutes to allow the agar agar to dissolve into the cream.

Whisk the remaining cream (by hand if youre macho – with a stand mixer or handheld electric beaters if youre me!) until it just begins to hold soft peaks. Add the reserved cream and agar agar mixture, the icing sugar and the vanilla, and whisk until the cream holds stiff peaks.

The agar agar will ensure that the cream holds its shape for about six hours.

I would prepare the whipped cream just before assembly.

Assembly

  • Pistachio Crust
  • Bittersweet Chocolate Pastry Cream
  • Vanilla Whipped Cream
  • Raspberries – About 1 1/2 pints (1 1/2 small packets)
  • Pretty edible flowers for additional decoration (optional)

Place the tart crust/shell on a good working surface. For the kind of pretty decoration that I created here, I actually centered the crust (in pan) on a small lazy susan that I had from Ikea – this helped move the tart as I was placing raspberries and piping cream.

Pour in the bittersweet chocolate pastry cream, and using a palette knife or even a spoon, ensure that the pastry cream is evenly covering the tart shell, and is smoothed on top.

For this tart, I placed half the vanilla whipped cream into a piping bag with a small round tip (and topped it up when needed). If you want to get extra fancy, you could use a star tip, but that for me would be gilding the lily!

GorgeousPipe a border of whipped cream around the edge of the tart. Now take the raspberries, one at a time, and using the small tip, fill the raspberry with whipped cream, and pipe a small circle of cream at the opening of the raspberry. Place the raspberries onto the pastry cream in circles – working your way from outside in.

Once the tart has been covered with raspberries, begin placing the flowers. Pipe small circles of cream between the raspberries, working from inside out, and on each small circle of cream, place a single flower. You could cover the entire tart with raspberries and flowers, or, as I preferred to do, leave the outer edges with the decadent chocolate cream peeking out.

Refrigerate the tart until ready to serve. Assemble no more than 6 hours before consuming!

When you are ready to serve, remove the tart from the pan, leaving the bottom intact.

Enjoy the pleasures of this most lovely of desserts.

Maple Soy Roasted Butternut

27 Nov

MmmmmMy friend GoldenOro once prepared roasted butternut by slicing it thin, leaving the skin on, and putting it in a high oven. It was gorgeous – caramelised from the butternut’s own sugars, sweet, soft, sticky, stunning. When making Thanksgiving dinner, I decided I wanted to prepare the butternut like that too – but of course, I wanted to put my own little spin on it.

I decided to marinated the sliced butternut for a few minutes in a lovely mixture of maple syrup, sesame oil and soy (and a few other things!), before roasting it in a hot oven. It turned out beautifully, and could easily be a component of an amazing salad – think sweet sticky butternut, crisp bitter arugula leaves, and salty creamy feta. A perfect lunch salad any time of the year! But of course, this butternut is gorgeous served as is – as a side dish it perfectly complements savoury dishes by adding a golden sweet counterpoint.

I also love this side dish because it can easily be prepared a day or two before hand – just cover it up, refrigerate, and bring to room temperature an hour or so before serving. It doesnt need to be hot – in fact, I think that room temperature brings out its complexities of flavour. If you want, pour a little olive oil over just before serving to bring out the orange glow of the butternut. Superb!

Serves between 8 – 10 as a side dish (or more depending on how many dishes you are serving!)

  • 2 tbsp apple cider vinegar
  • 3 tbsp maple syrup
  • 3 tbsp roasted sesame oil
  • 3 tbsp soy sauce
  • 1 tbsp molasses
  • Good grinding of pepper
  • 1 tbsp ginger powder
  • 4 tbsp olive oil
  • 1 tbsp balsamic vinegar
  • 4 tbsp fresh sage, chopped
  • 1 large butternut (about 1 1/2 kg – 3 lbs)

Preheat your oven to 400F (210C). Line a large baking tray with parchment/baking paper.

In a large bowl, mix together the apple cider vinegar, maple syrup, roasted sesame oil, soy sauce, molasses, pepper, ginger powder, olive oil, balsamic and fresh sage. Whisk together, and taste. Adjust the flavours as you prefer – may be some more soy for a bit more saltiness? A touch more sesame oil for that rounded nutty taste? Its up to you – follow your own sense of taste and balance.

Prepare your butternut. Wash the skin exceedingly well, scrubbing off any dirt. Pat dry. Halve the butternut from top to tail and scoop out the seeds. Slice the butternut finely (about 1/4 inch) and place the slices into the bowl with the marinade. Once all the butternut has been prepared, use your hands to toss the butternut in the marinade and leave to soak for about ten minutes.

Take the butternut out of the marinade, and place in a single layer on your baking sheet. Use a brush, and coat the top of the butternut with the left over marinade. Reserve the rest of the marinade for later, and roast the butternut for about 15 – 20 minutes. It will start to smell absolutely delicious!

Remove the butternut from the oven, and flip over every piece. It should be pretty well cooked – the flesh will yield to a fork. Brush the now flipped butternut slices with more marinade, and reserve any additional marinade for later. Roast the butternut for a further 15 – 20 minutes or until darkly burnished, with crispy bits, and edible skin. Watch it closely because you dont want it to burn, just turn almost into a sticky candy caramelised butternut.

Remove from the oven, and let cool on the baking tray for at least 10 – 15 minutes. Serve at once, with the remainder of the marinade drizzled over, or place in a container, covered, with the remainder of the marinade drizzled over, and refrigerate for up to 2 days before serving at room temperature.

Thoughts on Cooking + Celebrating

27 Nov

YUM!Yesterday was our Thanksgiving. What a wonderful night – and all my favourite F’s in one place: friends, family and food! We had a great time, and it was truly a moment to sit, laugh, love, eat and be thankful. And it was a day to truly indulge in the pleasures of cooking. I was thinking about it, and while some of the dishes were specific to an autumn feast, most of the guidelines and the menu structure are applicable to just about any celebration.

When making a big meal for a group of people, I like to think about what I will cook, and then go shopping. I try and shop and cook according to these few guidelines:

  • I try and make sure that I wont be completely bound by my initial menu ideas. If something at the shops strikes me as being particularly beautiful and fresh, then I adjust, change tack, re-imagine. Flexibility is all. If I want to make a raspberry tart, but the blueberries or strawberries look much better, well then, I just change the recipe!
  • I look for a certain flavour and richness balance when I am cooking many dishes – sweet, savoury, light, creamy, indulgent, healthy. Making everything with cream and butter for example just makes a meal in which people cant really enjoy it all – too rich everything cancels out the pleasure. But a few really rich dishes counterpointed by sharp, savoury, fresh – now thats something special!
  • I try and find a colour balance – browns and beiges need to be tempered with green, red, purple, orange. Fruit and vegetables come in such a gorgeous array of colours and texture. Big meals are the perfect time to take advantage of such variety.
  • I make sure to make enough – but not too much. One of my biggest problems as a cook is that I used to make such immense amounts of food that people got overwhelmed. Now, I try and make enough so that people can go back for seconds, but not enough so they will be uninterested in dessert. We had about 15 people at dinner. I made garlic mashed potatoes with 9 large spuds instead of 15 – because there were so many dishes, each person had a good amount of the mash, but there wasnt a huge amount left over.
  • I like to have what I consider a taste thread running through the meal. This might mean one component which I add to most dishes – sometimes as a highlight, other times as a flavour enhancer. Most of the time people dont spot the taste thread, but I know its there, and I know that it really connects all the disparate elements of the meal. In the case of our Thanksgiving Dinner menu, I caramelise-roasted about 7 heads of garlic. And I used that garlic in just about everything! I also added maple syrup to quite a few dishes as a sweetener, but also as a secondary taste thread. It worked for me!
  • I pay attention to where I am – when cooking here in Malaysia, I look to make some things with a little nod to our Asian tastes. So the cranberries were made into a chutney with a healthy dose of chili. And the butternut was roasted in a soy sauce-sesame oil marinade tempered with maple syrup. Context is important.
  • And finally, for me, the number of dishes is important. I always try and present an odd number of dishes. I dont know why this is important to me, but it is. Its part of how I imagine a meal and I always try and cook an odd number of things. May be its Malaysian custom – I know when making traditional meals with rice and curry and accompaniments, we always try and make an odd number of dishes. When getting married, the gifts the bride and groom give each other have to have an odd number. Whatever it is, wherever it comes from, it works for me!

So given those guidelines, here is what I prepared for Thanksgiving Dinner.

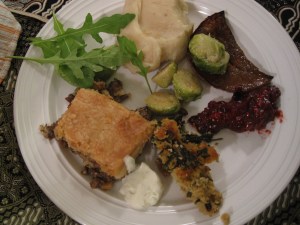
  • Mushroom pot pie – three different kinds of mushrooms, parsnips, leeks, caramelised garlic, red wine, quark/cream, covered with a home made puff pastry
  • Wasabi mustard cream – a savoury whipped cream with wasabi, mustard, and spring onions instead of a gravy – the sharpness and brightness of the wasabi and mustard giving a kick to the rest of the meal, and was inspired by my amazing horseradish quenelle with the mushroom pot pie at Per Se
  • Roasted Butternut – a whole butternut, skin on, halved and sliced thinly, and tossed in a marinade of soy sauce, maple syrup, sesame oil, fresh sage and olive oil. Roasted until darkly caramelised and gorgeous.
  • Rocket Salad – A fresh simple green salad of rocket leaves and avocado. A refreshing breath of clean green.
  • Cranberry Chili Chutney – cranberries cooked thick and jewel like with chutney spices, a touch of maple syrup, an onion, and a few caramelised garlic cloves
  • Braised brussels sprouts – from my earlier recipe – I used 5 cups of brussels sprouts, halved, with 1/2 cup of cream and a tablespoon of maple syrup. The sweetness of the maple syrup elevated the rich creamy nuttiness of the brussels sprouts beautifully!
  • Caramelised Garlic Mashed Potatoes – unabashedly rich and creamy – a stick of butter, cream, half a cup of caramelised garlic, creamed with three different kinds of potato. Lots of salt and pepper, and the final dish was probably the best mash I have ever made!
  • Cornbread Stuffing – the cornbread was made with maple syrup instead of sugar, and combined with sauteed leeks and spinach, toasted pine nuts and a small handful of chopped caramelised garlic. Combined with eggs, milk and grated parmesan and baked in a large shallow pan. The gold green combination was very pretty.
  • Cheddar Cheese Scones – because I love them so much, and couldnt resist. Such a quick delicious bread.
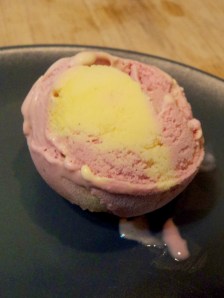
  • Passion Fruit Raspberry Ripple Ice Cream – refreshing and yet creamy – a wonderful end to the meal
  • Raspberry Tart – gorgeous lush tart with a pistachio crust, bittersweet chocolate cream, raspberries and a vanilla whipped cream. Decorated with pretty purple edible flowers. It was, if I may say so myself, really stunning

And there you have it… 11 dishes, prepared over the course of two days. A wonderful feast for beloved friends. I hope you had a beautiful Thanksgiving too. Much love x


Passion Fruit Raspberry Ripple Ice Cream

24 Nov

Yum!Yes, we were totally inspired yesterday by the astonishing, gorgeous raspberry tart at Nathalie’s Gourmet Studio. I think I might have become too excited, and pushed myself too hard, because last night I slept for over 12 hours. But today, I am feeling better. Not 100%, but good enough to write down this recipe.

AngelKitten and I decided to make ice cream. I knew I had a whole bunch of passion fruit from my organic delivery guy and so I suggested we start with that. But we were still obsessing about the raspberry tart, and so we decided to make a swirl of flavour – the tart brightness of passionfruit melded with the lush ripeness of raspberries. We also felt that the colours of both together would be beautiful … and oh what a pretty sight the final ice cream is! Gorgeous, happy making. And the taste is out of this world.

We started by making a double batch of vanilla custard which would serve as the base for the flavoured ice cream. If you dont want to add vanilla, leave it out, but for me, at least, the combination of the fruit and the vanilla is outstanding – the vanilla adds a musky note that helps the two flavours to meld. Its also one of my favourite flavours ever, and I just wanted to add it! We wanted to end up with about 5 cups of vanilla custard, and we also wanted about a cup each of flavouring.

Making ice cream is relatively simple, but you need to keep in mind the varied sweetness of the different elements you are adding to the mix. Because the fruit was not very sweet, we added sugar when we boiled it down – and therefore, we subtracted that amount of sugar from the custard. We also added only 8 egg yolks (4 per batch) – whereas most ice creams use 6 egg yolks per 3 cups of milk/cream. We wanted to keep the fruit flavours foremost (say that 3 times fast), and felt that 4 yolks per batch would ensure the creamy silkiness of the ice cream, without making it too French custard-y.

Finally, it was a simple process of mixing up 2 batches of ice cream in the ice cream maker, and when they were both still soft, combining them in a large serving container. We then just used a knife to ripple through, and let it all freeze and bloom overnight. This is home-made ice cream of the most joyous kind – fresh, bright and preservative free. Its going to be served as part of our Thanksgiving! Yum.

Makes 2 batches of ice cream, which you can swirl, or leave separate, as you wish. You will need an ice cream maker to ensure simplicity of work – but if you dont have one, freeze the flavoured creams, and every few hours, whizz in the blender until they are frozen and solid. Not as good, but still better than anything you can buy.

Vanilla Custard

Makes approximately 5 cups

  • 2 1/2 cups heavy cream
  • 2 1/2 cups milk
  • 1 vanilla bean pod or 1 tsp vanilla essence
  • 1/2 cup caster sugar
  • Pinch of salt
  • 8 egg yolks (the whites reserved for another use – they can be frozen very successfully)

Combine the heavy cream, milk and vanilla bean (or essence) in a medium pot over medium low heat. Heat the cream mixture slowly, stirring occasionally, until it just starts to steam, and reaches 80C/175F on a candy thermometer. If you dont have one (though you should! Theyre cheap and SO useful!) just wait until the cream starts to steam – about 5 – 10 minutes.

While youre waiting for the cream to start steaming, whisk the caster sugar, salt and egg yolks until the yolks are very light and golden coloured. They will be creamy looking. This is just perfect. The caster sugar will have completely incorporated into the eggs as well.

As soon as the cream has reached 80C, take it off the heat, count to ten (I dont know why, may be to let it cool a few degrees? Ive always done this though!), and pour about half of the hot cream into the egg mixture, whisking all the while. Pour the egg cream mixture back into the pot, and return to a medium low heat, stirring constantly.

You want the egg cream mixture (your custard) to reach 85C/185F, as you constantly stir. This should only take a matter of a few minutes… You can tell the custard is ready when it lightly coats the back of a spoon, and a line drawn down the middle of the custard on the spoon stays intact. You shouldnt really be stirring for more than a few minutes – you dont want a thick cream, just a lightly thickened custard, with the eggs properly cooked through.

Strain the custard into a bowl, top with parchment paper, and allow to cool to room temperature. Once at room temperature, put in the fridge for a few hours before making ice cream.

Passion Fruit Syrup

This will make about 1 cup of passion fruit syrup

  • 18 – 24 passion fruits, which should equal about 1 3/4 cups passion fruit pulp with seeds intact (Do note that passion fruits vary wildly from place to place. In South Africa, and the US, they tend to be thin skinned and very juicy. Here in Malaysia, they are thicker skinned, and less giving of pulp. You should figure out approximately how many you need for about 1 3/4 cups)
  • 1/4 cup caster sugar

In a clean pot, combine the passion fruit pulp and the sugar. Over medium heat, stirring constantly, allow the passion fruit and sugar to incorporate with each other, and the pulp to darken and thicken a bit. This should take between 5 – 10 minutes. The mixture will boil up, and the colour should become a dark yellow gold. As soon as the mixture is to your liking, strain and sieve into a separate bowl. You should have about 1 cup of passion fruit syrup. Allow to cool to room temperature and then refrigerate until cold.

Raspberry Syrup

This will make about 1 cup of raspberry syrup

  • 1 3/4 cup fresh or frozen raspberries
  • 1/3 cup caster sugar
  • 1 tbsp water

Combine the raspberries, sugar and water in a clean pot. Over medium low heat, stir and crush the berries into the sugar and water. They will let go of quite a bit of liquid and become a mushy pulpy bright red mess. They will smell and look totally gorgeous, like the colour of red Burmese rubies. Allow the mixture to boil up, and thicken. It should take only about 5 minutes or so. Sieve and strain the syrup into a small bowl and press the seeds to extract as much juice as possible. Allow to cool to room temperature and refrigerate until cold.

Passion Fruit Ice Cream

  • 2 1/2 cups vanilla custard
  • 1 cup passion fruit syrup
  • 1 – 2 drops natural (IndiaTree) yellow food colouring (optional)

Mix together the vanilla custard and passion fruit syrup. If you really want to, add a few drops of natural yellow food colouring, but its not necessary. For a really smooth ice cream, run the mixture through the sieve to ensure that its completely mixed.

Pour into ice cream maker, and allow to process for 1 hour. When the ice cream has been made, it will be very soft. Scoop into a container, cover and place in the freezer.

Raspberry Ice Cream

  • 2 1/2 cups vanilla custard
  • 1 cup raspberry syrup
  • 1 – 2 drops natural (IndiaTree) red food colouring (optional)

Mix together the vanilla custard and the raspberry syrup. If you really want to, add a few drops of natural red food colouring. For a smooth, well mixed ice cream, run the mixture through a sieve.

Pour into ice cream maker and allow to process for 1 hour. When ice cream has finished processing, it will be very soft. Scoop into a container, and proceed to make passion fruit and raspberry ripple ice cream, or place in freezer.

Passion Fruit Raspberry Ripple Ice Cream

  • 1 pint container passion fruit ice cream (still at semi-soft stage)
  • 1 pint container raspberry ice cream (just made)

We used a medium sized, rectangular metal baking tin with 3 inch sides. Use whatever shallow container you wish. We scooped out alternating heaping tablespoons of ice cream, three in a row, all the way across the baking tin. We then smoothed over the top, and used a knife, pulled across the tin, to ripple the flavours and colours together.

We then covered the ice cream with parchment paper, and plastic cling wrap, and froze for at least 24 hours to allow the ice cream to harden and the flavours to bloom.

Absolutely gorgeous, and totally worth the effort! Enjoy!