Archive | November, 2010

Anna Olson @ Le Meridien

30 Nov

On Sunday, my nieces and I went to see Anna Olson, the amazing chef from Fresh and Sugar, present a cooking demonstration at Le Meridien. The entire event was presented by the Asian Food Channel, which has really revolutionised access to food television here in South East Asia, and Mumm Champagne – with a free flow of champagne and sparkling apple juice. We were so excited about the event – and my nieces, the youngest at 15, were starstruck.

Even though admission was expensive (USD$100 each), we felt it was worth it – time spent watching a master chef at work, a five course meal at Le Meridien, and the chance to meet Chef Olson and get our cookbooks signed. We were excited beyond belief, and ready to have a luxurious, fun and decadent day.

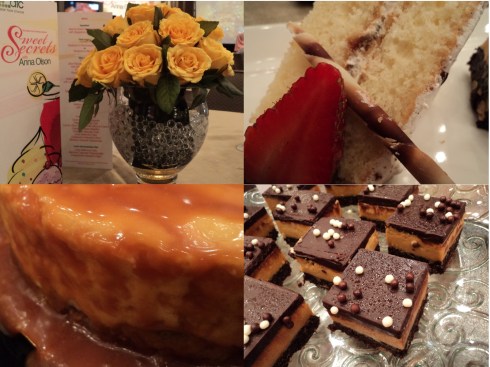
Let me start out by sharing the good with you – Anna Olson was wonderful! Warm, witty, charming and a brilliant cook. She made three desserts: a Lady Baltimore Cake – a white chiffon iced with an Italian meringue studded with nuts and dried fruit; a Banana Caramel Cheesecake – gorgeous cookie crust, a layer of caramelised bananas, a stunning cheesecake, all enrobed in “ooooooh” sticky caramel; and a Cappuccino Nanaimo Bar – a Canadian sweet treat that consisted of dark cookie layer, a fudgy custard layer and dark chocolate ganache.

with Anna Olson

The desserts tasted as good as they looked, and the cooking demonstration was brilliant. Chef Olson is extremely knowledgeable, and shares her tips, tricks and information openly and intelligently. She explained how sugar worked, how it interacted with various elements of baking. She worked quickly but calmly, explaining why each ingredient when into the recipe at a given time, and what it would do.

And oh is this woman charismatic and funny! The audience was a tough sell. I am not sure why – Malaysian audiences can be notoriously “dead” – may be it was because it was a Sunday morning, but there was little to no response at the beginning. By the end of her presentation, however, she had the audience laughing, clapping and excited. A true professional, and it was thrilling to watch her cook, see how she worked with her off set spatula, timed her ingredients, and all the while, speaking, joking, teasing and teaching. I was impressed. She brought her beloved husband, Chef Michael Olson, out at the end of the demonstration, and that personal touch really seemed to warm up the crowd. My nieces were so impressed by him that they also wanted to take photos with him at the end as well!

Chef Anna and Chef Michael seemed like down to earth, interesting, intelligent foodies, with a great breadth and depth of knowledge about cooking and baking. They were interested in everything unique and Malaysian – from durians to pandan to kaya, and they looked like they were really enjoying their tour in South East Asia. Hands down, this couple were the most laid back and approachable “celebrities” I have ever met (and I have met a few!). They were professional and open, relaxed and funny. It was a pleasure to be in their company.

Unfortunately, I was not impressed by the savoury part of the meal we were served. I had been thrilled to see that the menu was quite vegetarian-centric. Given that there were four courses before a flurry of (superb) desserts, two out of the four were vegetarian, while the other two courses had vegetarian options. Unfortunately, all four courses, eaten vegetarian, were overwhelmingly rich and creamy.

The starter – a beet and goat’s cheese terrine, which features in her new cookbook, was delicious. It was very intense, the goats cheese and herbs mingling with the tart sweetness of the beets. I ate it with bread, which helped cut the richness, and if I had known what was coming, I would have finished it all up. The cream of mushroom soup, with a puff pastry dome, tasted of nothing but white pepper. It was unfortunately, inedible. The seafood in parchment parcels (which was the alternative) was lapped up by the other members of our table though. The main course, spinach, corn and herb stuffed pepper seemed to have sat out for ages – it had become crusted and rather ungainly. It was not helped by the addition of yet more cream to bind the spinach and corn. Though my nieces, who had the beef, said that while it was not hot, it was at least, very tasty. And finally, the brie and fig tart was a great idea – except for the fact that the fresh figs had wilted in our heat, and the brie was yet again too rich.

Le Meridien KL

I often think that restaurants and hotels pay a lot of attention to how to balance meals for those who eat meat and fish, but little to no attention or care is paid to those of us who eat vegetables. Its as if we need to be thankful that they remembered to cater to us in the first place, and therefore we should accept whatever they give us with gratitude. Its a shame, because Chef Olson’s new book is chock full of wonderful, colourful, fresh and delicious looking vegetarian dishes – all of which seem balanced and thoughtful and not as cloyingly rich as what we were served.

I appreciated the effort to place some fresh vegetables in the mix, and I did enjoy the salads, but overall, I was surprised and disappointed with the lack of care and quality on the plates that were served to me – particularly at that price! I did quite enjoy the sparkling apple juice though, and I noted quite a few people joyously partaking of the Mumm!

And finally, we were invited to the meet and greet outside, where Chef Olson presented some of her other desserts – best amongst which were the gorgeous and lush lemon olive oil cake with citrus and cream, the cashew cookies and the delicate and airy madeleines. I watched as the entire audience filed out to the foyer to have their books signed, and pose for a precious photograph with Chef Olson – and also partake of more of her treats.

Unfortunately, a member of the AFC staff ruined the moment for everyone by going down the line of people patiently waiting and telling them, in a brusque and authoritative manner that they were running out of time, and thus they needed to make sure they didnt spend too much time with the Chef. When she got to us, I told her that I thought her attitude was offensive to people who had paid so much to meet Chef Olson, and I thought that the way she was delivering the message was rude.

The AFC staff acted as if we did not matter – and they did not truly represent AFC as it should be represented. From the start they were officious, rude, overwhelmed and unable to deal with issues that came up. I was sorry for their inability to work in such an environment, but that was not my problem. They represent an amazing television channel – they are the frontline for the consumers of that channel and its events, and they should work a little harder at being diplomatic, gracious and kind.

In the end, Chef Olson overcame all. She made time for each and every person, even though she looked tired. She smiled, she posed for photos, she signed books, she paid attention, she laughed and chatted. She was lovely, and for her, I was glad we went. I do want to note that from experience, I really enjoy Le Meridien – they have a stunningly good buffet with loads of options for vegetarians, and their service is always smiling and sweet. And AFC is a great television channel which has brought food into the homes of so many of us who look to be inspired and uplifted. I am just a little sad that a day that could have been perfect was marred, just a bit, by thoughtlessness.
by Anna Olson


White Chocolate Raspberry Pancakes

30 Nov

I woke up this morning, and I thought… Hungry! Kind of like my nephew, Ezril, who needs to be fed every few hours or he starts mumbling to himself like a slightly mad man. Heh. And then I got depressed thinking I had nothing in the house. But one of the pleasures of knowing how to cook is also knowing that if I think carefully enough, I always have something.

I had some gorgeous frozen raspberries in the freezer – I was considering making a raspberry coulis to go with my raspberry tart – but time got the best of me. I always have chocolate – and almost always have the basics: flour, milk, butter, eggs, baking powder. Hmmm. Pancakes. Yes! And literally less than ten minutes of putting it all together – a few minutes of cooking, and I was done!

Unfortunately, I snarfled up all the pancakes I made before thinking to pause for a photo (of the pancakes, not me). So you will have to wait till later on today for me to post an image. Suffice to say, these are lovely. Light, fluffy, studded with pink raspberry and melting bits of white chocolate. Simple, elegant and delicious.

And so easy that once you know the basic formula, you can get creative in so many ways. Cheddar basil pine nut pancakes may be? Strawberry bittersweet chocolate pancakes? Apple cinnamon walnut? Yes and yes and yes. Just keep to the basic formulation, and you will be fine.

Be inspired! Make some pancakes today 😉

Makes about 10 – 15 pancakes, depending on the amount of batter you use per pancake

  • 2 cups flour
  • 2 tsp baking powder
  • 1/2 tsp salt
  • 3 tsp light brown sugar
  • 1 1/2 cups milk
  • 2 eggs
  • 1 tbsp vanilla essence
  • 2 tbsp butter, melted plus extra for the pan
  • 1/2 cup white chocolate chunks (well chopped) or chips
  • 1 cup frozen raspberries

Measure out the flour, baking powder, salt and brown sugar into a large bowl. Using a fork, toss to combine well.

Measure the milk, eggs and vanilla essence and whisk together well. Pour over the dry ingredients, and still using your fork, stir to combine. Lumps are fine, dont over mix.

Melt the butter in a large non stick frying pan over low heat. When melted, pour over the pancake mixture, and stir well to combine.

Add the white chocolate and raspberries and stir lightly.

Place the frying pan over medium low heat, and slick on a little bit of butter. You dont need much – less than half a teaspoon. Just enough to cover the bottom and help the pancakes crisp and brown.

Once the butter has melted and foamed, ladle on the pancake batter – about 2 tablespoons at a time. I usually use a soup ladle for this. I get 3 pancakes in a pan at a time.

Allow the pancakes to cook undisturbed for about 3 – 4 minutes. You will see bubbles start to form. Check by lifting a corner of the pancake – if they seem lightly browned and crisp you can flip them over. Be patient. The worst thing you can do to a pancake is to flip it before its time. It will go all hard and rubbery on you. But if you flip it when its ready, the pancake will fluff up, and cook on the second side within a few minutes. You wont need to flip it again (in fact, you shouldnt) – it will be perfectly browned on the outside, and fluffy inside, with melting bits of white chocolate, and gorgeously tart raspberries.

Serve with a bit of butter and some maple syrup or honey.

Total heaven in a few minutes!

Any left over pancake batter can be stored in the fridge, covered, for up to 24 hours.

Enjoy!

Raspberry Tart

28 Nov

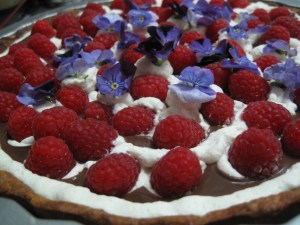
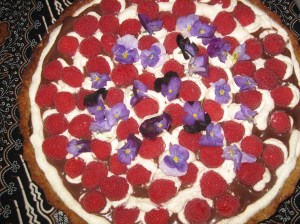
With purple pansiesThis raspberry tart is dramatic, beautiful, romantic and outrageously delicious. Its such a perfect combination of flavours and textures, and its so pretty that people smile when they see it. I love this tart, and I must give credit where it is due – it was inspired by Nathalie’s Gourmet Studio’s amazing raspberry tart, but enlivened with a few of my own happy pleasures. Specifically, dark bittersweet chocolate – and instead of a cookie crust, a pistachio crust inspired by her pistachio ice cream.

This tart is easily made (in its various components) ahead of time, and put together a few hours before serving. The combination of pistachio biscuit crust, dark bittersweet chocolate cream, light vanilla whipped cream and tart fresh raspberries is just outstanding. Crunchy, slightly bitter and nutty, creamy, chocolatey, tart, fresh, cool, bright – decadent, sumptuous, and totally sensual. Can you tell by all the superlatives how much I loved this tart? 😉

The element which brought drama and a really natural beauty to the tart were the flutters of sweet purple flowers adorning the top. My local supermarket sells edible flowers in a little packet – all different colours and they are beautiful. I picked out the purple ones – pansies I think – and together, they made for a stunningly lovely presentation. You can find information on edible flowers at the Cook’s Thesaurus and also some very pretty photographs here and here. Flowers are a wonderful way to make food look visually appealing and beautiful, and after this result, I definitely need to start using them more often!

This tart will serve 10 – 12 people. Its very rich, so you dont need huge slices.

Pistachio Crust

  • 1 cup whole pistachios
  • 2 tbsp powdered/icing sugar
  • 5 tbsp flour (plus additional if needed)
  • 1/2 tsp salt
  • 4 tbsp cold butter
  • 1 egg + 1 egg white
  • 1 tsp vanilla

Using a coffee grinder, processor, your immersion blender – or even a plastic back and a rolling pin to smack them into submission! – grind and pulverise the pistachios with the powdered sugar. The sugar will ensure that the nuts dont go over into a paste – but watch them carefully. I usually grind the pistachios in two batches of 1/2 cup each plus 1 tbsp of powdered sugar.

Put the ground pistachios and sugar into a bowl. Add the flour and salt and toss to combine. Grate the cold butter over the pistachio mixture, and using the tips of your fingers, combine very gently. You could even use a fork left in the fridge to mix everything up. This mixture can be exceedingly delicate so be careful!

Beat the 1 egg and vanilla together, and add to the pistachio-butter mixture. Combine gently and quickly until the mixture comes together into a dough. If its really sticky, add additional flour, a tablespoon at a time until it comes together, but be gentle and work quickly.

Shape the dough into a ball, and refrigerate, covered for at least half an hour.

Preheat your oven to 175 C (350F). I used a 11″ tart pan with a detachable base and non stick surface for this tart. If your tart pan is not non-stick (and really, it should be if it has a detachable base), butter the pan well. Remove the dough from the fridge, and centre it on a the tart pan. Using your fingers, quickly spread and knead and push and prod the dough so it completely covers the pan. Line the tart with parchment/baking paper, and pour in some pie weights. I use dried beans – theyre much cheaper, and they work just as well!

Bake your tart for about 15 – 20 minutes. Remove from the oven, remove the baking paper and pie weights/beans, and place the tart crust back into the oven for a further 5 minutes or so, or until the shell has lightly browned.

Remove from the oven and let cool for 3 minutes or so. Whisk the egg white with a fork in a small cup or bowl. Brush the interior of the shell with the egg white. This is a great trick to ensure that the tart crust is “water proof” and does not become soggy when you add the pastry cream!

Set aside to cool completely before assembly.

You can make the tart crust up to 1 day in advance, and store in the fridge, covered until needed.

Bittersweet Chocolate Pastry Cream

  • 1/2 cup sugar
  • 2 tbsp flour
  • 2 tbsp cornstarch
  • 2 tbsp cocoa powder
  • 1/4 tsp salt
  • 4 egg yolks
  • 2 cups cream
  • About 150 grams (1 1/2 small slab bars) best quality bittersweet chocolate – I used Lindt, broken into pieces
  • 2 tbsp butter
  • 1 tsp vanilla extract

In a medium saucepan, whisk together the sugar, flour, cornstarch, cocoa powder and salt until well combined. Whisk together the egg yolks and cream in a small bowl, and whisk into the sugar-flour mixture until you get a smooth paste.

Place the saucepan over medium low heat, and bring slowly to the boil, whisking all the while. This will take you about 10 minutes – about 5 minutes into this time, stick your thumb in the mixture. It should be like quite hot bathwater. Add the chocolate now, and continue whisking for a further 5 minutes or so. The mixture will start to steam, and bubble, and will have become noticeably thicker.

Check that the mixture will hold a line when it coats the back of a spoon and you run your finger through it. If not, continue to cook for a few minutes further, whisking all the while. It should not take that long to get there, so be vigilant! And remember, the pastry cream will thicken as it cools, so the consistency at which you take it off the stove is not the consistency it will be when you finally assemble the tart!

Remove the saucepan from the heat, and whisk in the butter and vanilla extract. Strain the pastry cream through a fine sieve, and allow to cool to room temperature.

The pastry cream can be made up to 2 days in advance, and stored, covered (with parchment paper spread over the surface for preference), in the refrigerator until needed.

Vanilla Whipped Cream

  • 1 1/2 cups heavy cream – 2 tbsp of cream removed from this amount
  • 1 1/2 tsp agar agar
  • 2 tbsp icing sugar
  • 1 vanilla pod, split, and beans scraped – or 1 tbsp vanilla essence/paste

Measure out 1 1/2 cups of heavy cream. From this amount, measure out 2 tbsp, and remove to a small bowl. Sprinkle agar agar over the 2 tbsp of cream, and set aside for a few minutes to allow the agar agar to dissolve into the cream.

Whisk the remaining cream (by hand if youre macho – with a stand mixer or handheld electric beaters if youre me!) until it just begins to hold soft peaks. Add the reserved cream and agar agar mixture, the icing sugar and the vanilla, and whisk until the cream holds stiff peaks.

The agar agar will ensure that the cream holds its shape for about six hours.

I would prepare the whipped cream just before assembly.

Assembly

  • Pistachio Crust
  • Bittersweet Chocolate Pastry Cream
  • Vanilla Whipped Cream
  • Raspberries – About 1 1/2 pints (1 1/2 small packets)
  • Pretty edible flowers for additional decoration (optional)

Place the tart crust/shell on a good working surface. For the kind of pretty decoration that I created here, I actually centered the crust (in pan) on a small lazy susan that I had from Ikea – this helped move the tart as I was placing raspberries and piping cream.

Pour in the bittersweet chocolate pastry cream, and using a palette knife or even a spoon, ensure that the pastry cream is evenly covering the tart shell, and is smoothed on top.

For this tart, I placed half the vanilla whipped cream into a piping bag with a small round tip (and topped it up when needed). If you want to get extra fancy, you could use a star tip, but that for me would be gilding the lily!

GorgeousPipe a border of whipped cream around the edge of the tart. Now take the raspberries, one at a time, and using the small tip, fill the raspberry with whipped cream, and pipe a small circle of cream at the opening of the raspberry. Place the raspberries onto the pastry cream in circles – working your way from outside in.

Once the tart has been covered with raspberries, begin placing the flowers. Pipe small circles of cream between the raspberries, working from inside out, and on each small circle of cream, place a single flower. You could cover the entire tart with raspberries and flowers, or, as I preferred to do, leave the outer edges with the decadent chocolate cream peeking out.

Refrigerate the tart until ready to serve. Assemble no more than 6 hours before consuming!

When you are ready to serve, remove the tart from the pan, leaving the bottom intact.

Enjoy the pleasures of this most lovely of desserts.

Maple Soy Roasted Butternut

27 Nov

MmmmmMy friend GoldenOro once prepared roasted butternut by slicing it thin, leaving the skin on, and putting it in a high oven. It was gorgeous – caramelised from the butternut’s own sugars, sweet, soft, sticky, stunning. When making Thanksgiving dinner, I decided I wanted to prepare the butternut like that too – but of course, I wanted to put my own little spin on it.

I decided to marinated the sliced butternut for a few minutes in a lovely mixture of maple syrup, sesame oil and soy (and a few other things!), before roasting it in a hot oven. It turned out beautifully, and could easily be a component of an amazing salad – think sweet sticky butternut, crisp bitter arugula leaves, and salty creamy feta. A perfect lunch salad any time of the year! But of course, this butternut is gorgeous served as is – as a side dish it perfectly complements savoury dishes by adding a golden sweet counterpoint.

I also love this side dish because it can easily be prepared a day or two before hand – just cover it up, refrigerate, and bring to room temperature an hour or so before serving. It doesnt need to be hot – in fact, I think that room temperature brings out its complexities of flavour. If you want, pour a little olive oil over just before serving to bring out the orange glow of the butternut. Superb!

Serves between 8 – 10 as a side dish (or more depending on how many dishes you are serving!)

  • 2 tbsp apple cider vinegar
  • 3 tbsp maple syrup
  • 3 tbsp roasted sesame oil
  • 3 tbsp soy sauce
  • 1 tbsp molasses
  • Good grinding of pepper
  • 1 tbsp ginger powder
  • 4 tbsp olive oil
  • 1 tbsp balsamic vinegar
  • 4 tbsp fresh sage, chopped
  • 1 large butternut (about 1 1/2 kg – 3 lbs)

Preheat your oven to 400F (210C). Line a large baking tray with parchment/baking paper.

In a large bowl, mix together the apple cider vinegar, maple syrup, roasted sesame oil, soy sauce, molasses, pepper, ginger powder, olive oil, balsamic and fresh sage. Whisk together, and taste. Adjust the flavours as you prefer – may be some more soy for a bit more saltiness? A touch more sesame oil for that rounded nutty taste? Its up to you – follow your own sense of taste and balance.

Prepare your butternut. Wash the skin exceedingly well, scrubbing off any dirt. Pat dry. Halve the butternut from top to tail and scoop out the seeds. Slice the butternut finely (about 1/4 inch) and place the slices into the bowl with the marinade. Once all the butternut has been prepared, use your hands to toss the butternut in the marinade and leave to soak for about ten minutes.

Take the butternut out of the marinade, and place in a single layer on your baking sheet. Use a brush, and coat the top of the butternut with the left over marinade. Reserve the rest of the marinade for later, and roast the butternut for about 15 – 20 minutes. It will start to smell absolutely delicious!

Remove the butternut from the oven, and flip over every piece. It should be pretty well cooked – the flesh will yield to a fork. Brush the now flipped butternut slices with more marinade, and reserve any additional marinade for later. Roast the butternut for a further 15 – 20 minutes or until darkly burnished, with crispy bits, and edible skin. Watch it closely because you dont want it to burn, just turn almost into a sticky candy caramelised butternut.

Remove from the oven, and let cool on the baking tray for at least 10 – 15 minutes. Serve at once, with the remainder of the marinade drizzled over, or place in a container, covered, with the remainder of the marinade drizzled over, and refrigerate for up to 2 days before serving at room temperature.

Thoughts on Cooking + Celebrating

27 Nov

YUM!Yesterday was our Thanksgiving. What a wonderful night – and all my favourite F’s in one place: friends, family and food! We had a great time, and it was truly a moment to sit, laugh, love, eat and be thankful. And it was a day to truly indulge in the pleasures of cooking. I was thinking about it, and while some of the dishes were specific to an autumn feast, most of the guidelines and the menu structure are applicable to just about any celebration.

When making a big meal for a group of people, I like to think about what I will cook, and then go shopping. I try and shop and cook according to these few guidelines:

  • I try and make sure that I wont be completely bound by my initial menu ideas. If something at the shops strikes me as being particularly beautiful and fresh, then I adjust, change tack, re-imagine. Flexibility is all. If I want to make a raspberry tart, but the blueberries or strawberries look much better, well then, I just change the recipe!
  • I look for a certain flavour and richness balance when I am cooking many dishes – sweet, savoury, light, creamy, indulgent, healthy. Making everything with cream and butter for example just makes a meal in which people cant really enjoy it all – too rich everything cancels out the pleasure. But a few really rich dishes counterpointed by sharp, savoury, fresh – now thats something special!
  • I try and find a colour balance – browns and beiges need to be tempered with green, red, purple, orange. Fruit and vegetables come in such a gorgeous array of colours and texture. Big meals are the perfect time to take advantage of such variety.
  • I make sure to make enough – but not too much. One of my biggest problems as a cook is that I used to make such immense amounts of food that people got overwhelmed. Now, I try and make enough so that people can go back for seconds, but not enough so they will be uninterested in dessert. We had about 15 people at dinner. I made garlic mashed potatoes with 9 large spuds instead of 15 – because there were so many dishes, each person had a good amount of the mash, but there wasnt a huge amount left over.
  • I like to have what I consider a taste thread running through the meal. This might mean one component which I add to most dishes – sometimes as a highlight, other times as a flavour enhancer. Most of the time people dont spot the taste thread, but I know its there, and I know that it really connects all the disparate elements of the meal. In the case of our Thanksgiving Dinner menu, I caramelise-roasted about 7 heads of garlic. And I used that garlic in just about everything! I also added maple syrup to quite a few dishes as a sweetener, but also as a secondary taste thread. It worked for me!
  • I pay attention to where I am – when cooking here in Malaysia, I look to make some things with a little nod to our Asian tastes. So the cranberries were made into a chutney with a healthy dose of chili. And the butternut was roasted in a soy sauce-sesame oil marinade tempered with maple syrup. Context is important.
  • And finally, for me, the number of dishes is important. I always try and present an odd number of dishes. I dont know why this is important to me, but it is. Its part of how I imagine a meal and I always try and cook an odd number of things. May be its Malaysian custom – I know when making traditional meals with rice and curry and accompaniments, we always try and make an odd number of dishes. When getting married, the gifts the bride and groom give each other have to have an odd number. Whatever it is, wherever it comes from, it works for me!

So given those guidelines, here is what I prepared for Thanksgiving Dinner.

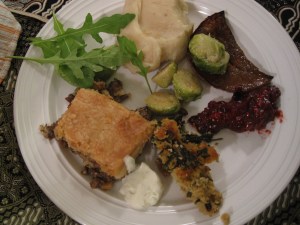
  • Mushroom pot pie – three different kinds of mushrooms, parsnips, leeks, caramelised garlic, red wine, quark/cream, covered with a home made puff pastry
  • Wasabi mustard cream – a savoury whipped cream with wasabi, mustard, and spring onions instead of a gravy – the sharpness and brightness of the wasabi and mustard giving a kick to the rest of the meal, and was inspired by my amazing horseradish quenelle with the mushroom pot pie at Per Se
  • Roasted Butternut – a whole butternut, skin on, halved and sliced thinly, and tossed in a marinade of soy sauce, maple syrup, sesame oil, fresh sage and olive oil. Roasted until darkly caramelised and gorgeous.
  • Rocket Salad – A fresh simple green salad of rocket leaves and avocado. A refreshing breath of clean green.
  • Cranberry Chili Chutney – cranberries cooked thick and jewel like with chutney spices, a touch of maple syrup, an onion, and a few caramelised garlic cloves
  • Braised brussels sprouts – from my earlier recipe – I used 5 cups of brussels sprouts, halved, with 1/2 cup of cream and a tablespoon of maple syrup. The sweetness of the maple syrup elevated the rich creamy nuttiness of the brussels sprouts beautifully!
  • Caramelised Garlic Mashed Potatoes – unabashedly rich and creamy – a stick of butter, cream, half a cup of caramelised garlic, creamed with three different kinds of potato. Lots of salt and pepper, and the final dish was probably the best mash I have ever made!
  • Cornbread Stuffing – the cornbread was made with maple syrup instead of sugar, and combined with sauteed leeks and spinach, toasted pine nuts and a small handful of chopped caramelised garlic. Combined with eggs, milk and grated parmesan and baked in a large shallow pan. The gold green combination was very pretty.
  • Cheddar Cheese Scones – because I love them so much, and couldnt resist. Such a quick delicious bread.
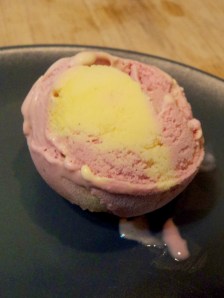
  • Passion Fruit Raspberry Ripple Ice Cream – refreshing and yet creamy – a wonderful end to the meal
  • Raspberry Tart – gorgeous lush tart with a pistachio crust, bittersweet chocolate cream, raspberries and a vanilla whipped cream. Decorated with pretty purple edible flowers. It was, if I may say so myself, really stunning

And there you have it… 11 dishes, prepared over the course of two days. A wonderful feast for beloved friends. I hope you had a beautiful Thanksgiving too. Much love x


Passion Fruit Raspberry Ripple Ice Cream

24 Nov

Yum!Yes, we were totally inspired yesterday by the astonishing, gorgeous raspberry tart at Nathalie’s Gourmet Studio. I think I might have become too excited, and pushed myself too hard, because last night I slept for over 12 hours. But today, I am feeling better. Not 100%, but good enough to write down this recipe.

AngelKitten and I decided to make ice cream. I knew I had a whole bunch of passion fruit from my organic delivery guy and so I suggested we start with that. But we were still obsessing about the raspberry tart, and so we decided to make a swirl of flavour – the tart brightness of passionfruit melded with the lush ripeness of raspberries. We also felt that the colours of both together would be beautiful … and oh what a pretty sight the final ice cream is! Gorgeous, happy making. And the taste is out of this world.

We started by making a double batch of vanilla custard which would serve as the base for the flavoured ice cream. If you dont want to add vanilla, leave it out, but for me, at least, the combination of the fruit and the vanilla is outstanding – the vanilla adds a musky note that helps the two flavours to meld. Its also one of my favourite flavours ever, and I just wanted to add it! We wanted to end up with about 5 cups of vanilla custard, and we also wanted about a cup each of flavouring.

Making ice cream is relatively simple, but you need to keep in mind the varied sweetness of the different elements you are adding to the mix. Because the fruit was not very sweet, we added sugar when we boiled it down – and therefore, we subtracted that amount of sugar from the custard. We also added only 8 egg yolks (4 per batch) – whereas most ice creams use 6 egg yolks per 3 cups of milk/cream. We wanted to keep the fruit flavours foremost (say that 3 times fast), and felt that 4 yolks per batch would ensure the creamy silkiness of the ice cream, without making it too French custard-y.

Finally, it was a simple process of mixing up 2 batches of ice cream in the ice cream maker, and when they were both still soft, combining them in a large serving container. We then just used a knife to ripple through, and let it all freeze and bloom overnight. This is home-made ice cream of the most joyous kind – fresh, bright and preservative free. Its going to be served as part of our Thanksgiving! Yum.

Makes 2 batches of ice cream, which you can swirl, or leave separate, as you wish. You will need an ice cream maker to ensure simplicity of work – but if you dont have one, freeze the flavoured creams, and every few hours, whizz in the blender until they are frozen and solid. Not as good, but still better than anything you can buy.

Vanilla Custard

Makes approximately 5 cups

  • 2 1/2 cups heavy cream
  • 2 1/2 cups milk
  • 1 vanilla bean pod or 1 tsp vanilla essence
  • 1/2 cup caster sugar
  • Pinch of salt
  • 8 egg yolks (the whites reserved for another use – they can be frozen very successfully)

Combine the heavy cream, milk and vanilla bean (or essence) in a medium pot over medium low heat. Heat the cream mixture slowly, stirring occasionally, until it just starts to steam, and reaches 80C/175F on a candy thermometer. If you dont have one (though you should! Theyre cheap and SO useful!) just wait until the cream starts to steam – about 5 – 10 minutes.

While youre waiting for the cream to start steaming, whisk the caster sugar, salt and egg yolks until the yolks are very light and golden coloured. They will be creamy looking. This is just perfect. The caster sugar will have completely incorporated into the eggs as well.

As soon as the cream has reached 80C, take it off the heat, count to ten (I dont know why, may be to let it cool a few degrees? Ive always done this though!), and pour about half of the hot cream into the egg mixture, whisking all the while. Pour the egg cream mixture back into the pot, and return to a medium low heat, stirring constantly.

You want the egg cream mixture (your custard) to reach 85C/185F, as you constantly stir. This should only take a matter of a few minutes… You can tell the custard is ready when it lightly coats the back of a spoon, and a line drawn down the middle of the custard on the spoon stays intact. You shouldnt really be stirring for more than a few minutes – you dont want a thick cream, just a lightly thickened custard, with the eggs properly cooked through.

Strain the custard into a bowl, top with parchment paper, and allow to cool to room temperature. Once at room temperature, put in the fridge for a few hours before making ice cream.

Passion Fruit Syrup

This will make about 1 cup of passion fruit syrup

  • 18 – 24 passion fruits, which should equal about 1 3/4 cups passion fruit pulp with seeds intact (Do note that passion fruits vary wildly from place to place. In South Africa, and the US, they tend to be thin skinned and very juicy. Here in Malaysia, they are thicker skinned, and less giving of pulp. You should figure out approximately how many you need for about 1 3/4 cups)
  • 1/4 cup caster sugar

In a clean pot, combine the passion fruit pulp and the sugar. Over medium heat, stirring constantly, allow the passion fruit and sugar to incorporate with each other, and the pulp to darken and thicken a bit. This should take between 5 – 10 minutes. The mixture will boil up, and the colour should become a dark yellow gold. As soon as the mixture is to your liking, strain and sieve into a separate bowl. You should have about 1 cup of passion fruit syrup. Allow to cool to room temperature and then refrigerate until cold.

Raspberry Syrup

This will make about 1 cup of raspberry syrup

  • 1 3/4 cup fresh or frozen raspberries
  • 1/3 cup caster sugar
  • 1 tbsp water

Combine the raspberries, sugar and water in a clean pot. Over medium low heat, stir and crush the berries into the sugar and water. They will let go of quite a bit of liquid and become a mushy pulpy bright red mess. They will smell and look totally gorgeous, like the colour of red Burmese rubies. Allow the mixture to boil up, and thicken. It should take only about 5 minutes or so. Sieve and strain the syrup into a small bowl and press the seeds to extract as much juice as possible. Allow to cool to room temperature and refrigerate until cold.

Passion Fruit Ice Cream

  • 2 1/2 cups vanilla custard
  • 1 cup passion fruit syrup
  • 1 – 2 drops natural (IndiaTree) yellow food colouring (optional)

Mix together the vanilla custard and passion fruit syrup. If you really want to, add a few drops of natural yellow food colouring, but its not necessary. For a really smooth ice cream, run the mixture through the sieve to ensure that its completely mixed.

Pour into ice cream maker, and allow to process for 1 hour. When the ice cream has been made, it will be very soft. Scoop into a container, cover and place in the freezer.

Raspberry Ice Cream

  • 2 1/2 cups vanilla custard
  • 1 cup raspberry syrup
  • 1 – 2 drops natural (IndiaTree) red food colouring (optional)

Mix together the vanilla custard and the raspberry syrup. If you really want to, add a few drops of natural red food colouring. For a smooth, well mixed ice cream, run the mixture through a sieve.

Pour into ice cream maker and allow to process for 1 hour. When ice cream has finished processing, it will be very soft. Scoop into a container, and proceed to make passion fruit and raspberry ripple ice cream, or place in freezer.

Passion Fruit Raspberry Ripple Ice Cream

  • 1 pint container passion fruit ice cream (still at semi-soft stage)
  • 1 pint container raspberry ice cream (just made)

We used a medium sized, rectangular metal baking tin with 3 inch sides. Use whatever shallow container you wish. We scooped out alternating heaping tablespoons of ice cream, three in a row, all the way across the baking tin. We then smoothed over the top, and used a knife, pulled across the tin, to ripple the flavours and colours together.

We then covered the ice cream with parchment paper, and plastic cling wrap, and froze for at least 24 hours to allow the ice cream to harden and the flavours to bloom.

Absolutely gorgeous, and totally worth the effort! Enjoy!

Vegetarian Thanksgiving + NGS!

23 Nov

Gorgeous!I have been ill this past week. Just one of those yucky, enervating flus that goes around and just decimates you. And then, once the infection is over, the recovery takes a while… Im not getting any younger, and when I get sick these days, I really feel it! 😉

But I have been trying to get out and about. Yesterday had lunch with two of my favourite women … Goddess and AngelKitten. We lunched at Nathalie’s Gourmet Studio, and were totally utterly blown away by the dessert. A gorgeous, decadent, stunningly pretty raspberry tart accompanied by pistachio ice cream. The ice cream was a revalation. Nutty and dark goldgreen, it wasnt too sweet, and tasted intensely, purely of pistachios. And who knew that raspberries and pistachios were best taste friends? What an extraordinary taste combination … and so inspirational!

It inspired AngelKitten and I so deeply that we immediately went home and made ice cream – a ripple of gorgeously tart passionfruit and glowing raspberries. And it made me imagine a tart, which I will make for Thanksgiving … pistachio crust, dark chocolate pastry cream, and raspberries sitting atop a gentle cloud of whipped cream. Perfection.

Which brings me to Thanksgiving. Last year, I was at my sister’s house, and it was wonderful! Cooking with those that you love – its the ultimate form of holiday celebrations. This year, I am far away from my family, but close to the family of my heart. So we are doing a collective, pot luck Thanksgiving at Pingaling’s house. I have been dreaming about what I am going to make for this celebration. I know we arent Americans, but the idea of having a day to be thankful is so resonant and powerful… well, we just cant resist.

But, because we are Malaysians, and we suit our holidays to suit our needs, we are celebrating on Friday instead! So I have a few more days to finalise my vegetarian Thanksgiving meal. Here is what I am thinking of at the moment:

  • Rocket / Arugula Salad with caramelised pears, macadamias and avocado
  • Mushroom pot pie (with remembrance of the ultimate Per Se version)
  • Garlic mashed potatoes
  • Red wine gravy
  • Roasted brussels sprouts
  • Sweet potato and parsnip hash with a touch of maple syrup
  • Pickled beets
  • Whisky and cranberry sauce (or may be a kind of a chutney?)
  • Broccoli with garlic
  • Cornbread stuffing with mushrooms, almonds, spinach and sun dried tomatoes
  • Cheddar Cheese Biscuits/Scones
  • Raspberry tart with a pistachio crust and chocolate cream
  • Cranberry biscotti
  • Pear Riesling sorbet

I dont think anyone will miss the turkey do you? 😉

Sayang Scones – Gluten Free Orange Vanilla Scones!

21 Nov

Scones!Today, I had tea with my most beloved of GoddessMothers. We talked, as usual, about love, family, hopes, dreams, secrets, spirit, happiness, joy … well, life in general. As we sat and chatted, laughed and cried, reconnected and restrengthened, we nibbled on these rather luscious orange vanilla scones. They were pretty damn good if I might say so myself (I am munching on one, as I type this, sandwiching some cheddar cheese and damson jam).

The thing is, my GoddessMother just found out she has a gluten intolerance. Basically, she cannot eat anything with wheat in it, or she becomes ill. My friend S also has the same issue, and so I am aware of the need to adapt and adjust recipes for gluten-intolerance. My GoddessMother was coming for tea, which immediately suggested scones… but gluten-free scones? I had this image of hard little rocks of wedgy dough tasting strangely of fake flour… Not an appetising look!

I went out and got some gluten-free flour (mainly maize and tapioca in my mix) – and you need to check ingredients. The flour needs to have some sort of xanthan gum or vegetable gum in it – this helps the softness and stretchiness of the dough. Without it, you should add about 1/2 tsp of xanthan gum, which you can get at any good healthfood shop. Because the scent and texture of gluten-free flour is so different, I decided to really layer on the flavour  – the grated rind of an orange for a bit of brightness, and a tablespoon of vanilla and honey each for some voluptuousness! You could scent it with just about any flavouring you like, but this combination made uniquely delectable sweet scones.

There are a few things you should keep in mind when making these scones. First and foremost, preheat the oven before you start mixing all the ingredients. From the time when you add the (cold) butter to the time the scones go into the oven, should be no more than 10 minutes or so. Work quickly and gently, and keep the integrity of the cold butter intact if you can. I added about 4 tsp of baking powder to the mix because I was going for slightly nubbly crumbly (but still tender and gentle) scones – if you want them fluffier, add 2 tsp more! And when you work with gluten-free flour, add a few tablespoons of milk powder. This adds to the lusciousness of the dough, but also adds to the depth of flavour of the scones.

Makes about 18 scones

  • 3 1/2 cups gluten-free flour
  • 3 tbsp milk powder
  • 1/2 tsp salt
  • 1/2 cup light brown sugar
  • Grated peel of 1 (washed) orange
  • 12 tbsp cold butter
  • 4 – 6 tsp baking powder (the more baking powder, the fluffier)
  • Liquid of up to 10 fl oz (about 1 1/4 cup) which should include: 1 egg, a few tablespoons sour cream and/or yogurt, a few tablespoons of cream (if you like), 1 tbsp liquid honey, and the rest whole milk
  • 1 tbsp (or to taste) vanilla
  • 1 tbsp milk + 1 egg for glaze

Preheat your oven to 215C (425F), and line a jelly roll tin or baking pan with parchment paper.

In a large bowl, mix together the flour, milk powder, salt, and light brown sugar. Mix together gently with a fork. Using a superfine grater, grate the peel of a washed orange into the bowl, and mix together again.

Using a large hole grater, grate the butter directly into the flour mixture and stir lightly to combine and coat the butter with the flour mixture. You will have an oatmealy texture, and everything should smell brightly of orange.

Add baking powder, and mix again lightly.

In a large measuring jug, mix together the egg, a tablespoon each sour cream and yogurt, the honey, and make up to 10 fl oz (approximately 1 1/4 cup) with milk. Whisk this together with a fork to ensure everything is combined.

Add the vanilla (either as essence, paste or vanilla bean scraped) to the liquid mixture and whisk to combine again. Pour over the flour, and using your hands, quickly mix and knead the mixture into a soft pliable dough. Allow to rest, for about 3 minutes, in a cool place (even your fridge). This will allow the gluten-free flour to really come into its own, and makes it much easier to cut out the scones.

Flour (with gluten-free!) a working surface, and turn the dough out onto the surface. It should feel very tender and soft. If you think it needs more flour, add by a tablespoon at a time. Pat out into a 1 1/2 inch thick rectangle, and cut out scones, and place on prepared baking pan. Lightly glaze with milk, and bake in the preheated oven for 10 minutes. Remove from the oven, and turn the pan. Before putting it back in, however, glaze again with egg. This will really encourage browning without burning. Bake for a further 10 – 15 minutes until the scones have risen, and baked through.

Cool on pan for 5 minutes before removing to serving plate. Wonderful with cream and damson jam, with tomato marmalade and cheese, or buttered, hot from the oven. Delicious! Enjoy.


Suji (Semolina) Cake 2

19 Nov

HappySo, I was thinking about the suji cake I made earlier this month. It was quite delectable, and very rustic. Nubbly bits of almonds gave it texture and a deliciously different crumb. It was the suji cake of my memory and my childhood… But there were a few things about it that annoyed. First and foremost, you really had to make this cake with forethought. No popping a few ingredients together, and quickly baking in the oven. The butter and suji had to be left for a while to get acquainted, which is fine if you have the time, but if you really want suji cake right here, right now, could be a bit frustrating.

There was another suji cake of my memory that was slightly smoother, more pudding-y, with the same gorgeous scent, and since I havent been well, and have not had much to do, I decided to try and see if I could come close to making it. I succeeded quite well with this cake, and it took about 20 minutes to put together, and a further 20 – 30 minutes in a hot oven to bake. Easy and quick, this is a different suji cake, but just as comforting, just as golden, and just as open to interpretation – may be even more so.

I used vanilla to scent this cake, but you could certainly go with cinnamon, some almond essence, the grated rind of an orange or lemon… Go with what comforts you, and get semolina that is as fine as possible… and yet, not floury. You want the texture and the bite of the semolina in this cake. Its a big part of what makes it so unique.

If the previous cake was a bit intimidating, start with this one. Its a pleasure to make, and a joy to smell baking in the oven. Its a fantastic little cake to offer friends who are dropping by for tea. It creates happy happy memories, even when you might be struggling with a cold, or tiredness, or just the regular woes of the world. A little sifted icing sugar, or a simple glaze, or a smear of buttercream elevates this cake, but its so good it doesnt really need it. As you can tell from the photo – I was so greedy for a taste, I sliced it straight out of the pan, without waiting to sift any icing sugar on my bit.

This little golden cake seems to say, for that one glorious instant, its OK. Just have some cake, and be happy.

Makes 1 9-inch cake

  • 1 3/4 stick (12 tbsp) butter, slightly softened
  • 3/4 cup icing (powdered) sugar plus an additional / optional 1/4 cup for sifting over cake if you wish
  • 5 eggs separated – 5 yolks plus 4 whites (the extra white can be discarded or saved for a future use)
  • 1 tbsp sour cream
  • 1 tbsp vanilla essence (or 1 vanilla bean scraped – or in fact, and flavouring that seems to catch your fancy)
  • 1/4 tsp salt
  • 1 cup fine semolina
  • 1 tsp baking powder
  • 1 cup ground almonds

Preheat your oven to 175C (350F). Butter a 9-inch cake tin, and line with baking paper. Butter that too, and set the cake tin aside.

In a large mixing bowl, cream the butter until soft and slightly fluffy. Add 3/4 cup icing sugar, and cream well. It will look like the beginning of buttercream. I decided to use icing sugar in this recipe because I wanted the softness of the cake to be highlighted. The fineness of the icing sugar really helped.

Add the 5 egg yolks, one at a time, beating on low speed after each addition until fully incorporated, before you add the next. This cake, while quite quick and easy, also relies on a slow and gentle process of addition of each ingredient. I used a stand mixer, and as I added each egg yolk only after I separated it from its white. This gave the batter a period of slow steady incorporation of each yolk before the next was added.

Once all five yolks have been added, you should have a gloriously golden batter. Add the sour cream and vanilla essence, pausing to combine after each addition.

In a measuring cup, combine the salt, semolina and baking powder, and stir with a fork to combine. Add to the egg-butter-sugar mixture in a slow steady stream, beating with a stand mixer or electric beaters all the while, on medium low. Keep beating for about a minute, and then add the ground almonds in a steady stream, beating all the while.

Once the mixture has been well combined, set it aside for at least ten minutes or so.

Clean your beaters, and in a clean bowl, whisk the 4 egg whites until they hold firm peaks. If you turn the bowl upside down, and the egg whites stay, then they are ready – though I would not suggest you do this unless youre sure, or you have extra egg whites to work with!

Once the batter has sat for the requisite time, fold in the beaten egg whites, in three batches, combining extremely well. You need to make sure the batter is fully incorporated. The egg whites will lighten the colour and texture of the mixture. You shouldnt beat them into the batter, but you dont need to be timid about mixing them in firmly with a spatula.

Turn out the batter into your prepared tin, and bake for 20 – 30 minutes, or until the cake is firm to the touch, and a tester inserted into the centre comes out clean.

Let cool for five minutes in the pan, and then turn out onto a cake rack, and turn right side up again. Cover with sifted icing sugar if you like.

A warm slice of this cake will ease just about anything that ails you 🙂 Enjoy.


Quick French Onion Soup

18 Nov

Quick French OnionI am sick today. There seems to be a bug going around, and somehow, I caught it. I coughed all of yesterday – miserable, tight-chested, and painful. I slept for ages this morning, woke up and decided I needed some soup. But when I went to the kitchen, all I had was 3 onions …  A very sad state of affairs, but I was planning on shopping today! And instead, I am sick!

So I decided to make a French Onion soup. This is not a fancy one, with toasted bread rubbed with garlic, and gruyere cheese. Its basic, simple, warming and deeply comforting. If you have cheese, grate some over your toast, but if you want to keep it vegan, dont add any cheese (or butter in the beginning) at all. It will still taste delicious, and reach all those cold miserable places.

This makes about 4 servings of soup. You could easily double it for a dinner party, and toast a baguette, and pile over some stringy gruyere. Broiled in the oven, its a decadent feast – but when youre sick, as I am today, its just too much effort. I toasted a really lovely dark brown slice of bread, placed it in the bottom of the bowl, and grated some parmesan and cheddar over – its what I had. I then ladled the soup over, and allowed the bread and cheese and hot oniony soup to meld and interact. Beautiful. Comforting.

Definitely feeling a little bit better 🙂

Serves 4. Doubles easily.

  • 3 large onions (about 1/2 kg) sliced very fine
  • 1 tbsp olive oil
  • 1 tbsp butter (or an additional tbsp olive oil if youre keeping it vegan)
  • 1 heaping tbsp flour
  • 4 cups of hot vegetable stock – I used 1 organic vegetable stock cube dissolved in 4 cups of boiling water
  • Salt and pepper
  • 1 slice dark brown bread, well toasted, per serving
  • A bit of parmesan, cheddar or gruyere, grated

Peel the onions of their brown skin, and slice really fine. I used a mandolin for this job, and it was fast, easy and really exact. If you dont have one, use a sharp knife and try and get the onion slices as fine as possible.

Place a medium saucepan over medium heat, and warm the olive oil and butter (or just olive oil) until the butter has melted. Add all the onions, and stir to coat the onions with the oil/butter mixture. Turn heat down to medium low and saute the onions until well browned for at least 20 minutes or so. This is the ultimate trick to this soup – you need to be really patient with the onions. They need to cook and cook and cook until they are deeply brown because this is the basis of the flavour and strength of the soup.

They will let go of some liquid, this is fine, and then they will get glossy and soft. Keep at it. They will start to turn golden, stir a little and let cook further. You want a deep dark brown – teak or coffee with a touch of milk colour. If you prefer a lighter soup, obviously, you can let the onions go only to light golden, but you will miss the deep layered flavours that you would get if you keep your nerve and just keep cooking them. Without letting them burn!

And you dont have to stir all the time. The occasional stir is fine, whilst you make yourself a cup of tea, play with the cat or take some vitamins. Let the onions do their own job. Just keep the heat low and steady, and stir sometimes to make sure nothing is burning.

Once the onions are cooked to your liking, sprinkle over the flour and stir well. Cook for a few minutes to allow the flour to amalgamate with the onions and fat. This will ensure a creamy thick soup without a raw flour flavour.

Pour over hot vegetable stock, stir well, semi cover the pot and allow to simmer for about half an hour. Taste, add some pepper and a touch of salt.

YumMeanwhile, toast your bread till quite dark. Place in a soup bowl (you might have to shove it in there, this is fine), and grate some cheese over. Not too much as it can be overwhelming, but enough to add flavour and interest to the soup.

Ladle hot soup over the toast and cheese just to cover, and allow to sit for a minute so that the soup and toast and cheese get firmly acquainted.

Serve to those needing comfort.