Tag Archives: wine

Ballymaloe Cookery School – Days 10 – 15

17 May

What a whirlwind week it has been. So many extraordinary stories and voices, such bliss and peace, laughter and light. When I look back over the posts on this blog, I see the trepidation with which I approached this trip. I knew it would be life changing – and when one comes to that moment in time where all will change, there is a pause, a hesitation. But time is inevitable – it keeps moving forward. And as long as one goes with it, with the flow of experience, with the grace of the universe … change is beautiful. And experience is precious.

So this past week has been intense on a whole variety of levels. We had some wonderful visits from cheese and wine makers, as well as Ballymaloe House’s resident sommelier. We had cooking demonstrations from Darina and Rachel, did our chores, changed our kitchens, and cooked our hearts out. Every day we are learning new techniques. We are being pushed to consider timing and rhythm, presentation and plating. Every day we produce food that we sit down as a group to eat together, and we are truly blessed. And this past weekend, I found myself wandering to the regginbrow was to be seen ringsome on the aquaface.  And I returned full of grace.

So here we go. Days 10 – 15 in this magical place they call the Emerald Isle, in a little corner called Ballymaloe.

Day 10 – Blessed are the Cheese Makers and Wine Tasters

Wednesdays are always full on theory – demonstration days. And this past Wednesday, we had a morning of cheese making, and an afternoon of wine tasting.

In the morning, we were introduced to Eddie O-Neill, Dairy Artisan Food Specialist at Teagasc’s Moorepark Research Centre. Eddie is a cheese man pure and simple. He is immersed in cheese making and can easily explain the science of milk – and cheese – in an accessible and yet scientific manner. Eddie was fascinating, enthusiastic, passionate and totally immersed in the magic of turning milk into cheese.

Eddie and Darina

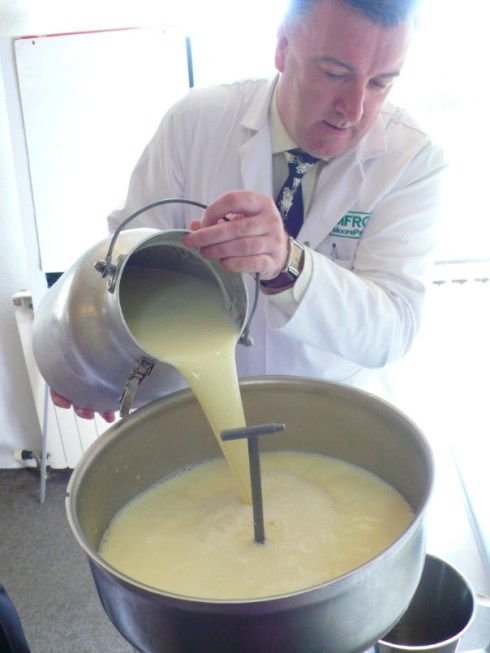
We were given a brief and thorough overview of the different kinds of milk, fat content, and methodologies of treating milk. Eddie showed us how to separate the cream from the milk – and from this process, all else follows! He used the gorgeous raw milk from the Jersey cows at Ballymaloe.

Separating the cream and the milk

From that point, we were taken on a whirlwind tour of cheesemaking. Eddie and Darina made butter, yoghurt, labne, buttermilk, srikhand, cottage cheese, mel y mato, paneer, ricotta, couer a la creme and a gouda! It was completely overwhelming, and they would never have been able to accomplish so much without the sure, strong preparedness of the fabulous Emer who was working with them. Once you understand the chemical reactions of milk to heat, to enzymes, to agitation and time, it all doesnt seem quite so difficult. But it was a lot of cheese making going on, and it all looked delicious!

The butter was made with the rich Jersey cream – whipped past whipped cream stage, into butter stage. It was washed and cleaned, cooled and patted into little balls. Incredible!
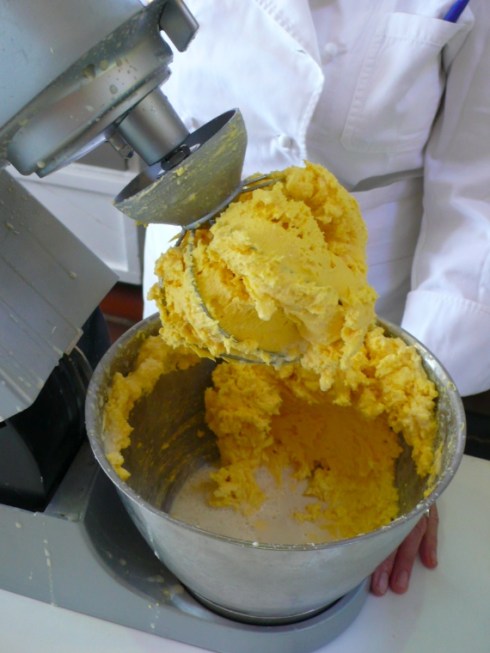
Jersey Cream, whipped into butter, ready to be cleaned, cooled and eaten! The white liquid at the bottom is whey.

Eddie went through the complex and precise process of making a Gouda type cheese with us. He heated the milk, added the rennet, waited a certain amount of time, and then cut the resulting set milk, and stirred for a set amount of time to release as much of the liquid as possible. It may look mundane, but there was something mystical about the entire process.

Making the Gouda-type Cheese - cutting the curds

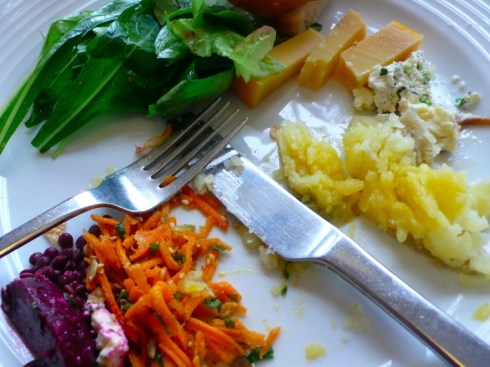
And then … before we knew it, it was time for lunch! Wednesdays are the only days we do not cook – so our instructors cook for us. We feasted on the various cheeses that had been made, the first of the new potatoes, and some gorgeous salads (the carnivores also had a roasted piece of bacon, which smelled fantastic, I must admit). I was enjoying the tastes and textures of my lunch, when I looked down and realised how beautiful the colours were, how fresh and clean everything looked. When you are surrounded by such bounty, your body feels healthy and clean and nourished. It is beautiful.

My Multi-Coloured Nourishing Lunch

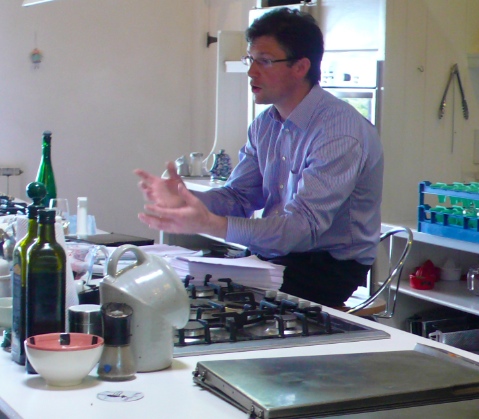
In the afternoon, we were introduced to Colm McCan, the Sommelier at Ballymaloe House, winner of the Sommelier of the Year award, and our lecturer for the next 12 weeks in the intricacies of wine. He is passionate and funny, and gave us a an in-depth introduction to the world of wine. He introduced us to various white wines – including our first tasting which was an alcohol-free wine! He wanted to ensure that we understood that while he could teach us about the different varietals, introduce us to the rituals and techniques of wine, and guide us through the various established types of wine… our perception, our taste, and our own sense of what we liked and did not like were in the end, intensely personal.

It was a great session, and while I didnt actually drink any of the wine, the intricacies and depth of flavour that Colm introduced us to were fascinating and thought-provoking.

Colm McCan - Sommelier at Ballymaloe House

Day 11 – A Quiet Day

On this day, to be honest, I felt a bit squiffy. I went in in the morning, with my order of work completed, and started gathering together my ingredients. But I just didnt feel “right” and I told Annmarie, my instructor. She immediately told me to go home. Ballymaloe has a very strict policy that if you feel unwell, you dont cook. They dont want students passing on viruses or illnesses to each other, and so off I went, back to the quiet cottage at the top of a tree lined drive. I fell into bed, and slept the morning and through lunch. It felt strange not to cook, but obviously, my body needed to just stop for a moment.

In the afternoon, we had our first demonstration from Rachel Allen. She has a wonderful way about her, funny, quick, and sure, passionate about food, and open to questions and comments from the peanut gallery. It was a pleasure to learn from her.

R & S Cooking Demo

Days 12 & 13 – The Ringsome on the Aquaface

The next day, last Friday, I felt good enough to cook in the morning. I made a white soda bread, a French Peasant soup and a gorgeous almond tartlet with fresh raspberries. The French Peasant soup’s original recipe called for blanching and frying cubes of bacon, and as a vegetarian, I did not particularly want to do this. I thought about possible substitutions, and decided that the soup might taste good with dried mushrooms instead of the bacon – they would give the same smokey note, without the meat. One of the best things about Ballymaloe is the personal interaction with our instructors, who are there to guide, mentor and grade us. But they are also very open to our suggestions, and Annmarie was happy to let me try out the substitution. It worked really well, and instead of chicken stock, I used a combination of the porcini mushroom soaking water and vegetable stock. It was a good, simple, delicious soup, and I was happy with the process.

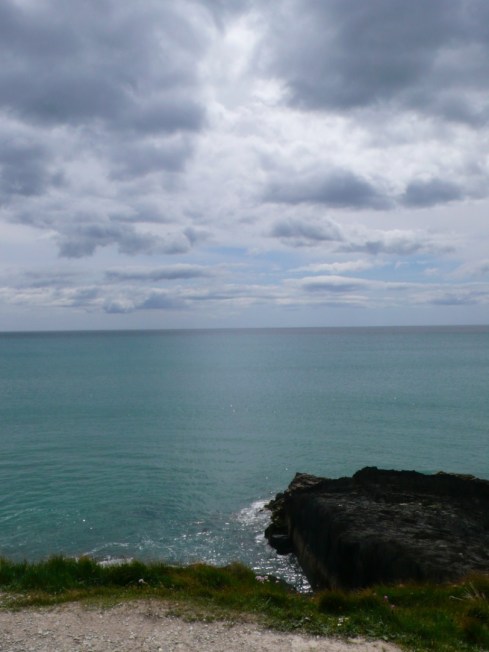
However, I did not stay for lunch, or for the afternoon demonstration. Instead, I went on an adventure – to the seaside – to West Cork – with an old friend. We stayed at Incheydoney Resort. Its a strange place – it feels like an Italian cruise ship from the 1970’s in the form of a hotel. The food there is dire (as we found to our common dismay on Friday night) but we redeemed ourselves with a meal at Deasey’s by the water in the pretty village of Ring the next evening. Sublime food, wonderful balance, and a perfect setting.

But beyond the food, and the hotel … there was pure bliss. I have no words to describe it so I will let the poets and the pictures say it for me.

Did the sea define the land, or the land the sea?
Each drew new meaning from the waves’ collision. 
Sea broke on land to full identity.
 

Seamus Heaney

I watch 
the sea
your hands
the waves
seep into my bones
 
the sky descends
we sleep in blue
 

Eileen Carney Hulme

Day 14 – Drifting Back

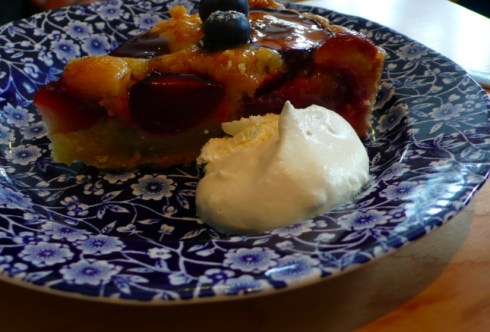
Sunday saw me coming back to my own breath, and drifting back into the beautiful life at Ballymaloe. M and I went to an antiques fair where I picked up a tiny silver rattle for my newest godson, and a gift for my hostess in Provence later this summer. We stopped at the Ballymaloe House Cafe and had coffee and lemon curd cake and a beautiful plum tart. I hope we will make both of these during our time here!

Perfect Plum Tart at Ballymaloe House Cafe

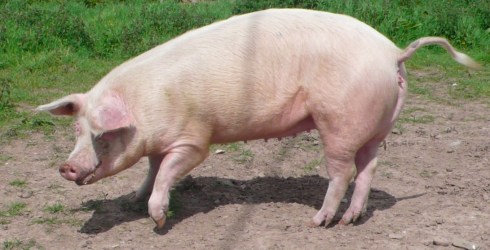
Then the other M and I went for a little outing, and fed Ms. Piggy some organic apples and pears. She was glad to see us again, and I think this may become a regular Sunday visitation. Kind of like church, but better. 🙂

Ms. Piggy by the Pub after her organic apple - Happy Piggy

All in all, a blessed and bright weekend.

Day 15 – Monday Happy Monday

And Monday rolls around, and we are back – at school, cooking our passion. New assignments, new partners – I like this rotation. It keeps us on our feet, challenges us to find our way around new kitchens and spaces, and ensures we work with new people every week. R and I are partners this week, and I like his chilled out style. He is relaxed and calm, good natured and knows what he is doing.

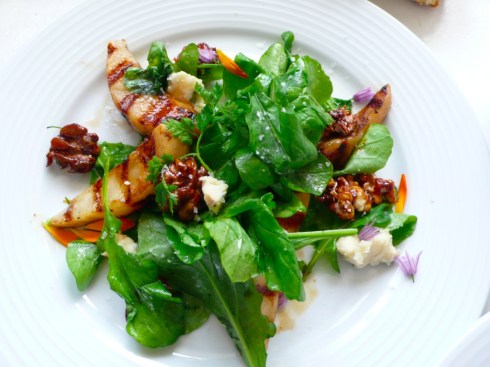
On this day I made vegetarian stock, another (very good) white soda bread, a mint sauce (for the lamb that my partner was roasting) and a salad of Crozier Blue Cheese, wild rocket, chervil, caramelised spiced walnuts and chargrilled pears. The salad was stunningly pretty, with many delicious layers of flavour  and texture – salty, sweet, fresh, tart, crunchy, creamy. It was quite complex to make. But it was one of those dishes that offered a lovely meditative space. I spent time on my salad leaves, cleaning each leaf, and gently coating it with dressing. I melted ground spices and sugar, and slowly caramelised toasted walnuts. I peeled a juicy pear, and grilled it over fire. And I scattered petals over the salad and rejoiced in balance and beauty.

Salad of Crozier Blue Cheese, Char Grilled Pears and Caramelised Spiced Walnuts

And I was thrilled with my Irish Soda Bread. It came out beautifully – perfect texture, and lovely deep slashes to let the faeries out!

My Lovely Little Baby Soda Bread

In the afternoon, we had a surprise visit from Niel Ellis, one of South Africa’s top ten most influential wine makers. Colm introduced him, and he spoke to us about the wines he makes, and the importance of handing down knowledge from generation to generation. What struck me the most was the intimate relationship he had with the land, and his connectedness to how it affects all growing things.

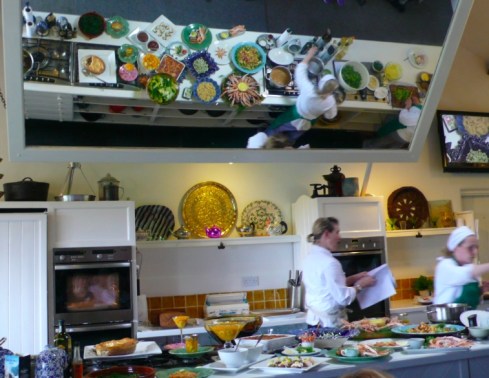
And then later, Rachel gave us another demo. It was an amazing array of food – from a lesson on prawns and how to cook them (including prawn bisque, prawns on brown bread, etc) to moussaka and shepherd’s pie to chutneys to mangoes with lime, banana and passion fruit.

What Rachel Cooked

It was quite the spread! And tomorrow morning, I will be making a vegetarian moussaka, a dessert of mango and lime, a brown Irish soda bread, and a spiced apple chutney (the last one in tandem with R). So I best go and do my order of work before I doze off … and wake to another bright and beautiful day at Ballymaloe.

Happiness abounds. All is light.

Twice Baked Caramelised Onion Cheese Tarts

27 Feb

This is a complex, work intensive dish, but the results are nothing short of spectacular, if I might say so myself. The rich buttery puff pastry holds a wonderful creamy base laden with succulent deeply wine-y caramelised onions. Topped with melted raclette, the tart is complicated, delicious and very satisfying. These were created as a tapas for the O’Gourmet Food Hall Spanish red wine tasting, and were paired with a beautiful, organic Crianza 2005.

The onions were caramelised in an entire bottle of Crianza 2005, and cooked down into a thick jammy muddle for four hours. The puff pastry is simple, if you an find an all butter prepared puff pastry. If you cant, there are some amazingly easy recipes for foolproof puff pastry made with your food processor available online. Dont, under any circumstances, use puff pastry that is made with vegetable fat – it ruins everything!

Part of the problem with tarts of this kind is that even though the top bakes up gorgeously, the bottom is often underbaked. I solved this problem by baking the tarts as per normal, letting them cool for a few minutes, taking them out of their muffin tins, and flipping them over onto a baking sheet. I then baked them again in a very hot oven for about ten minutes, until the bottoms were golden and crisp, and just as delicious as the tops! We must always have balance in cooking…as in life.

I used raclette in this tart – a smooth very creamy melting cheese, often added to fondues. The cheese is rich and salty, yet mild. It compliments the onions, without overwhelming them. Baked into the tart the raclette melds with the onions and savoury custard into a molten cheesy joy.

You can serve this tart warm from the oven, or at room temperature within 24 hours. The recipe for the onions makes more than you need. Any extra can be used as the base for a magnificent pasta, a grilled cheese sandwich, or to spark your cooking imagination!

Makes 20 medium sized tarts. Do adjust for your own crowd!

Twice Baked Caramelised Red Wine Onion Tarts with Raclette

Caramelised Red Wine Onions

  • 1 cup (2 sticks – 16 tbsp) butter
  • 8 cups (approximately 8 – 10 medium) yellow onions, sliced in fine half rings
  • 1 bottle red wine (I used QV Crianza 2005)
  • 1/4 cup red wine vinegar
  • 1/4 cup balsamic vinegar
  • 1/2 cup light brown sugar (organic if possible)
  • Pepper and salt

In a large, heavy pan, over medium low heat, melt the butter. While the butter is slowly melting, prepare the onions. Peel, cut in half (from stem to root), and slice thinly. I always keep root intact to hold the onion together while I slice it.

Once the butter has melted, add the onions, and toss so that they are covered completely by the butter. Add about half a bottle of wine, the red wine vinegar, balsamic, sugar and a lot of pepper and a bit of salt. Stir well to combine, and cover the pan with a tight fitting lid. Reduce the heat a tad, and allow the mixture to simmer, stirring every ten minutes or so for about an hour.

By the end of an hour or so, the onions should be stained dark red with the wine, and quite soft. Remove the lid, add the remaining wine, stir well, and allow to cook down for another three hours or so, stirring every half an hour to make sure the onions dont burn. You can judge when you feel they are ready, but do try and give them as much time as possible. They will turn a deep dark wine red.

When the onions are ready, take off heat, and allow to cool to room temperature. Taste and adjust for salt and pepper.

These may be kept, covered, in the fridge, for up to 3 weeks.

Assembly

  • 5 to 6 sheets all butter puff pastry (enough for 20 squares to fit muffin tins)
  • Caramelised onions
  • 4 eggs
  • 2 cups cream
  • Salt and pepper
  • 300 gm raclette or other melting cheese, sliced thinly

Preheat the oven to 180C (350F). Spray a muffin tin pan with non stick spray (I used an organic canola oil). Line a large baking sheet with parchment or baking paper.

The puff pastry should be quite cold, yet malleable. If you have made fresh puff pastry, make sure you pop it in the freezer for about 5 minutes before cutting it. Cut the puff pastry into squares larger than the width of the muffin tin and place one square in each. I like the squares with the edges rough and untamed. I tend to like these tarts look rustic, but if you prefer an ordered tart, by all means cut big rounds.

Pierce the pastry with a fork all over (particularly the bottom), and bake in the oven for about 10 – 15 minutes until light golden.

Meanwhile, whisk together the eggs and cream, season with a bit of salt and pepper, and place in a pouring jug.

Once the pastry has been baked to golden brown, remove from the oven and let cool for a few minutes.

Place a tablespoon or more of the caramelised onions in each tart, and pour over the custard mixture. Bake again in the oven for about 1o minutes, and then remove and top the tarts with the sliced raclette or other melting cheese. Bake again for a further five minutes or so, or until the cheese has melted and is starting to bubble, and the custard is just set.

Remove the tarts from the oven and allow to cool for about 10 – 15 minutes. Remove from the muffin tins, and place onto the prepared baking pan upside down. Bake in the hot oven for a further 5 – 10 minutes, or until the bottoms are crispy and browned.

Allow to cool for at least 10 minutes before serving, or serve at room temperature within 1 day.

Enjoy!

Red Wine Poached Figs Baked with Fourme D’Ambert

27 Feb

I could eat these figs all day. They are sensuous, sweet, sticky, salty, just a little burnt… totally delectable. I created them for the O’Gourmet Food Hall wine tasting, and they were paired with (and poached in) a Luberri 2009. The figs interacted extremely well with the wine, opening it up and accenting its unique properties.

This is an easy dish to prepare, as long as you take your time, and are aware of the quality of ingredients. I used large, soft Turkish dried figs to start with, and slowly poached them in a bottle of red wine until they were succulent and very soft. I then drained them, and allowed them to cool for a few hours.

When they were ready, I split them sideways, and stuffed them with a dream of a cheese: one of the oldest French cheeses, Fourme d’Ambert. This blue is nutty, semi-hard and complex. Its manufacture dates back to Roman times, and it has an ageless grace and elegance. Baked stuffed in the figs, the cheese goes soft and slightly burnt around the edges, capturing and contrasting with the sticky sweetness of the figs. Fourme d’Ambert also has wine notes, so it also picks up and amplifies the flavours of the wine the figs have been poached in.

These gorgeous babies can be prepared a few hours in advance, and still be incredibly delicious. I must admit though, they are phenomenal straight out of the oven, with the Fourme d’Ambert bubbling away, and the scent of wine and cheese tantalising. I would serve a few with a bitter salad as a starter.

I made 20 figs for the wine tasting. Do adjust to your own crowd 😉

Red Wine Poached Fig baked with Fourme d'Ambert

  • 20 large, soft dried Turkish figs
  • 1 bottle Luberri 2009 (or other complex red Spanish wine)
  • 300 g Fourme d’Ambert (or other semi-hard blue cheese)

Place the figs in a large saucepan. Cover the figs with wine, and bring to the boil over medium high heat. As soon as the wine is boiling, turn the heat down to medium low, and poach / simmer the figs for at least 20 – 30 minutes or until very soft and yielding.

Drain the figs out of the wine (reserve the wine for the optional sauce below), and leave to cool for at least 2 – 3 hours, or even over night.

Preheat the oven to 180C (360 F). Line a large baking sheet with parchment paper.

Using a scissors or very sharp knife, split the figs in half side ways – though if you really want to do it top to tail, who am I to stop you?

Stuff about a tablespoon of cheese in the centre of each fig, and place the fig on the baking sheet, stem side up.

Once you have stuffed all the figs, bake in the hot oven for 5 – 10 minutes, until the cheese has melted, and is bubbly and starts to burn just around the edges. The wine soaked figs will also become shiny and sticky.

Serve hot, or at room temperature.

These figs will keep for 2 – 3 days, covered in the fridge. To serve, bring to room temperature.

For optional wine glaze:

If you are serving the figs as a starter, you could glaze them with a reduction of red wine.

  • Remaining wine from poaching figs
  • 1/2 tsp cinnamon
  • 1 tbsp honey
  • 1 tbsp balsamic

In a medium saucepan, combine the wine, cinnamon, honey and balsamic. Simmer over medium low heat until reduced to a thick shiny glaze. Taste and adjust seasoning. Drizzle over figs just before serving.

Mangoes Poached in Wine With Pink Peppercorns

11 Dec

with Pink PeppercornsYou know how a sense memory sometimes stays with you long after the remembrance of when or where it was, or even with whom you shared that memory? Or sometimes a sense memory – a smell, a taste, a touch, a sound becomes the touchstone of a time and place in your life. I have that with food. Foufou to me is Ghana – the slave forts, the colours of the women’s dresses, the covered markets – all can be conjoured simply by the taste of that dish. My late father is white toast, butter and sugar. South Africa is Appeltizer, thick brown bread, and snoek pate.

And sometimes, a taste memory just lingers because it was that good. Recently, I had dinner with a dear friend at the new Chinoz in Bangsar Shopping Centre (try their pumpkin and parmesan gnocchi if you go – truly sublime!). And I realised that it was at another restaurant by the Chinoz group, the late lamented Q*doz, where I had fresh mangoes poached in sweet wine with peppercorns. This was probably one of the most powerful taste memories I have ever had. I tucked it away, and carried it with me wherever I went.

Im not sure why it affected me so powerfully, but it was amazing. I usually order chocolate desserts wheresoever I go … Believe you me, I could make a life size model of myself with all the chocolate I have eaten at restaurants over the years! But this night, I was convinced to try the poached mangoes… and what a revelation! Warm, soft, perfumed, the mangoes were rich and gorgeous in their own juices and the sweet seductiveness of the wine. I adore mango, but thought I only liked it fresh until that night. Gently poached in wine, the essence of the fruit was stroked and encouraged to blossom. I wish I could describe the layers of taste. The acidic spark of the wine, the voluptuous sensuality of the mango, and suddenly, the fire of the peppercorns. It was a joyous dish which made my soul sing.

And, as I said, I have carried that memory with me through many other experiences and lives 🙂 And when I encountered the sweet smelling, ripe mangoes at O’Gourmet, I suddenly had the urge to recreate, if not the exact dish, the memory of those flavours. I found beautiful pink peppercorns from Kashmir, treasured like gold, and my absolute favourite Leatherwood honey from Tasmania. I had more than half a bottle of De Matino Sauvignon Blanc left after making my fig and mangosteen ripple, and thus this dish was born.

Its such a simple preparation, and I think one could really be flexible in terms of ingredients. Use a good wine, though, because that taste comes through very strongly. And if possible, try and use pink peppercorns. Their flavour – musky, sweet, faded fire – is unique and wonderful and it perfumes the flesh of the mango, and the deep complexity of the reduced wine in a subtle nuanced way that is a total joy. Black peppercorns tend to be a tad more forthright in my opinion, but they can be used (may be a little more judiciously) here too.

I served this with my goat’s milk cheese ice cream but almost all my tasters said that each dish on its own was so complex, they needed to be served individually. These mangoes, warm from the pan, would do very well with some first class vanilla ice cream. Or, just on their own, with the gorgeous shiny sauce drizzled over. Beautiful!

Serves 6 pax

  • 1 + 1 + 1 tbsp pink peppercorns
  • 1/2 + 1 1/2 + 1/2 cup crisp white wine (I used a De Martino Sauvignon Blanc) – 2 1/2 cups in total
  • 1 large mango, peeled and sliced
  • 1 – 2 tbsp honey

With peppercornsCrush 1 tablespoon of pink peppercorns, and leave the other two tablespoons whole.

In a large pan, over high heat, combine 1/2 cup of white wine and the crushed peppercorns, and 1 tablespoon of the whole. Allow to come to the boil and reduce until you have a very thick wine reduction and the peppercorns.

Lower the heat, pour in 1 1/2 cups of wine, and add the peeled and sliced mangoes to the pan. Simmer the mangoes at the lowest heat for about five minutes, and then drizzle over the honey and sprinkle over the final tablespoon of peppercorns.

Continue to poach, for a further 10 – 15 minutes, or until the wine has reduced a little, and the mangoes have become slightly translucent.

Using a spoon, flip the mangoes over gently, and poach for a further few minutes. Taste and adjust the sauce – you might want to add another tablespoon of honey.

Remove from heat, and pour over final 1/2 cup of white wine.

Serve warm with vanilla ice cream. The mangoes will keep, covered, in the fridge for up to 3 days.

O’ Gourmet Goat’s Milk Cheese Ice Cream (with a Fig Mangosteen Ripple!)

9 Dec

I love goat’s milk cheese. It has an incredible, lush richness, and a particular ripe tang that comes from the flavour of the milk. Its made in a huge variety of forms, from soft spreadable cheese to firm cheese that melts beautifully. It is one of the earliest known forms of dairy products, and there is something very intense and primal for me about goat’s cheese. From Greek feta to the multiple varieties of French chevre, goat’s milk cheese is always intriguing and wonderful to cook with. I particularly love a good soft chevre, accompanied by dried of fresh figs, spread on toasted french bread. This woman can definitely live on cheese alone!

Given my adoration of goat’s milk cheese, it shouldnt be surprising that I have been wanting to make a goat’s milk cheese ice cream for ages. Ice cream is a pretty simple recipe – eggs, milk, sugar – and the addition of whatever flavourings you wish. I had an intense conversation with M. Sebastien of O’Gourmet Food Hall, and he suggested a Pave de Jadis – a soft chevre, with a thick, fudgy consistency. A tad sweet, slightly tangy, with a hint of lemon, pave de jadis literally translates as “paving stone” and gets its name from the ash which covers the brick of cheese. Its a French cheese, made in the Loire valley, and it tastes of springtime, of green grass pastures and sunshine. Its gorgeous and bright, and its soft texture is perfect for making ice cream.

As I spoke with M. Sebastien, I decided that I wanted to elevate this ice cream by adding a ripple of contrasting flavour through it. I decided on dried fruit that had been poached in white wine. I first thought of a Sauternes or other sweet wine, but M. Sebastien suggested a very beautiful, light and crisp De Martino Sauvignon Blanc from the Maipo Valley of Chile. This is an organic wine, and it was perfect. It paired perfectly with the cheese as well as the fruit, and brought out the lemony notes in the ice cream. I am going to use it to poach mango with peppercorns as well (but that is for tomorrow…).

Meanwhile, I needed to find my fruit. I decided to use dried fruit because the sugar in dried fruit would add a sweet note, and confirm that this is a dessert ice cream rather than a savoury one. Dried figs from Turkey seemed to be perfect, voluptuous and golden, bursting with jammy honeyed ripeness… but then my interest was caught. O’Gourmet has a large and amazingly exciting selection of dried organic fruits that are very Malaysian – rambutan, lychee… and mangosteen! I tasted everything, and fell in love at first bite with the mangosteen. Dried mangosteen. Have you ever heard of such a gorgeous idea? All the honey mango peach tastes of the mangosteen are highlighted and intensified. Its totally delicious, and I decided then and there to mix the fig and mangosteen into the ripple.

Because I wanted a taste testing that was as broad as possible, I decided to make two batches of the ice cream – one with a fig mangosteen ripple that had been poached in the De Martino wine, and the other a ripple in which the dried fruits had been poached in a Pear and Elderflower Presse by Belvoir Fruit Farms. This sparkling juice had the same crispness and brightness as the wine, though it was a little sweeter. It gave me the chance to make a non-alcholic version of the ice cream for those who choose not to consume alcohol. Lovely!

This recipe is actually incredibly easy to make, its just that the ingredients are exotic and beautiful. Treat them with a lot of care and respect, and plan ahead. The ripple can be made up to a week ahead and stored in the fridge. The ice cream custard needs to be made at least four hours before you decide to churn the ice cream, and the ice cream must be churned at least 12 hours before you serve it to give the flavours time to ripen and bloom in the freezer. It is a dramatic and gorgeous presentation, and will intrigue and challenge your guests. I will be serving it with fresh mango lightly poached in white wine and peppercorns, which is a memory from one of my favourite restaurants from long ago… but more on that next time.

Meanwhile, enjoy this ice cream. I think its a wonderful introduction to the seductive goodness, the natural deliciousness of goat’s milk. It has an almost cheesecake flavour, and is very dense, rich and thick. Its not too sweet, and definitely reflects the quality of the cheese you choose to use – so choose well! Enjoy!

Makes 1 quart

with De Martino Wine

Fig Mangosteen Ripple

Obviously, if you cannot find dried mangosteen, you could just add more figs, or think up your own decadent combination. Dried cranberries and blueberries might be gorgeous here. Sun dried tomatoes would also be pretty wonderfully wild.

  • 1/2 cup (about 100 g) dried figs
  • 1/2 cup (about 100 g) dried mangosteen
  • 1 1/2 cups white wine (I used De Martino Sauvignon Blanc) – for the non alcoholic version, use 1 cup of sparkling juice (I used Pear & Elderflower Presse by Belvoir Fruit Farms)

Chop the dried fruit into small chunks. I used a scissors, and just cut the fruit into small bits right over the saucepan.

Place the fruit and the wine in a small saucepan, and on the lowest heat possible, poach the fruit in the wine. You want the liquid to be just simmering, never boiling. The liquid will plump up the fruit, and the fruit will absorb almost all of the wine. When the mixture becomes a sticky, gooey paste (about 10 – 15 minutes depending on your heat source), let cool and store covered until you are ready to ripple it into the ice cream.

This also makes an amazing topping for ice cream on its own. Very seasonally apt too!

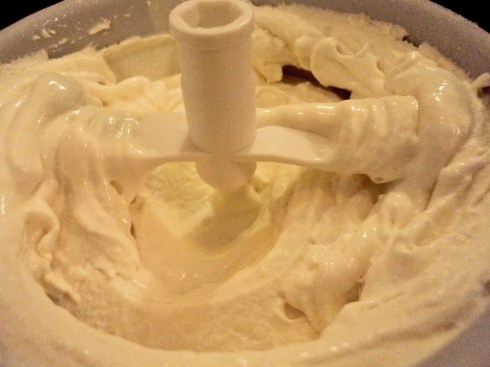
Churned

Goat’s Cheese Ice Cream

  • 2 1/2 cups milk/cream mixture. I used 1 cup of goat’s milk to 1 1/2 cups of cream. But you be the judge on how rich you want it! I also keep an additional 1/2 cup milk/cream for thinning out the mixture just before it goes into the ice cream maker – sometimes, the custard can be just a tad too cheesy
  • 1/3 + 1/3 cup of caster sugar
  • 6 egg yolks (reserve the whites for other uses – making macaroons may be?)
  • 7 oz (about 200 g) soft fresh goat’s milk cheese (I used Pave de Jadis) – make sure it is a soft, fudgy, fresh cheese
  • Pinch of sea salt

Place the milk/cream and 1/3 cup of caster sugar in a medium saucepan over medium low heat. Whisk together to combine, and heat the mixture, stirring occasionally, until it reaches 175F on a thermometer, or until it just begins to steam, and bubbles begin to form on the edges of the pan.

Meanwhile, whisk together the egg yolks and the remaining 1/3 cup of sugar. I always use an electric stand mixer for this because I really want to incorporate the eggs and the sugar into a creamy whole. Use whatever youve got though, but make sure to beat for at least 3 – 5 minutes, until the eggs are light and lemony coloured, and thick in consistency.

Take the milk mixture off the heat, and add about 1/3 to the egg mixture, stirring well all the while. Once you have tempered the eggs, add the rest of the milk, slowly, stirring constantly.

Crumble the goat’s milk cheese into a large bowl and set aside.

Place the egg/milk mixture back into the pan, and cook for a further few minutes, until the mixture becomes a custard. It will thicken and coat the back of a spoon. When you draw a line through the custard on the spoon, the line will hold. The temperature will be about 175F.

Have two bowls ready, one with the crumbled goat’s milk cheese at the bottom, and a good sieve.

Take the custard off the heat, and pour through the sieve onto the crumbled goat’s milk cheese. Once all the custard has been sieved, allow the mixture to sit for a few minutes, while the heat of the custard softens and melts the cheese. Mix well, using the edge of your spatula to break up the chunks of cheese.

Sieve a second time into a second bowl, ensuring that the cheese has incorporated into the custard. Taste and adjust the level of milk/cream. Sometimes I add a further 1/2 cup of cream at this stage if the cheese is too tangy and overwhelming.

Sieve a third and final time to ensure total smoothness of the mixture. Cover, and refrigerate for at least 4 hours.

When you are ready to make ice cream, taste the cold custard. I usually will stir in a pinch of fleur de sel (or Maldon) to just highlight all the different flavours – the sweet, tangy, creamy all benefit from just a pinch of salt. Pour the custard into the ice cream maker, and follow manufacturers instructions.

With Fig Mangosteen Ripple

Goat’s Milk Cheese Ice Cream with a Fig Mangosteen Ripple

  • 1 quart goat’s milk cheese ice cream
  • Fig mangosteen ripple

Once the ice cream has been churned, you need to work very quickly. Have clean containers ready, a good spatula, a spoon, and the dried fruit ripple.

Scoop out about half of the churned ice cream into the container. Spoon over the dried fruit ripple, going right to the edge, and then scoop over the remaining ice cream. Smooth over the top with the spatula and freeze for about 1 – 2 hours until semi-firm.

Using a knife, ripple the ice cream so that the dried fruit is swirled throughout. You choose if you want it really mixed in or you want large chunks of fruit ripple sitting in the immaculate pale white ice cream.

Freeze overnight to allow the flavours and depth of contrast to blossom.

Enjoy this elegant, unique creation with those you adore 🙂

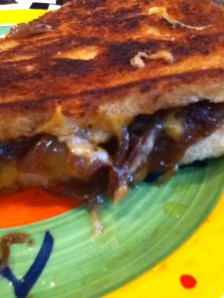
Grilled Cheese with Jammy Onions

15 Oct

with Jammy OnionsIts suddenly cold! Last night when I went out to get the hound in, I saw my breath, puffs of white, against the darkness of the night. And today, its gray and rainy. In about a week, I will be home in the warmth of the tropics, but here, its cold, and only going to get colder.

Lunch today was about comfort – grilled cheese with the addition of jammy, dark caramelised onions. If you need to start from the beginning it can take a little less than an hour to make this meal. But if you make the jammy onions in advance and have them in the fridge… well, then, you can do this quick as a blink! Jammy onions are wonderful to have on hand, by the way. They elevate anything and everything – from pasta sauce, to curry, to soup.

This is very rich – so make sure that when youre actually grilling the sandwiches in the pan, that you use only a little bit of butter – and low heat. This will enable the cheese inside to really melt and meld with the onions, and the bread to toast without getting too greasy and buttery.

Wonderful served with tomato soup – or something green like a sharp mustardy arugula (rocket) salad with sliced tomatoes and a sharp dressing on the side. This is lunch to warm the innards and bring a smile to the faces of those you love. And its just grilled cheese – but with such a lovely twist.


Serves 4

  • 2 medium onions
  • 2 tbsp olive oil
  • Salt and pepper
  • 1/2 tsp basil
  • 1/2 tsp oregano
  • 1/4 cup red wine
  • 1 tsp brown sugar
  • 2 – 3 tbsp balsamic vinegar
  • 1 – 2 tbsp soy sauce
  • Water
  • 8 slices bread – I used sourdough, though a yeasty brown bread would be wonderful here too
  • A few tablespoons mayonnaise (or Marie’s Italian dressing – my family’s favourite!)
  • 2 2/3 cups grated cheese (approximate) – you can use cheddar, brie, blue, goat, parmesan – what ever you like. I used cheddar and jack – and figured about 2/3rd cup cheese per person, but its sometimes less. You could also use 8 slices of cheese but please dont use plastic cheese – its gross!
  • A few tablespoons of butter, softened to room temperature

First, prepare the onions. Slice the onions in half, peel, and slice the top off. Slice half rings, thinly all the way to the root.

Put a medium non stick pan over medium high heat, add olive oil and onions, and saute for 3 – 5 minutes, until the onions have softened. Add salt, pepper, basil, and oregano, and mix well to combine.

Put heat up to high, and add red wine. Allow the red wine to bubble, and mix the onions well to coat them in the wine. The wine will soften the onions, and will be absorbed almost completely by them. Once the onions are a dusky red, and the wine has been absorbed, sprinkle over brown sugar, balsamic and soy sauce. Stir to combine, and allow to bubble for a few minutes.

Add about 1/4 cup water, and bring the heat down to medium. Simmer the onions for at least 10 minutes, or until all the water has been absorbed. Taste, adjust seasonings, and consider if the onions are soft and melting enough for you. If not, add some more water (and a little touch more sugar if you like), and bubble away again. Each time you add more water, and it gets absorbed, the onions will go darker, slicker and jammier. Sometimes I do this, in increments 3 or 4 times.

Once the onions are a good jammy consistency, transfer to a heat proof bowl and set aside.

Rinse out the non stick pan, and have another one ready. If you dont think you can fit two sandwiches in one pan (and will thus have to cook them in two rounds), preheat the oven to the lowest temperature, and have a baking sheet ready to receive grilled sandwiches while you make the rest.

Lay out 8 slices of bread in 4 groups of 2 each. Spread mayonnaise (or other sandwich spread – we use Marie’s Italian dressing – mustard would be good here – as would aioli) sparingly on bread. Spread about 1/3 cup (or less if you like) grated cheese – or 1 slice of cheese – on 4 slices of bread. Divide jammy onions between these four slices, and cover again with another 1/3 cup grated cheese (or 1 slice of cheese) each. Cover with remaining slices of bread to make 4 sandwiches.

Butter the outside of each sandwich, sparingly. Place sandwiches on non stick pans, two to a pan, and place on low heat.  Grill sandwiches undisturbed for about 5 – 7 minutes (I always check at 5) on low heat. If you think the sandwiches are not toasting enough, bring heat up, but just a little.

Flip sandwiches, and grill for about 3 – 5 minutes on second side. Once sandwiches are grilled to your preference, remove from pan, slice horizontally, and serve. The cheese should have melted through those glorious onions, and it should be a sticky wonderous mess.

Fig Walnut Tart

24 Aug

This tart was something I dreamed up in my imagination, and it turned out better than I could ever have imagined! I made it for my sister’s birthday feast, but it would be phenomenal as a meal on its own – perhaps with a simple side salad of arugula + tomato. It would also be a stunning first course – served either in slices or in little individual tartlets – you could use muffin pans. Its savoury and sweet, incredibly rich, and yet surprisingly light. If you like figs, this is nirvana.

My sister’s husband, BSA, and I were chatting about how I would incorporate all the fresh purple figs that are growing on their tree into my sister’s feast. They are beautiful, and really needed to be used up … I also found some pretty green Calamyrna figs at Whole foods, and I added those too! BSA suggested walnuts – I have to admit I am not a huge fan of the nut in and of itself. I find it bitter and powdery in a funny way. But incorporated into a crust, now thats a different story!

And the figs had to sit in something. I first thought of smearing the base of the tart with blue cheese, but the blue goat’s cheese I found wasnt really blue, and didnt meet my fancy. So instead, I mixed together fresh mascarpone, ricotta and a touch of creme fraiche, with a few eggs. The eggs and ricotta lightened the base – it became almost fluffy, and yet retained a beautiful clean sweetness. Bland, but a perfect counterfoil for the rich luscious figs. I think I was inspired by the wonderful open faced ricotta and fig sandwich I had at Le Pain Quotidien!

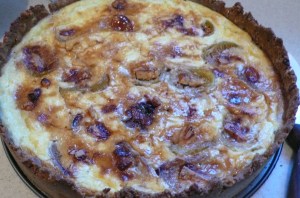
I poached the figs in a bit of sweet dessert wine and then reduced the poaching liquid to a thick syrup. I sliced the figs in half, and stuffed each of them with strong soft goat’s cheese and literally tucked them into the pillowy bed of ricotta and mascarpone. They sunk in a little, and I baked the whole thing until the filling was puffed, and the centre didnt jiggle any more. About ten minutes before I thought it would be done, I poured over the poaching syrup and let it bake in.

This was wonderful at room temperature, and really superb the next day, cold. This tart will keep, and the figs are transformed by their bedmates. This is a sensualist’s meal – textural, full of tastes, layers of flavour, and silky smooth. Serve it to those you love. They will be wowed.

I baked the tart in a 9 3/4 inch springform cake pan, and just released the edges when serving. It made for a rustic beautiful tart, but use whatever you have!

Serves 8 – 12 people

For the walnut crust

  • 1 cup chopped walnuts
  • 1 cup whole wheat pastry flour (for extra nuttiness, but if you only have regular flour – use that!)
  • 1/2 – 3/4 tsp salt
  • 1 tsp cracked black pepper
  • 1/2 stick (4 tbsp) butter
  • 1 egg

In a food processor (or, as I did, in the wonderful attachment mini processor that came with my sister’s new immersion blender!) pulverise the walnuts until they are a fine coarse meal. In a small bowl, mix together the walnut meal and the flour, and add salt and pepper. Use your judgement when it comes to the salt – I eventually added about 3/4 of a teaspoon, but I was using unsalted butter… you might find you need less if you are using salted.

Grate the butter into the flour mixture, and using your fingers, mix until you have sandy pebbles.

Crack an egg into the bowl, and using your fingers, combine the egg into the flour-butter mixture. You will get a slightly sticky dough. Knead this a couple times in the bowl, and then refrigerate to allow all to come together for about 10 minutes or so.

Preheat the oven to 190 C.

Take the dough out of the fridge, and on a floured surface, roll out. You might find this is difficult, but do your best. The dough will be crumbly. Transfer to a tart pan, or a 9 – 10 inch springform cake pan. Use your fingers to spread out the dough across the bottom of the pan, and up the sides. Its okay if the dough tears, just use slightly wet fingers to patch it up again.

Put the pan in the fridge for 5 minutes to let the dough set, and then prick the dough all over with the tines of a fork.

Bake for 15 – 20 minutes until the pastry is lightly browned. The butter will have foamed up on the surface of the pastry – this is okay, it will incorporate back in once you take the pastry out of the oven. Cool for at least 20 minutes before assembling.

For the filling + assembly

  • 1/2 cup sweet dessert wine (or port wine, or red wine, or white wine, or if youre not into wine, grape or apple juice!)
  • 1/2 cup water
  • 1 tbsp honey
  • 10 – 12 ripe fresh figs, whole
  • 1 cup mascarpone
  • 1 cup fresh ricotta
  • 2 heaping tbsp creme fraiche or sour cream
  • 2 eggs
  • 1/2 cup or so soft goat’s cheese (or blue cheese if you would rather – Cashel Blue might be wonderful here!)

Place wine, water, honey and figs in a medium saucepan that will fit all the figs snugly. Over medium heat, bring the wine to a boil, and then turn heat down, and simmer for about ten minutes. Remove the figs from the wine and allow them to cool separately.

Bring the wine mixture to the boil, and boil steadily until reduced to a very thick syrup. Set aside.

Beat the mascarpone, ricotta, and creme fraiche together until just combined. Beat the eggs into the mixture, and taste. You might want to add a little salt and pepper, but I didnt think it needed it.

Preheat the oven to 190 C

Pour the mascarpone mixture into the cooled walnut tart shell.

Chop the goat’s cheese into bite sized chunks, slice each fig in half from stem to bottom, and stuff the centres with a piece of goat’s cheese. Lay the figs into the mascarpone mixture gently, cut face side up.

Bake the tart for about 30 – 45 minutes, or until the centre does not wobble any more. About ten minutes before it is done (when you see a bare wobble), pour the reserved wine syrup over.

I really liked this cooled to room temperature before serving, particularly in the hot summer night, but if you want to serve it warm or hot, please let it sit for at least 10 – 15 minutes before slicing and devouring!

Enjoy!!!

Green Pasta for MZ+BSA

27 Jun

While visiting M a few months ago, I was able to cook in her wonderful kitchen (using knives that a friend of BSA had hand made!) and enjoy all the bounty and amazing-ness that was Whole Foods! I could so live in that place!

One of my favourite concoctions was this green pasta. BSA seemed to like it enough that he went for thirds (or was that fourths?). Either way, it is made with the freshest and greenest veg you can find. Feel free to adjust, though these go well together. The mushroom adds a warm muskiness that holds everything else together.  This dish bursts with energy and vibrancy, and its so delicious. Simple, and not creamy either, which is satisfying without being overwhelming.

You could serve this with all sorts: couscous, rice, even a toasted brioche, but angel hair pasta, to me, has the delicacy that this dish needs.

Feeds 4 hungry people

  • Approximately 1/4 cup olive oil
  • 5-7 cloves garlic, thinly sliced
  • 250 g mushrooms
  • 2 cups baby spinach, thinly sliced into ribbons
  • 2 cups artichoke hearts
  • 1/4 – 1/2 cup white wine (or alternatively, veg stock and lemon juice, if you dont want alcohol)
  • 1 cup broccolini (or other type broccoli) roughly chopped
  • Few leaves fresh basil
  • Salt and pepper to taste
  • 1/2 cup or so parmesan and more to serve
  • Angel hair pasta

Start with about half the olive oil, or enough to thickly coat the bottom of a large non stick pan. You should have a green gold puddle. Add more olive oil as needed while cooking. Turn heat on low.

As oil heats, throw in all the thinly sliced garlic. It will infuse the oil, and add depth to the flavour of the finished pasta. Watch as garlic gets soft but dont allow it to brown.

Meanwhile peel and slice the mushrooms, and add to pan, putting heat up to medium low. Stir well and encourage the juices of the mushrooms to let go.

Prepare spinach by taking leaves, rolling them into little cigar shapes, and cutting into ribbons. Add to pan and saute to wilt.

Roughly chop artichoke hearts, and add to the pan. Stir all ingredients together, to introduce them to one another and immediately add wine (or veg stock/lemon juice). Allow to braise for a few minutes, and check for flavour. Add salt and pepper to taste. Note: I usually add white pepper to this dish so as not to whack all the delicate flavours over the head with ground black pepper.

Roughly chop broccolini, and add it to the steaming pan. Turn off heat after a few minutes. Use a light hand with this recipe and work quickly. You want your ingredients to cook, but you dont want them to boil and leach all their flavour and freshness. Remember that the heat will continue cooking the vegetables for quite a while after you take the pan off the fire.

Tear a few leaves of fresh basil in half, or crush them between your fingers to release their amazing scent and oils. Add to the pan and mix all together.

Cook angel hair pasta, reserving 1/2 mug of cooking liquid. Drain pasta. Mix vegetables and pasta together by adding pasta to the vegetables rather than vice versa. Use tongs and mix well. Add a little of the pasta cooking liquid if you think its too dry. You might want to add some lemon juice or another splash of wine. Grate parmesan lightly over and mix well.

You could use many different vegetables for this beautifully delicate dish. Asparagus comes to mind, as do peas, rocket, french beans.