Tag Archives: vanilla

A Rainbow Birthday Cake for Ms Yangie!

9 Apr

AngelKitten has been a regular helper, co-cook, co-conspirator and dreamer in my kitchen. It started out as an expression of interest on AngelKitten’s part to learn how to cook … but it has evolved into a friendship forged by food, and a sisterhood defined by how we balance each other. She is a perfectionist – specific and exacting, designing the most delicate and beautiful visual elements for my food. I am a little more … Aries in my approach. I cook with great passion, and my food is usually delicious – but I have been known to be a tad disorganised and messy. AngelKitten records everything I do (many of the recipes on this blog come from her handwritten notes), and when we brainstorm, she is the one who designs, sketches and keeps notes.

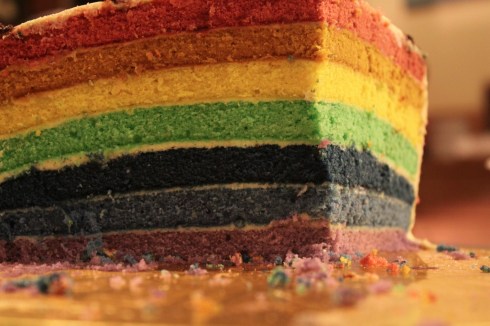
One of the cakes that AngelKitten has always wanted to make was a rainbow cake – thin layers of vanilla cake, coloured in the seven shades of the rainbow. We were considering it for our Princess Doll Cake, but ended up deciding it would be just too complex. For that cake, we stayed with the pink (!) theme, and divided the vanilla cake in half and flavoured it with fresh raspberry puree. But the idea for a rainbow cake always stayed with AngelKitten, and when her Mum’s birthday came around, she asked if we could make it.


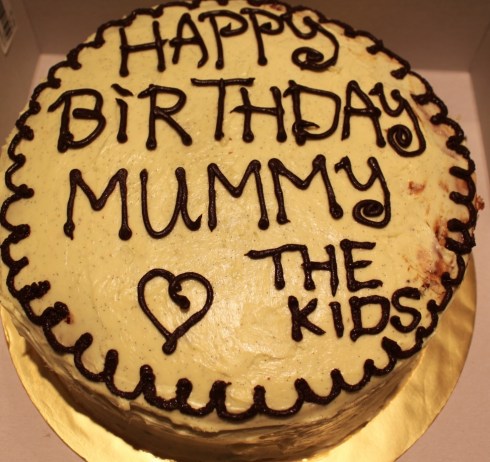
Ms Yangie's Birthday Rainbow Cake ... but where is the rainbow?!


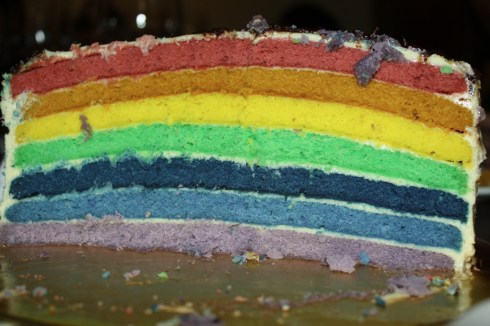
We adapted the recipe for the vanilla cake for this rainbow cake. You need a little more batter, so instead of doubling it, I made one and a half times as much (with a touch less baking powder). You also require loads of bowls because you will need to divide the batter into seven. We followed the colours of the rainbow as exactly as possible – purple, indigo, blue, green, yellow, orange and red. We used Wilton gel colours because we wanted to achieve a very bright rainbow, though I think, with a little care, you could easily create a more pastel, but just as beautiful rainbow with IndiaTree colours.

You also need a lot of time. This cake takes seven bakings of 10 minutes each, and we only used two cake pans – so there was quite a bit of washing, cleaning, and cooling in between. We iced the cake with a vanilla bean cream cheese icing and AngelKitten made a chocolate ganache to pipe the decoration and birthday wishes. Yangie (AngelKitten’s Mum) had been wanting a rainbow on her cake, and when she received a pure white iced cake, kept asking, where is my rainbow? When she cut into the cake, and found this gorgeous rainbow, she was thrilled. And I was delighted with being able to help AngelKitten create such a wonderful gift for her beloved Mum.

Ahhh there it is! Rainbow Cake reveals itself!

Rainbow Cake

Makes 1 9-inch rainbow cake (7 layers)

  • 4 1/2 cups superfine or cake flour
  • 3 1/4 tsp baking powder1 tsp salt
  • 1 1/2 cups (12 oz) butter, room temperature
  • 3 cups sugar
  • 6 eggs
  • 2 tbsp (or more) vanilla (I used 3 large vanilla beans and 2 tbsp vanilla essence)
  • 1 1/2 cups milk

Preheat your oven to 165C (325F) and line two 9 inch cake pans with parchment paper. Spray the cake tins with non stick spray or use some softened butter. Set aside. Have seven bowls at the ready, along with gel or liquid food colour, and toothpicks.

In a small bowl, sift together the flour, baking powder and salt, and set aside.

In an electric stand mixer, cream together the butter and sugar until light and fluffy. Add the eggs one at a time, and then add the vanilla. You should have a creamy batter, but dont worry if it looks a bit curdled – it does that sometimes!

Fold in (dont beat in) the flour mixture, alternating with the milk.

Divide the batter evenly into the seven bowls. Begin dying the batter, starting with the violet/purple hue. As soon as it is dyed to your liking (and remember it does get a little darker in the oven), pour the batter into a prepared baking tin, and smooth with a spatula. The layer will be very thin. Bake for ten minutes, or until a toothpick inserted into the cake comes out clean, and it springs back lightly when pressed. Remove the layer from the oven, cool on a cake rack for about ten minutes, and then remove from cake tin by turning onto cake rack. Keep the parchment paper on the bottom of the cake as it cools. Repeat with the remaining six layers, prepping your pans as you go.

When the first layers have cooled sufficiently, begin to ice the cake (you will be icing and baking all at the same time! Multitasking is fun!). Centre the first layer of cake on a cake plate. Use the parchment paper to help you move the cake layer around – lift the layer into your hands by turning the cake rack over, and shift the layer over to the cake plate by carrying it on the paper. Use the first of your seven bowls of frosting, and frost the top of the cake, and the sides lightly. Repeat with the remaining layers, using the parchment paper to help you centre the cake layers on top of each other.

Once you have iced all the layers, frost a thin layer of icing along the top and sides. Place in the fridge for ten minutes (this is called the crumb icing – and helps you achieve a smooth final layer of icing), and then finally ice a thicker layer of vanilla cream cheese frosting over everything.

Serve to the delight of your family and friends!

Gorgeous and Dramatic

Vanilla Cream Cheese Frosting / Icing

  • 1 cup butter, softened
  • 2 cups cream cheese, softened
  • 1 cup icing sugar
  • 2 tbsp vanilla essence or 1 – 2 vanilla beans

In an electric stand mixer, beat together the butter and cream cheese until light and fluffy. Make sure the two are completely combined and no lumps or bumps remain – this may take up to five minutes.

Remove the bowl, and sift the icing sugar over the butter-cream cheese mixture. Beat again until fully incorporated, adding the vanilla to taste as you go.

Divide the frosting into seven bowls (we reused the batter bowls) and ice the rainbow cake as above.
O’Gourmet Food Hall Trifecta of Ginger Cake

4 Feb

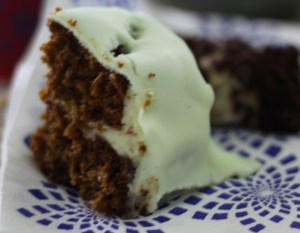
Everyone loves ginger cake. I certainly havent met a ginger cake that I didnt like, even those slightly stodgy, heavy ones. Its the magical melding of ginger and dark sugar, of molasses and heat that creates layers of flavour. Ginger cake is complex. Its a full frontal experience because the spice perks up the taste buds, while the richness and sweetness tease the palette. I have always loved ginger cake, but when I got a whiff of the Bentong ginger available at O’Gourmet Food Hall, I knew I wanted to try my hand at remaking it anew.

Bentong ginger is considered the best in the world. It is fresh, crisp, stark and sharply spicy, but it has undertones of sweetness. O’Gourmet Food Hall has organic, locally grown and incredibly fresh Bentong ginger. The scent assails you as soon as you peel the root. The firmness of the ginger, the clarity of the flesh, and the taste. Absolutely gorgeous.

I decided I wanted to make a ginger cake with this particular varietal, but I wanted to add more depth to it if possible. I found some ginger curd which has a more muted caramel deep throbbing hum of ginger to it, and some beautiful fresh ground ginger powder which adds a musky beat. A trifecta of ginger in one cake. Would it be too much? Turns out, if youre careful and you add the fresh ginger in stages, you can find a balance of taste that is close on perfect. Add to that the dark tones of brown sugar and molasses, fresh organic eggs, and a frosting of cream cheese and fresh vanilla bean. Sublime. Happy making. And amazingly easy.

Do note that if you want a very simple ginger cake, you could just halve the recipe and leave out the frosting. You will then have what is more like a tea cake, still stunningly gingery but a little more sedate and less full on. If you cant find ginger curd, leave it out, but do try and find the freshest, crispest, firmest ginger you can, and use organic ingredients as much as possible.

For a two layer cake (serving 12 people… or more!)

  • 3 cups organic pastry flour
  • 2 tsp baking soda
  • 1/2 tsp salt
  • 2 tsp ginger powder
  • 3/4 cup dark brown sugar
  • 1/2 cup molasses
  • 1/3 cup treacle (or corn syrup or honey if you dont have treacle)
  • 2 – 3 tbsp ginger curd (optional but very good)
  • 2 eggs
  • 1 1/2 sticks (12 tbsp) butter, melted
  • 1 cup hot water
  • 1/2 – 1 cup fresh ginger, peeled and grated finely
  • 8 oz cream cheese
  • 1/2 cup icing sugar
  • 2 vanilla beans or 2 tbsp (or more) vanilla essence
  • 1 – 2 tbsp cream (if needed)

Preheat your oven to 175C (350F), and butter two cake tins, and line with baking paper.

In a small bowl, combine the flour, baking soda, salt and ginger powder. Set aside.

In a large bowl, whisk together the sugar, molasses, treacle, ginger curd and eggs. Set aside while you melt the butter into the hot water in a small saucepan, over medium heat.

Whisk the melted butter and water into the sugar/molasses mixture, and stir in the fresh ginger. It really depends on how strong your ginger is – so I always add 1/2 cup first, and then taste. Add more until you get a peppery almost overwhelmingly ginger taste. Remember that the heat of the oven will mute some of that sting.

Stir the flour mixture into the large bowl, and mix until just combined. Pour the batter into the prepared cake tins, and bake in the oven for 20 – 25 minutes, or until a cake tester is inserted and comes out with a few crumbs clinging to it.

Remove the cake from the oven, and allow to cool, in the pan, for about 5 – 10 minutes. Turn out onto a rack to cool to room temperature.

Meanwhile, add the cream cheese to a stand mixer bowl, and beat for a few minutes until it attains a softened consistency. Add the icing sugar, a tablespoon at a time, and continue to beat. I always like to taste the frosting at each tablespoon of sugar, because I dislike icing that is too sweet. Split the vanilla pods and scrape out the beans and add to the frosting. Beat for a few seconds more until the vanilla is totally integrated. Add a tablespoon of cream (or milk) if the mixture is too stiff.

A Trifecta of Ginger CakeCentre a cake round on a serving plate, and ice the top. Place the second cake round on top, and ice the top and sides of the cake. Refrigerate until half an hour before serving.

Enjoy!

Chili Ice Cream

4 Jan

I have had a thing for ice cream for as long as I can remember. The cool, smooth texture, melting as it meets the heat of your mouth. The happiness contained in that one complex, and yet simple bite. Its comfort food, and yet it can be incredibly sensual. I love imagining different ice cream flavours, and when I found the amazing Kashmir chili powder at O’Gourmet, my senses went into overdrive. What would happen, I wondered, if the cool of ice cream met the deep dusky heat of chili?

As it turns out, very very good things. I made a basic vanilla ice cream – heavy on the vanilla – and added the chili powder at the end. The interesting part for me is that when you first taste it, you dont really feel the heat of the chili. It seems subtle … nuanced … just a hint. The overarching flavour and scent, at first, is vanilla. And then, the chili wraps itself around your throat, your taste buds, and you get a flash of heat. Amazing. When people taste this ice cream, they mmmm at the flavour of the vanilla, and say they cannot taste the chili. Seconds later, their eyes light up, they smile, and they go ohhhhh. There it is!

And I was also inspired by a beautiful gift from my dearest Adi – cocoa nibs that she brought back from her journeying. Cocoa nibs are the bean of the cocoa plant, before its made into chocolate. Roasted, to bring out the oils and the flavour, and then crushed, the nibs have a deep, intense and complex chocolate flavour without any added sweetness. I added the nibs to the ice cream right at the end – to give texture, almost like a chocolate chip ice cream, and also because chocolate and chili are such lush and symbiotic bed mates.

Such an amazing contrast. And such a wonderful aphrodisiac. Capsaicin, the compound which gives chili its heat, is considered an aphrodisiac the world over. It stimulates our nerve endings, gives us a rush of endorphins and makes our pulse beat faster. Pretty sexy, I would say. And combining the chili with chocolate, another well known aphrodisiac, is like a partnership made in heaven. You could serve this ice cream unadorned, and it would be a revelation. Combined with hot fudge sauce and port pear chili jam, it becomes a sundae that over takes the sense, strokes the fires and makes people melt. It really is that good.

And to be honest, its preparation is pretty simple. You need to make it at least a day before serving, to allow the ice cream to ripen in the freezer. Get the absolute best quality chili powder you can find – and add it to the vanilla ice cream base carefully. Not all chili powders pack the same punch. Some are much more complex than others, and some have significantly more fire. In total, I added about 1 and a half tablespoons of chili powder, but you may need much more or much less. Add by the quarter teaspoon, and taste and adjust as you go. You will know its right when after the first flush of vanilla and cream have abated, your mouth is aflame with the heat of chili – for one brief, beautiful, blazing moment. And then, as it dissipates, you get that urge and you want it to start all over again 😉

Makes about 1 quart

  • 3 cups milk / cream – I used 1 cup milk + 2 cups cream. You can certainly change the ratio, but the more cream you use, the smoother the finished product
  • 2 vanilla beans or 2 tbsp vanilla essence or 2 tbsp vanilla paste
  • 1/4 tsp salt
  • 3/4 cup caster or light brown sugar
  • 5 egg yolks (whites reserved for another use)
  • 1 – 2 tbsp chili powder, added in increments of 1/4 tsp at a time – to your taste
  • 2 – 3 tbsp cocoa nibs (optional, but wonderful)

Pour the milk / cream into a large saucepan. Split the vanilla beans, and scrape out the seeds into the milk / cream. Add the beans to the milk as well. Add the salt and half a cup of the sugar, and stir to combine.

Place the milk mixture on low heat, and bring to about 170F (77C). The mixture will start to steam. Stir to ensure all the sugar has been absorbed, and set aside.

Whisk together the egg yolks and the remaining 1/4 cup sugar, until the yolks are thick and lemon coloured. When you lift the whisk, the yolks should form a ribbon.

Temper the yolks by pouring about 1/4 of the hot milk mixture into the yolks and whisk well. Pour the yolk/milk mixture back into the saucepan, and stir. Place back on low heat, and bring the mixture back up to 170F (77C), stirring all the while. The mixture should coat the back of a spoon.

Strain the custard through a fine sieve. Discard the vanilla beans (or wash and dry them, and pop them in a canister of sugar) and allow the custard to cool to room temperature.

Refrigerate the cooled custard for at least 1 – 2 hours.

Once the custard has cooled, begin to add the chili powder, 1/4 teaspoon at a time, whisking well after each addition. It helps to sieve the custard back and forth between two large bowls, as you add each 1/4 teaspoon of chili powder. This ensures that the chili powder really gets integrated into the vanilla custard, and allows you to taste its heat.

Once you have reached your optimum chili level, add the custard to an ice cream maker, and process according to the maker’s directions.

As soon as the ice cream has been processed, scoop it out into a container (it will be very soft, and you will need to work quickly), and fold in the cocoa nibs, if using. Sprinkle a few cocoa nibs on top, and freeze overnight to allow the ice cream to ripen.

Serve as is, or with hot fudge sauce and pear port chili jam for a wicked and decadent sundae.

Enjoy!

Hot Fudge + Port Pear Chili Jam

30 Dec

So yes, I am in a saucy mood. I have been cooking a lot recently, but not new recipes. And its been one of those weeks (months?) – first my phone died, and then my hardrive on my laptop got fried. I am lucky in that I have the means to deal with these issues (new phone on the one hand, and my old laptop on the other). But its been a frustrating time, and I havent felt a whole lot of inspiration.

But a stroll through O’Gourmet certainly helped! Mr. Kumar (the manager) was so excited to show me some chili powder from Kashmir – hand carried back to KL. It was like nothing I had ever seen before – rich, deep burnt orange red, and almost wet … with a scent that had so many layers to it I cannot even begin to describe, but I will try. Soft, mellow, with a sharp tinge… hauntingly musky with a long profound beat of heat and sun and spice. Gorgeous. Stunningly sensual. I had to cook with it – and suddenly, inspiration arrived!

I decided to make a chili ice cream (the recipe for which I will post tomorrow). But this was to be not just a singular ice cream, but an ice cream sundae. Hot fudge sauce (with dark bittersweet chocolate and melted Scottish fudge) and a chili jam – with a base of port and pears – at once sweet, hot and boozily beautiful. I felt that these sauces would elevate and intrigue – and would provide the perfect foil for the cold creamy ice cream. AngelKitten suggested we get some caramelised pistachios to top the sundae. What a combination of flavours and tastes! I couldnt wait to get started.

These two sauces would of course be just as magical on their own (the hot fudge sauce is particularly simple to put together) or combined over chocolate or vanilla ice cream. If you can, though, try the whole package. Its quite a few pieces of cooking work – but if you break it all down, and prepare in advance, its actually a doddle!

Hot Fudge Sauce

Makes about 2 cups of hot fudge. This can be served warm, or made in advance and reheated just before serving. Use the best quality chocolate and fudge you can find.

  • 450 – 500 g (1 lb) vanilla fudge
  • 1/2 cup cream
  • 250 – 300 g bittersweet (at least 70%) chocolate, chopped
  • 1/2 teaspoon Maldon or other sea salt

Grate the fudge into a large saucepan. Add the cream and stir a little.

Add the chopped chocolate, stir, and add the Maldon salt.

Place the saucepan over a low heat, and melt the chocolate into the fudge, stirring all the while. Make sure that the fudge too has been completely melted into the sauce.

Serve warm, or store, covered, in the refrigerator for up to 2 weeks. Reheat before serving.

Port Pear Chili Jam

Makes about 2 cups of jam.

This jam is quite loose. It pours like a sauce, but it also depends on how long you cook it – the less liquid left, the more “jammy” and thick it becomes.  If you do not want to use port or another alcohol, substitute with grape juice.

  • 9 pears (I used 3 each of D’Anjou, Bosc and Conference), peeled, pared and roughly chopped
  • 1 + 1 tbsp pear balsamic vinegar (if you cannot find this, try using pear or apple juice or even some apple cider vinegar)
  • 1 cup port wine (or grape juice)
  • 1 tsp best quality (Kashmir if you can find it) chili
  • 1 tsp chili flakes
  • 1 tsp mustard seeds
  • 3 – 6 tbsp dark brown sugar
  • 1 tbsp cinnamon
  • 1/2 tsp salt
  • 1 tbsp best quality (25 year old) balsamic vinegar
  • 2 tbsp honey (I used leatherwood honey)
  • 1 tbsp vanilla bean paste or vanilla essence

Peel, core and chop the pears. As you work, place the pears in a large saucepan, and toss them with 1 tbsp of the pear vinegar.

Measure out the pour wine and add to it the remaining 1 tbsp pear vinegar, chili, chili flakes, mustard seed, 3 tbsp of brown sugar, cinnamon, salt and balsamic vinegar. Stir well to combine, and pour over the pears.

Place the saucepan over high heat, and bring the mixture to the boil, stirring well.

Once the mixture comes to the boil, lower the heat to medium, and add the honey and the vanilla. Allow the mixture to simmer, uncovered for at least an hour. The jam will thicken and become much darker in colour. Taste and add a little more brown sugar if you feel you need to up the sweetness of the jam.

Give it a stir every so often. Allow to simmer until it is a thickness that you prefer. I like it a little liquid because I am using it as an ice cream topping … but! If you want to make it into a proper jam, just cook it for a little longer.

This can be served warm or at room temperature, and will keep, uncovered in the fridge for up to 2 – 3 weeks.

Apologies for lack of photos – still dealing with loss of hardrive!

Mini Candy Apples

22 Dec

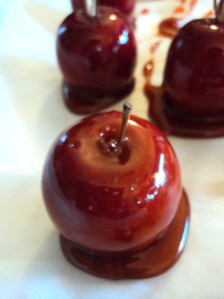
I think I might have candy on my mind! Actually, I kind of do … I am devising a Yee Sang Cake for O’Gourmet Food Hall, and I have been looking at innocuous and innocent fruits with an evil candy-ing glint in my eye. Heheh. I love the candied caramelised oranges I made yesterday, and today, I decided to try another route – candied apples. But not just any apples, mind you, sweet, succulent, fragile miniature apples from Japan. These little babies are just so beautiful – perfect in miniature – that I could not bear to cut them up and cook them.

I remembered growing up in the US, one of the greatest fall and winter pleasures were  candied apples we would get from farm stalls. These candies are the stuff of memory – and the taste of them conjures up cold, crisp weather, puffs of breath, that clean smoky scent in the air, sky blue (or white with coming snow) and immeasurably beautiful. I adore candy apples – for the memory and the joy they represent.

These candy apples – large or small – would make lovely home-made Christmas presents. They are quick and relatively easy, they transport grownups back to the innocent pleasures of childhood, and they can be decorated in all sorts of ways – double dip these candy apples in ground nuts, bits of chocolate, crushed candy cane … let your imagination go wild! Or, serve them as part of a Christmas buffet or dinner. Such pretty pleasures.

Candy apples are not that difficult to make, but you really need a sugar thermometer to evaluate exactly where your candy is going. And you need to be brave (hot sugar is very dangerous), and have a sure hand. Work quickly, surely and have everything at the ready. I love how the hot candy clings to the apple skin – and lightly softens the apple flesh. When you bite into one of these gorgeous beauties, you get crackling shards of cinnamon candy, and then soft yielding apple. Lovely!

Makes 8 – 10 large or 12 – 16 small candy apples

  • 12 – 16 small apples (or 8 – 10 large) – try and get the small ones if you can, but if not, a strong red skinned apple is fine
  • 2 cups sugar
  • 1/2 cup light corn syrup
  • 1/2 cup water
  • 1 tsp cinnamon
  • 1 tsp vanilla (optional)
  • A few drops red food colouring (optional – I used India Tree natural food colour)

Line a baking pan or jelly roll tin with parchment or wax paper.

Wash the apples extremely well. I placed all the apples in a large bowl, squirted in some fruit and vegetable cleaner, and covered with water. I let the apples sit for about five minutes before draining and drying the apples very well.

Place the completely dried apples onto the prepared tin, and piece each apple with a skewer. For the tiny apples, I used double toothpicks.

Set the apples aside.

In a medium saucepan, combine the sugar, corn syrup and water. Stir well to ensure that everything is combined.

Place the saucepan over medium high heat, and bring the sugar/water mixture to a boil, swirling the pan a few times to make sure everything is mixed well. Dont stir – sugar crystals will form, and this is not a great final candy look. Use your candy thermometer, and allow the sugar syrup to come to 149C (300F).

Take off the heat, and have everything at the ready. Sprinkle on the cinnamon, and mix well (a silicone spatula is fine). Add the vanilla and red food colouring (stand back as it will bubble up), and stir well again.

Using an oven mit, pick up the saucepan, and tilt it so that the candy forms a deep well in one side. Pick up an apple by the toothpick, or skewer, and submerge the apple as completely as possible in the candy. As you remove the apple from the candy, twirl it, and place it back onto the parchment paper.

If you are adding another topping, dip immediately before placing back on the parchment paper.

Repeat with the rest of the apples, and allow to air dry for at least a few hours.

Remove the skewers or toothpicks, and serve as is or wrap in parchment paper to give as lovely gifts.

Raspberry Tart

28 Nov

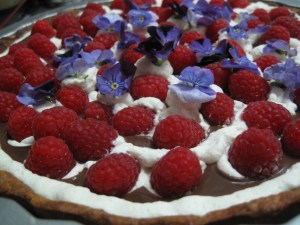
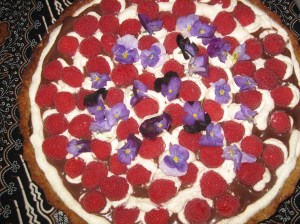
With purple pansiesThis raspberry tart is dramatic, beautiful, romantic and outrageously delicious. Its such a perfect combination of flavours and textures, and its so pretty that people smile when they see it. I love this tart, and I must give credit where it is due – it was inspired by Nathalie’s Gourmet Studio’s amazing raspberry tart, but enlivened with a few of my own happy pleasures. Specifically, dark bittersweet chocolate – and instead of a cookie crust, a pistachio crust inspired by her pistachio ice cream.

This tart is easily made (in its various components) ahead of time, and put together a few hours before serving. The combination of pistachio biscuit crust, dark bittersweet chocolate cream, light vanilla whipped cream and tart fresh raspberries is just outstanding. Crunchy, slightly bitter and nutty, creamy, chocolatey, tart, fresh, cool, bright – decadent, sumptuous, and totally sensual. Can you tell by all the superlatives how much I loved this tart? 😉

The element which brought drama and a really natural beauty to the tart were the flutters of sweet purple flowers adorning the top. My local supermarket sells edible flowers in a little packet – all different colours and they are beautiful. I picked out the purple ones – pansies I think – and together, they made for a stunningly lovely presentation. You can find information on edible flowers at the Cook’s Thesaurus and also some very pretty photographs here and here. Flowers are a wonderful way to make food look visually appealing and beautiful, and after this result, I definitely need to start using them more often!

This tart will serve 10 – 12 people. Its very rich, so you dont need huge slices.

Pistachio Crust

  • 1 cup whole pistachios
  • 2 tbsp powdered/icing sugar
  • 5 tbsp flour (plus additional if needed)
  • 1/2 tsp salt
  • 4 tbsp cold butter
  • 1 egg + 1 egg white
  • 1 tsp vanilla

Using a coffee grinder, processor, your immersion blender – or even a plastic back and a rolling pin to smack them into submission! – grind and pulverise the pistachios with the powdered sugar. The sugar will ensure that the nuts dont go over into a paste – but watch them carefully. I usually grind the pistachios in two batches of 1/2 cup each plus 1 tbsp of powdered sugar.

Put the ground pistachios and sugar into a bowl. Add the flour and salt and toss to combine. Grate the cold butter over the pistachio mixture, and using the tips of your fingers, combine very gently. You could even use a fork left in the fridge to mix everything up. This mixture can be exceedingly delicate so be careful!

Beat the 1 egg and vanilla together, and add to the pistachio-butter mixture. Combine gently and quickly until the mixture comes together into a dough. If its really sticky, add additional flour, a tablespoon at a time until it comes together, but be gentle and work quickly.

Shape the dough into a ball, and refrigerate, covered for at least half an hour.

Preheat your oven to 175 C (350F). I used a 11″ tart pan with a detachable base and non stick surface for this tart. If your tart pan is not non-stick (and really, it should be if it has a detachable base), butter the pan well. Remove the dough from the fridge, and centre it on a the tart pan. Using your fingers, quickly spread and knead and push and prod the dough so it completely covers the pan. Line the tart with parchment/baking paper, and pour in some pie weights. I use dried beans – theyre much cheaper, and they work just as well!

Bake your tart for about 15 – 20 minutes. Remove from the oven, remove the baking paper and pie weights/beans, and place the tart crust back into the oven for a further 5 minutes or so, or until the shell has lightly browned.

Remove from the oven and let cool for 3 minutes or so. Whisk the egg white with a fork in a small cup or bowl. Brush the interior of the shell with the egg white. This is a great trick to ensure that the tart crust is “water proof” and does not become soggy when you add the pastry cream!

Set aside to cool completely before assembly.

You can make the tart crust up to 1 day in advance, and store in the fridge, covered until needed.

Bittersweet Chocolate Pastry Cream

  • 1/2 cup sugar
  • 2 tbsp flour
  • 2 tbsp cornstarch
  • 2 tbsp cocoa powder
  • 1/4 tsp salt
  • 4 egg yolks
  • 2 cups cream
  • About 150 grams (1 1/2 small slab bars) best quality bittersweet chocolate – I used Lindt, broken into pieces
  • 2 tbsp butter
  • 1 tsp vanilla extract

In a medium saucepan, whisk together the sugar, flour, cornstarch, cocoa powder and salt until well combined. Whisk together the egg yolks and cream in a small bowl, and whisk into the sugar-flour mixture until you get a smooth paste.

Place the saucepan over medium low heat, and bring slowly to the boil, whisking all the while. This will take you about 10 minutes – about 5 minutes into this time, stick your thumb in the mixture. It should be like quite hot bathwater. Add the chocolate now, and continue whisking for a further 5 minutes or so. The mixture will start to steam, and bubble, and will have become noticeably thicker.

Check that the mixture will hold a line when it coats the back of a spoon and you run your finger through it. If not, continue to cook for a few minutes further, whisking all the while. It should not take that long to get there, so be vigilant! And remember, the pastry cream will thicken as it cools, so the consistency at which you take it off the stove is not the consistency it will be when you finally assemble the tart!

Remove the saucepan from the heat, and whisk in the butter and vanilla extract. Strain the pastry cream through a fine sieve, and allow to cool to room temperature.

The pastry cream can be made up to 2 days in advance, and stored, covered (with parchment paper spread over the surface for preference), in the refrigerator until needed.

Vanilla Whipped Cream

  • 1 1/2 cups heavy cream – 2 tbsp of cream removed from this amount
  • 1 1/2 tsp agar agar
  • 2 tbsp icing sugar
  • 1 vanilla pod, split, and beans scraped – or 1 tbsp vanilla essence/paste

Measure out 1 1/2 cups of heavy cream. From this amount, measure out 2 tbsp, and remove to a small bowl. Sprinkle agar agar over the 2 tbsp of cream, and set aside for a few minutes to allow the agar agar to dissolve into the cream.

Whisk the remaining cream (by hand if youre macho – with a stand mixer or handheld electric beaters if youre me!) until it just begins to hold soft peaks. Add the reserved cream and agar agar mixture, the icing sugar and the vanilla, and whisk until the cream holds stiff peaks.

The agar agar will ensure that the cream holds its shape for about six hours.

I would prepare the whipped cream just before assembly.

Assembly

  • Pistachio Crust
  • Bittersweet Chocolate Pastry Cream
  • Vanilla Whipped Cream
  • Raspberries – About 1 1/2 pints (1 1/2 small packets)
  • Pretty edible flowers for additional decoration (optional)

Place the tart crust/shell on a good working surface. For the kind of pretty decoration that I created here, I actually centered the crust (in pan) on a small lazy susan that I had from Ikea – this helped move the tart as I was placing raspberries and piping cream.

Pour in the bittersweet chocolate pastry cream, and using a palette knife or even a spoon, ensure that the pastry cream is evenly covering the tart shell, and is smoothed on top.

For this tart, I placed half the vanilla whipped cream into a piping bag with a small round tip (and topped it up when needed). If you want to get extra fancy, you could use a star tip, but that for me would be gilding the lily!

GorgeousPipe a border of whipped cream around the edge of the tart. Now take the raspberries, one at a time, and using the small tip, fill the raspberry with whipped cream, and pipe a small circle of cream at the opening of the raspberry. Place the raspberries onto the pastry cream in circles – working your way from outside in.

Once the tart has been covered with raspberries, begin placing the flowers. Pipe small circles of cream between the raspberries, working from inside out, and on each small circle of cream, place a single flower. You could cover the entire tart with raspberries and flowers, or, as I preferred to do, leave the outer edges with the decadent chocolate cream peeking out.

Refrigerate the tart until ready to serve. Assemble no more than 6 hours before consuming!

When you are ready to serve, remove the tart from the pan, leaving the bottom intact.

Enjoy the pleasures of this most lovely of desserts.

Sayang Scones – Gluten Free Orange Vanilla Scones!

21 Nov

Scones!Today, I had tea with my most beloved of GoddessMothers. We talked, as usual, about love, family, hopes, dreams, secrets, spirit, happiness, joy … well, life in general. As we sat and chatted, laughed and cried, reconnected and restrengthened, we nibbled on these rather luscious orange vanilla scones. They were pretty damn good if I might say so myself (I am munching on one, as I type this, sandwiching some cheddar cheese and damson jam).

The thing is, my GoddessMother just found out she has a gluten intolerance. Basically, she cannot eat anything with wheat in it, or she becomes ill. My friend S also has the same issue, and so I am aware of the need to adapt and adjust recipes for gluten-intolerance. My GoddessMother was coming for tea, which immediately suggested scones… but gluten-free scones? I had this image of hard little rocks of wedgy dough tasting strangely of fake flour… Not an appetising look!

I went out and got some gluten-free flour (mainly maize and tapioca in my mix) – and you need to check ingredients. The flour needs to have some sort of xanthan gum or vegetable gum in it – this helps the softness and stretchiness of the dough. Without it, you should add about 1/2 tsp of xanthan gum, which you can get at any good healthfood shop. Because the scent and texture of gluten-free flour is so different, I decided to really layer on the flavour  – the grated rind of an orange for a bit of brightness, and a tablespoon of vanilla and honey each for some voluptuousness! You could scent it with just about any flavouring you like, but this combination made uniquely delectable sweet scones.

There are a few things you should keep in mind when making these scones. First and foremost, preheat the oven before you start mixing all the ingredients. From the time when you add the (cold) butter to the time the scones go into the oven, should be no more than 10 minutes or so. Work quickly and gently, and keep the integrity of the cold butter intact if you can. I added about 4 tsp of baking powder to the mix because I was going for slightly nubbly crumbly (but still tender and gentle) scones – if you want them fluffier, add 2 tsp more! And when you work with gluten-free flour, add a few tablespoons of milk powder. This adds to the lusciousness of the dough, but also adds to the depth of flavour of the scones.

Makes about 18 scones

  • 3 1/2 cups gluten-free flour
  • 3 tbsp milk powder
  • 1/2 tsp salt
  • 1/2 cup light brown sugar
  • Grated peel of 1 (washed) orange
  • 12 tbsp cold butter
  • 4 – 6 tsp baking powder (the more baking powder, the fluffier)
  • Liquid of up to 10 fl oz (about 1 1/4 cup) which should include: 1 egg, a few tablespoons sour cream and/or yogurt, a few tablespoons of cream (if you like), 1 tbsp liquid honey, and the rest whole milk
  • 1 tbsp (or to taste) vanilla
  • 1 tbsp milk + 1 egg for glaze

Preheat your oven to 215C (425F), and line a jelly roll tin or baking pan with parchment paper.

In a large bowl, mix together the flour, milk powder, salt, and light brown sugar. Mix together gently with a fork. Using a superfine grater, grate the peel of a washed orange into the bowl, and mix together again.

Using a large hole grater, grate the butter directly into the flour mixture and stir lightly to combine and coat the butter with the flour mixture. You will have an oatmealy texture, and everything should smell brightly of orange.

Add baking powder, and mix again lightly.

In a large measuring jug, mix together the egg, a tablespoon each sour cream and yogurt, the honey, and make up to 10 fl oz (approximately 1 1/4 cup) with milk. Whisk this together with a fork to ensure everything is combined.

Add the vanilla (either as essence, paste or vanilla bean scraped) to the liquid mixture and whisk to combine again. Pour over the flour, and using your hands, quickly mix and knead the mixture into a soft pliable dough. Allow to rest, for about 3 minutes, in a cool place (even your fridge). This will allow the gluten-free flour to really come into its own, and makes it much easier to cut out the scones.

Flour (with gluten-free!) a working surface, and turn the dough out onto the surface. It should feel very tender and soft. If you think it needs more flour, add by a tablespoon at a time. Pat out into a 1 1/2 inch thick rectangle, and cut out scones, and place on prepared baking pan. Lightly glaze with milk, and bake in the preheated oven for 10 minutes. Remove from the oven, and turn the pan. Before putting it back in, however, glaze again with egg. This will really encourage browning without burning. Bake for a further 10 – 15 minutes until the scones have risen, and baked through.

Cool on pan for 5 minutes before removing to serving plate. Wonderful with cream and damson jam, with tomato marmalade and cheese, or buttered, hot from the oven. Delicious! Enjoy.


Suji (Semolina) Cake 2

19 Nov

HappySo, I was thinking about the suji cake I made earlier this month. It was quite delectable, and very rustic. Nubbly bits of almonds gave it texture and a deliciously different crumb. It was the suji cake of my memory and my childhood… But there were a few things about it that annoyed. First and foremost, you really had to make this cake with forethought. No popping a few ingredients together, and quickly baking in the oven. The butter and suji had to be left for a while to get acquainted, which is fine if you have the time, but if you really want suji cake right here, right now, could be a bit frustrating.

There was another suji cake of my memory that was slightly smoother, more pudding-y, with the same gorgeous scent, and since I havent been well, and have not had much to do, I decided to try and see if I could come close to making it. I succeeded quite well with this cake, and it took about 20 minutes to put together, and a further 20 – 30 minutes in a hot oven to bake. Easy and quick, this is a different suji cake, but just as comforting, just as golden, and just as open to interpretation – may be even more so.

I used vanilla to scent this cake, but you could certainly go with cinnamon, some almond essence, the grated rind of an orange or lemon… Go with what comforts you, and get semolina that is as fine as possible… and yet, not floury. You want the texture and the bite of the semolina in this cake. Its a big part of what makes it so unique.

If the previous cake was a bit intimidating, start with this one. Its a pleasure to make, and a joy to smell baking in the oven. Its a fantastic little cake to offer friends who are dropping by for tea. It creates happy happy memories, even when you might be struggling with a cold, or tiredness, or just the regular woes of the world. A little sifted icing sugar, or a simple glaze, or a smear of buttercream elevates this cake, but its so good it doesnt really need it. As you can tell from the photo – I was so greedy for a taste, I sliced it straight out of the pan, without waiting to sift any icing sugar on my bit.

This little golden cake seems to say, for that one glorious instant, its OK. Just have some cake, and be happy.

Makes 1 9-inch cake

  • 1 3/4 stick (12 tbsp) butter, slightly softened
  • 3/4 cup icing (powdered) sugar plus an additional / optional 1/4 cup for sifting over cake if you wish
  • 5 eggs separated – 5 yolks plus 4 whites (the extra white can be discarded or saved for a future use)
  • 1 tbsp sour cream
  • 1 tbsp vanilla essence (or 1 vanilla bean scraped – or in fact, and flavouring that seems to catch your fancy)
  • 1/4 tsp salt
  • 1 cup fine semolina
  • 1 tsp baking powder
  • 1 cup ground almonds

Preheat your oven to 175C (350F). Butter a 9-inch cake tin, and line with baking paper. Butter that too, and set the cake tin aside.

In a large mixing bowl, cream the butter until soft and slightly fluffy. Add 3/4 cup icing sugar, and cream well. It will look like the beginning of buttercream. I decided to use icing sugar in this recipe because I wanted the softness of the cake to be highlighted. The fineness of the icing sugar really helped.

Add the 5 egg yolks, one at a time, beating on low speed after each addition until fully incorporated, before you add the next. This cake, while quite quick and easy, also relies on a slow and gentle process of addition of each ingredient. I used a stand mixer, and as I added each egg yolk only after I separated it from its white. This gave the batter a period of slow steady incorporation of each yolk before the next was added.

Once all five yolks have been added, you should have a gloriously golden batter. Add the sour cream and vanilla essence, pausing to combine after each addition.

In a measuring cup, combine the salt, semolina and baking powder, and stir with a fork to combine. Add to the egg-butter-sugar mixture in a slow steady stream, beating with a stand mixer or electric beaters all the while, on medium low. Keep beating for about a minute, and then add the ground almonds in a steady stream, beating all the while.

Once the mixture has been well combined, set it aside for at least ten minutes or so.

Clean your beaters, and in a clean bowl, whisk the 4 egg whites until they hold firm peaks. If you turn the bowl upside down, and the egg whites stay, then they are ready – though I would not suggest you do this unless youre sure, or you have extra egg whites to work with!

Once the batter has sat for the requisite time, fold in the beaten egg whites, in three batches, combining extremely well. You need to make sure the batter is fully incorporated. The egg whites will lighten the colour and texture of the mixture. You shouldnt beat them into the batter, but you dont need to be timid about mixing them in firmly with a spatula.

Turn out the batter into your prepared tin, and bake for 20 – 30 minutes, or until the cake is firm to the touch, and a tester inserted into the centre comes out clean.

Let cool for five minutes in the pan, and then turn out onto a cake rack, and turn right side up again. Cover with sifted icing sugar if you like.

A warm slice of this cake will ease just about anything that ails you 🙂 Enjoy.


Royal Icing

14 Nov

cookieOh Royal Icing, how do I love thee? This stuff is absolutely fantastic for cookies – it sets hard, and any colour you add to it becomes almost jewel like. When its still wet, you can decorate it with sparkles or sugar or dragees or any other edible lovely you can think of. Its also good as a glaze for a pound cake or a bundt cake – it goes on slick and if its quite liquid, it adds just a thin glaze, that will thicken and harden and protect your cake from drying out. You can flavour it (my preference is vanilla, but go crazy – chocolate, almond, lemon, whatever your passion), and its quick and easy to make… IF you have the correct tools.

I only make royal icing with meringue powder. Its traditionally made with egg whites, but even when using organic eggs, I am never quite happy serving raw egg to children, people with compromised immune systems or pregnant women. The risk of salmonella is just too high. Meringue powder is basically egg whites that have been pasturised and freeze dried, mixed with small amounts of sugar, edible gums, alum, salt, vanillin and calcium lactate. It can be used in just about any recipe that calls for egg white, but to be honest, in most recipes fresh egg white tastes better! But in royal icing, I believe it is essential, and I love love love it! You can find it in speciality baking shops, or online, and I always try and have a jar of it around. Baking is just that much easier with it.

That said, you need to be super organised, otherwise the icing will definitely get the best of you. It hardens pretty quickly, so make sure that you work with only what you need at any given time, and cover the rest (or store in an airtight container). This recipe will give you about 3 cups of royal icing – more than enough to ice about 100 – 150 small cookies. I would highly recommend the use of IndiaTree natural food colouring to tint the icing, and a palette knife to spread the icing on the cookie. If you have them, pastry bags, fitted with small-ish tips are incredibly useful for applying the icing to the cookie surface (and if you want to get really fancy, try using tiny tips and decorating the icing with a contrasting colour!).

Gingersnaps!Have a large work surface, arrange all your cookies on a flat sheet, and work about 10 cookies at a time – icing, and then decorating if you wish with hearts, sparkles, etc. Let the cookies air dry for at least 2 hours before packing away. I divided my icing up into 4 equal portions, placed it in plastic take away containers with lids, and dyed it blue, purple, green and pink. I then covered what I didnt need, and placed what I would use in a pastry bag. I clipped the bags top and bottom, to ensure the icing stayed a good creamy consistency as I worked. When I moved on to the next colour, I whisked the icing before I used it to make sure it was creamy and smooth.

Its all a bit complex, but you will soon find your own rhythm and natural feel for it. Practice – even on strips of wax paper, and see how it spreads, how it comes out of the pastry bag, how it moves about when smoothed with a palette knife. Once you play with royal icing, you will look for reasons to play once more!

Makes about 3 cups

  • 1/4 cup meringue powder
  • 1/2 cup warm water and flavouring (I usually put about a tablespoon or two of vanilla in a measuring cup, and then make it up to 1/2 cup with warm water)
  • 4 cups icing sugar
  • 3 tbsp corn syrup (for smoothness and liquidity – not the monetary kind!)

In a stand mixing bowl (or large bowl if you are using handheld mixers), combine the meringue powder with the warm water and flavouring. If you dont want to use vanilla, use whatever flavour strikes your fancy.

Whisk on medium speed until the meringue powder has dissolved into the water, and begins to whip up – it will look just like whipped egg whites, and will have the same glossy, creamy consistency. This should take about 1 – 2 minutes.

Add the icing sugar and corn syrup, and beat for about 5 minutes on medium speed. Add additional warm water, a teaspoon at a time, if the consistency is too thick for your liking.

Colour with natural food colouring, and use immediately.

White Chocolate Shortbread

11 Nov

I am in full on cookie baking mode. I just put about 200 Starry Starry Night cookies into the freezer, waiting to be baked tomorrow, and I decided to sit and think about what other kind of cookie I could make. I love shortbread – full, rich, simple and classic, but I wanted to give it a twist. As I looked in my store cupboard, I realised I had about a kilogram of Valrhona white chocolate waiting to be made into something fabulous.

I wanted to make white chocolate chip cookies, and I still may do that, but I wondered if there was a way to get white chocolate into a shortbread without making a shortbread with white chocolate chips. I wanted the white chocolate to be in every bite, to permeate the shortbread – to live in its essence 🙂 So I thought about it some more, and looked at the ingredients list – pretty simple, really. Butter, sugar, flour. Vanilla for additional flavour if needed, and a touch of salt. Thats it.

Well, I thought, if I were to add white chocolate, I could bring the sugar content down. But how to add the chocolate without melting it? Melting the chocolate and adding it to shortbread would, I thought, mess with the essential crumby-ness of this classic biscuit. It would make a nice cookie, but it wasnt what I wanted. I was still thinking about the sugar though, and then it came to me… Could I somehow crumb the white chocolate so that it was mixed in with the flour? I could blitz with my immersion blender – and lo! It worked!

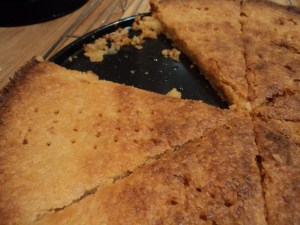
This cookie is astoundingly good. Its surprising too – white chocolate just oozes out of its very heartbeat – but you dont see it when you bite into the cookie, so it taste is unexpected and wonderful. Crispy, rich, scented with vanilla and white chocolate, this cookie is so much more wicked than it looks. Enjoy it very soon, with someone you love very much 😉

Makes 8 triangles from a 9 or 10 inch pan

  • Approx 1 cup (5 oz/150 g) good quality white chocolate (I used Valrhona disks – otherwise, use a good chocolate bar and roughly chop), cold from the fridge
  • 1 1/4 cup all purpose flour
  • 1/4 tsp salt
  • 1/2 cup (8 tbsp) butter, softened
  • 1/4 cup light brown sugar
  • 1 tbsp vanilla

Place white chocolate, flour and salt in a large bowl. Using your hands, mix together until all the white chocolate is completely covered in flour. This is important for the next step, so please dont skip it!

If you are using a food processor or blender, place the flour chocolate mixture into the machine, and pulse lightly until the white chocolate has crumbed and completely integrated into the flour. If you are using an immersion blender, as I did, place the blender into the flour chocolate mixture, and pulse quickly. Move the bowl around, until all the chocolate has been incorporated into the flour. Set aside in the refrigerator while you prepare the butter mixture.

In a stand mixture, or using a hand held mixer, cream the butter until it is light and fluffy. This usually takes about a minute or two. Add the light brown sugar and cream until it is incorporated into the butter. Add vanilla and mix again.

Remove the flour mixture from the fridge, and add to the butter mixture, adding it in a few batches. The dough will come together quickly.

Butter a spring form pan or a tart pan (about 9 – 10 inches across), and place the dough in the centre. Using your hands, quickly push the dough so that it covers the entire bottom of the pan. Score wedges with a sharp knife (I cut it into 8 pizza wedges – you could do it however you wish), and poke holes in it with the tines of a fork.

Refrigerate the prepared dough for at least an hour, or overnight.

Once youre ready to bake the shortbread, preheat the oven to 175C (350F). Bake the shortbread for about 25 – 35 minutes. Check after about 15 minutes, and if its browning too fast, cover with a little aluminum foil to prevent it from burning. After about 25 minutes check again – it should be crumbly and firm to the touch.

Cool, in the pan, on a rack for about ten minutes. Re-score and re-hole if you feel the shortbread needs it! After about ten minutes, cut the shortbread through with an offset spatula or sharp knife, and allow to cool for a further ten to fifteen minutes. Serve immediately and enjoy!

If you have any leftover, cover and refrigerate for up to 2 weeks.