Tag Archives: starter

Twice Baked Caramelised Onion Cheese Tarts

27 Feb

This is a complex, work intensive dish, but the results are nothing short of spectacular, if I might say so myself. The rich buttery puff pastry holds a wonderful creamy base laden with succulent deeply wine-y caramelised onions. Topped with melted raclette, the tart is complicated, delicious and very satisfying. These were created as a tapas for the O’Gourmet Food Hall Spanish red wine tasting, and were paired with a beautiful, organic Crianza 2005.

The onions were caramelised in an entire bottle of Crianza 2005, and cooked down into a thick jammy muddle for four hours. The puff pastry is simple, if you an find an all butter prepared puff pastry. If you cant, there are some amazingly easy recipes for foolproof puff pastry made with your food processor available online. Dont, under any circumstances, use puff pastry that is made with vegetable fat – it ruins everything!

Part of the problem with tarts of this kind is that even though the top bakes up gorgeously, the bottom is often underbaked. I solved this problem by baking the tarts as per normal, letting them cool for a few minutes, taking them out of their muffin tins, and flipping them over onto a baking sheet. I then baked them again in a very hot oven for about ten minutes, until the bottoms were golden and crisp, and just as delicious as the tops! We must always have balance in cooking…as in life.

I used raclette in this tart – a smooth very creamy melting cheese, often added to fondues. The cheese is rich and salty, yet mild. It compliments the onions, without overwhelming them. Baked into the tart the raclette melds with the onions and savoury custard into a molten cheesy joy.

You can serve this tart warm from the oven, or at room temperature within 24 hours. The recipe for the onions makes more than you need. Any extra can be used as the base for a magnificent pasta, a grilled cheese sandwich, or to spark your cooking imagination!

Makes 20 medium sized tarts. Do adjust for your own crowd!

Twice Baked Caramelised Red Wine Onion Tarts with Raclette

Caramelised Red Wine Onions

  • 1 cup (2 sticks – 16 tbsp) butter
  • 8 cups (approximately 8 – 10 medium) yellow onions, sliced in fine half rings
  • 1 bottle red wine (I used QV Crianza 2005)
  • 1/4 cup red wine vinegar
  • 1/4 cup balsamic vinegar
  • 1/2 cup light brown sugar (organic if possible)
  • Pepper and salt

In a large, heavy pan, over medium low heat, melt the butter. While the butter is slowly melting, prepare the onions. Peel, cut in half (from stem to root), and slice thinly. I always keep root intact to hold the onion together while I slice it.

Once the butter has melted, add the onions, and toss so that they are covered completely by the butter. Add about half a bottle of wine, the red wine vinegar, balsamic, sugar and a lot of pepper and a bit of salt. Stir well to combine, and cover the pan with a tight fitting lid. Reduce the heat a tad, and allow the mixture to simmer, stirring every ten minutes or so for about an hour.

By the end of an hour or so, the onions should be stained dark red with the wine, and quite soft. Remove the lid, add the remaining wine, stir well, and allow to cook down for another three hours or so, stirring every half an hour to make sure the onions dont burn. You can judge when you feel they are ready, but do try and give them as much time as possible. They will turn a deep dark wine red.

When the onions are ready, take off heat, and allow to cool to room temperature. Taste and adjust for salt and pepper.

These may be kept, covered, in the fridge, for up to 3 weeks.

Assembly

  • 5 to 6 sheets all butter puff pastry (enough for 20 squares to fit muffin tins)
  • Caramelised onions
  • 4 eggs
  • 2 cups cream
  • Salt and pepper
  • 300 gm raclette or other melting cheese, sliced thinly

Preheat the oven to 180C (350F). Spray a muffin tin pan with non stick spray (I used an organic canola oil). Line a large baking sheet with parchment or baking paper.

The puff pastry should be quite cold, yet malleable. If you have made fresh puff pastry, make sure you pop it in the freezer for about 5 minutes before cutting it. Cut the puff pastry into squares larger than the width of the muffin tin and place one square in each. I like the squares with the edges rough and untamed. I tend to like these tarts look rustic, but if you prefer an ordered tart, by all means cut big rounds.

Pierce the pastry with a fork all over (particularly the bottom), and bake in the oven for about 10 – 15 minutes until light golden.

Meanwhile, whisk together the eggs and cream, season with a bit of salt and pepper, and place in a pouring jug.

Once the pastry has been baked to golden brown, remove from the oven and let cool for a few minutes.

Place a tablespoon or more of the caramelised onions in each tart, and pour over the custard mixture. Bake again in the oven for about 1o minutes, and then remove and top the tarts with the sliced raclette or other melting cheese. Bake again for a further five minutes or so, or until the cheese has melted and is starting to bubble, and the custard is just set.

Remove the tarts from the oven and allow to cool for about 10 – 15 minutes. Remove from the muffin tins, and place onto the prepared baking pan upside down. Bake in the hot oven for a further 5 – 10 minutes, or until the bottoms are crispy and browned.

Allow to cool for at least 10 minutes before serving, or serve at room temperature within 1 day.

Enjoy!

Red Wine Poached Figs Baked with Fourme D’Ambert

27 Feb

I could eat these figs all day. They are sensuous, sweet, sticky, salty, just a little burnt… totally delectable. I created them for the O’Gourmet Food Hall wine tasting, and they were paired with (and poached in) a Luberri 2009. The figs interacted extremely well with the wine, opening it up and accenting its unique properties.

This is an easy dish to prepare, as long as you take your time, and are aware of the quality of ingredients. I used large, soft Turkish dried figs to start with, and slowly poached them in a bottle of red wine until they were succulent and very soft. I then drained them, and allowed them to cool for a few hours.

When they were ready, I split them sideways, and stuffed them with a dream of a cheese: one of the oldest French cheeses, Fourme d’Ambert. This blue is nutty, semi-hard and complex. Its manufacture dates back to Roman times, and it has an ageless grace and elegance. Baked stuffed in the figs, the cheese goes soft and slightly burnt around the edges, capturing and contrasting with the sticky sweetness of the figs. Fourme d’Ambert also has wine notes, so it also picks up and amplifies the flavours of the wine the figs have been poached in.

These gorgeous babies can be prepared a few hours in advance, and still be incredibly delicious. I must admit though, they are phenomenal straight out of the oven, with the Fourme d’Ambert bubbling away, and the scent of wine and cheese tantalising. I would serve a few with a bitter salad as a starter.

I made 20 figs for the wine tasting. Do adjust to your own crowd 😉

Red Wine Poached Fig baked with Fourme d'Ambert

  • 20 large, soft dried Turkish figs
  • 1 bottle Luberri 2009 (or other complex red Spanish wine)
  • 300 g Fourme d’Ambert (or other semi-hard blue cheese)

Place the figs in a large saucepan. Cover the figs with wine, and bring to the boil over medium high heat. As soon as the wine is boiling, turn the heat down to medium low, and poach / simmer the figs for at least 20 – 30 minutes or until very soft and yielding.

Drain the figs out of the wine (reserve the wine for the optional sauce below), and leave to cool for at least 2 – 3 hours, or even over night.

Preheat the oven to 180C (360 F). Line a large baking sheet with parchment paper.

Using a scissors or very sharp knife, split the figs in half side ways – though if you really want to do it top to tail, who am I to stop you?

Stuff about a tablespoon of cheese in the centre of each fig, and place the fig on the baking sheet, stem side up.

Once you have stuffed all the figs, bake in the hot oven for 5 – 10 minutes, until the cheese has melted, and is bubbly and starts to burn just around the edges. The wine soaked figs will also become shiny and sticky.

Serve hot, or at room temperature.

These figs will keep for 2 – 3 days, covered in the fridge. To serve, bring to room temperature.

For optional wine glaze:

If you are serving the figs as a starter, you could glaze them with a reduction of red wine.

  • Remaining wine from poaching figs
  • 1/2 tsp cinnamon
  • 1 tbsp honey
  • 1 tbsp balsamic

In a medium saucepan, combine the wine, cinnamon, honey and balsamic. Simmer over medium low heat until reduced to a thick shiny glaze. Taste and adjust seasoning. Drizzle over figs just before serving.

Marinated Red Peppers with Feta + Smoked Paprika

26 Feb

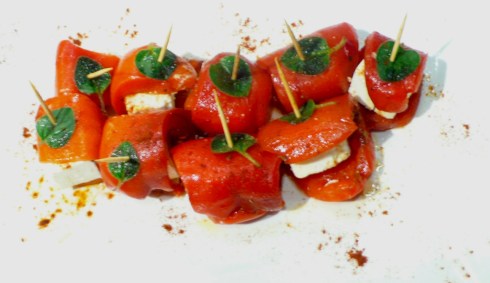
These marinated red peppers with feta and smoked paprika were the second tapas served at the recent O’Gourmet Food Hall Spanish red wine tasting. They were paired with a Gotes 2009, and the sweet-salty combination of the peppers and feta served to deepen and highlight the wine. The smoked paprika added depth and flavour without overwhelming the lush combination.

While this seems to be an easy dish, if you are preparing the peppers from scratch, it can be time consuming. When using fresh pepeprs, I blister them in a very hot oven, or over the fire on the stovetop. However, I have found that jarred or canned peppers work just as well – as long as you ensure an overnight marination in spices and herbs. I also feel that this is best assembled just before serving – the creaminess of the feta can leech into the peppers, and you end up with a scraggly looking mess. Put it all together a maximum of an hour before you serve it, and it stays gorgeous and clean. And as with the tapenade, a little fresh herb (in this case an oregano leaf) adds a pretty texture and taste to the final presentation.

This is a really easy and yet visually pleasing starter. You could serve it with, or even atop some french bread toasts, or you could add a salad and serve a few plated for a pretty starter.

I made approximate 20 individual tasters, but you could make as many as you please, by adjusting the amounts of peppers and feta.

Marinated Peppers with Feta and Smoked Paprika


Marinated red peppers

  • 1/3 cup extra virgin olive oil (organic if possible)
  • Salt and pepper
  • 1 – 2 tsp mixed Italian herbs
  • 5 – 6 garlic cloves, sliced thickly
  • 1 tsp smoked paprika
  • 1 tbsp balsamic vinegar
  • 4 – 6 jarred / canned / blistered red peppers

In a large bowl, combine the olive oil, salt and pepper, herbs, garlic, smoked paprika and vinegar. Taste and adjust seasonings.

Prepare the peppers. They should be slick and soft. If you have blistered/roasted them from fresh, ensure that all seeds have been removed, as well as the skin. I use scissors for this next step. Cut / slice the peppers into long strips. You want something that will wrap itself around a cube of feta.

Place the strips of pepper into the olive oil mixture, cover and allow to marinate for at least 2 – 3 hours, preferably overnight.

To serve:

  • Marinated red pepper strips
  • Goat’s milk feta (approximately 2 cups), cubed
  • Fresh oregano
  • Toothpicks
  • Additional smoked paprika

Choose your prettiest red pepper strips. Wrap a strip of red pepper around a cube of feta, and place an oregano leaf on top. Skewer with a toothpick, and arrange prettily on a serving plate. Just before serving, sprinkle with additional smoked paprika for a deep bass note.

Tapenade with French Bread Toasts

26 Feb

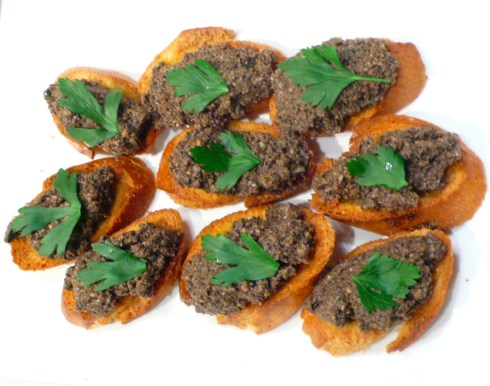
I made this tapenade for a wine tasting at O’Gourmet Food Hall. It was paired with a Santanegro Syrah 2008 – a light red wine. I think tapenade is one of the most delightful of the vegan/vegetarian starters – its so easy to make, and yet has such complex flavours, particularly if you get the balance right. Because its so simple, its important to ensure that all the components are beautifully presented.

I used a really good quality french bread for the toasts – sliced on the diagonal, and then brushed with a mixture of virgin olive oil, Maldon salt and a few cloves of garlic. Baked in the oven until golden brown, they were then covered with the tapenade, and a small sprig of parsley. Obviously, the parsley isnt neccessary, but it makes it look so pretty and elegant.

I love the lemon in this tapenade. It brightens the dark complexity of the olives and oil, and brings a freshness and clarity to the taste of the paste. You could use this as a starter, or in so many other things – a few tablespoons mixed with angel hair pasta gives you a quick and satisfying dinner; a teaspoon or so spread on bread is the basis for a sandwich with intriguing depth, and as a dip for crudites, this is strong and delicious.

This recipe makes about 2 – 2 1/2 cups. I made 20 appetisers and had enough left over for a snack later!

Tapenade with French bread toasts

For the Tapenade

  • 2 cups black olives (drained and pitted if needed)
  • 1 cup green olives (drained and pitted if needed)
  • 1/4 cup extra virgin olive oil (organic if you can find it)
  • 1 lemon
  • 2 cloves of garlic
  • 2 – 3 tbsp caper berries

In a large bowl, combine the olives, about half the olive oil, the grated zest of the lemon (I use a Microplane lemon grater), the garlic cloves cut in half, and the caper berries. You can use a food processor to blitz everything, but I actually like using my immersion blender. It gives much more control, and you can decide when the tapenade is of the consistency that you prefer. I personally like it a little chunky, but you can process until almost smooth.

Squeeze the juice of half the lemon into the mixture, and stir well. Taste and adjust flavourings. You shouldnt need salt as the the olives are usually quite salty, but if you really want it, add. I usually adjust the lemon a little, or the caper berries.

Cover the tapenade with the remaining olive oil, and set aside for at least 2 hours, or overnight to let all the flavours meld.

For the toasts and to serve

  • 2 small (or 1 large) loaves fresh, crusty French bread
  • 3 – 4 tablespoons extra virgin olive oil
  • large pinch of Maldon Salt
  • 2 cloves of garlic, sliced thickly
  • Small bunch of Italian parsley

Preheat your oven to 180C (350F). Line a large baking sheet with parchment or baking paper.

Slice the loaves on the diagonal, and place the sliced bread on the baking sheet.

Mix the olive oil, salt and garlic together in a small bowl, and using a pastry brush, brush the bread with the olive oil mixture. Add extra olive oil if needed, but you dont want it too oily.

Bake the toasts in the oven for approximately 5 – 10 minutes until light golden.

Can be prepared up to 2 days in advance.

To serve, spoon about a tablespoon of tapenade on each toast. Top with a small sprig of parsley, and serve.

Enjoy!

Spicy Cheese Crackers

27 Dec

I really dont like the crackers that you can get at the stores. They taste like they are full of chemicals. And when the process of making crackers is so very simple, its a wonder that we buy them at all. This past Christmas, I was going to dinner at Jobby’s house. I wanted to bring some lovely but simple things, as I had been immersed in cooking these last few days. I decided on a raspberry-gooseberry fool, which is just whipped cream, scented with vanilla and a touch of icing sugar, folded into cooled stewed raspberries and gooseberries. That sweet tart cool creamy combination is beautiful – and it takes minutes to make.

I knew Jobby would probably make her wonderful hummus. So crackers were a good addition – and they are delicious enough to eat on their own. Unfortunately I did not get a photograph because Nana chowed down more than half before we even left the house! But suffice to say, these crackers are wonderful – such a complex blend of flavour. You could spice them up with anything you like, but I used chili powder, mustard seeds, and English mustard powder. The combination is divine, spicy and cheese-y all at the same time. The crackers are crisp and flaky and can be cut into rounds, squares, or whatever your heart desires. Poke a few holes in them, pop them in a hot oven, and watch them brown up and puff a little. Beautiful.

These crackers will keep, in an air tight box, for about a week, but if you have a Nana around the house they wont last!

Makes about 100 crackers, depending on how you cut them

  • 1 cup bread flour (OO flour)
  • 1 cup polenta
  • 1 tsp salt
  • 1 tsp baking soda
  • 1 tsp chili powder
  • 2 tsp mustard seeds
  • 1 1/2 tsp English mustard powder
  • 1 cup cheese – cheddar/parmesan mix
  • 3 tbsp cold butter
  • 1 cup buttermilk

Preheat the oven to 190 C (375F).

Line a baking sheet with parchment paper.

In a large bowl, combine the flour, polenta, salt, baking soda, chili powder, mustard seeds and English mustard powder. Toss to combine.

Grate the cheese over the flour mixture, and stir well.

Grate over the cold butter, and stir again, gently.

Pour over the buttermilk, and combine. Turn the dough out onto a working surface and knead, gently until it all comes together.

Form the dough into a ball, and refrigerate, covered for about half an hour.

Once the dough has rested and cooled, divide it into quarters.

You can now roll the dough out very thin, and cut it into shapes, or roll the dough into a log, and slice very thinly.

Arrange on the baking sheet, and using the tines of a fork, poke a few holes in each cracker. This is optional, but it will help keep the crackers flat and less puffy.

Bake for about 8 – 10 minutes, or until the crackers are golden and cheesy.

Let cool for at least 10 minutes before gobbling up!


Quick French Onion Soup

18 Nov

Quick French OnionI am sick today. There seems to be a bug going around, and somehow, I caught it. I coughed all of yesterday – miserable, tight-chested, and painful. I slept for ages this morning, woke up and decided I needed some soup. But when I went to the kitchen, all I had was 3 onions …  A very sad state of affairs, but I was planning on shopping today! And instead, I am sick!

So I decided to make a French Onion soup. This is not a fancy one, with toasted bread rubbed with garlic, and gruyere cheese. Its basic, simple, warming and deeply comforting. If you have cheese, grate some over your toast, but if you want to keep it vegan, dont add any cheese (or butter in the beginning) at all. It will still taste delicious, and reach all those cold miserable places.

This makes about 4 servings of soup. You could easily double it for a dinner party, and toast a baguette, and pile over some stringy gruyere. Broiled in the oven, its a decadent feast – but when youre sick, as I am today, its just too much effort. I toasted a really lovely dark brown slice of bread, placed it in the bottom of the bowl, and grated some parmesan and cheddar over – its what I had. I then ladled the soup over, and allowed the bread and cheese and hot oniony soup to meld and interact. Beautiful. Comforting.

Definitely feeling a little bit better 🙂

Serves 4. Doubles easily.

  • 3 large onions (about 1/2 kg) sliced very fine
  • 1 tbsp olive oil
  • 1 tbsp butter (or an additional tbsp olive oil if youre keeping it vegan)
  • 1 heaping tbsp flour
  • 4 cups of hot vegetable stock – I used 1 organic vegetable stock cube dissolved in 4 cups of boiling water
  • Salt and pepper
  • 1 slice dark brown bread, well toasted, per serving
  • A bit of parmesan, cheddar or gruyere, grated

Peel the onions of their brown skin, and slice really fine. I used a mandolin for this job, and it was fast, easy and really exact. If you dont have one, use a sharp knife and try and get the onion slices as fine as possible.

Place a medium saucepan over medium heat, and warm the olive oil and butter (or just olive oil) until the butter has melted. Add all the onions, and stir to coat the onions with the oil/butter mixture. Turn heat down to medium low and saute the onions until well browned for at least 20 minutes or so. This is the ultimate trick to this soup – you need to be really patient with the onions. They need to cook and cook and cook until they are deeply brown because this is the basis of the flavour and strength of the soup.

They will let go of some liquid, this is fine, and then they will get glossy and soft. Keep at it. They will start to turn golden, stir a little and let cook further. You want a deep dark brown – teak or coffee with a touch of milk colour. If you prefer a lighter soup, obviously, you can let the onions go only to light golden, but you will miss the deep layered flavours that you would get if you keep your nerve and just keep cooking them. Without letting them burn!

And you dont have to stir all the time. The occasional stir is fine, whilst you make yourself a cup of tea, play with the cat or take some vitamins. Let the onions do their own job. Just keep the heat low and steady, and stir sometimes to make sure nothing is burning.

Once the onions are cooked to your liking, sprinkle over the flour and stir well. Cook for a few minutes to allow the flour to amalgamate with the onions and fat. This will ensure a creamy thick soup without a raw flour flavour.

Pour over hot vegetable stock, stir well, semi cover the pot and allow to simmer for about half an hour. Taste, add some pepper and a touch of salt.

YumMeanwhile, toast your bread till quite dark. Place in a soup bowl (you might have to shove it in there, this is fine), and grate some cheese over. Not too much as it can be overwhelming, but enough to add flavour and interest to the soup.

Ladle hot soup over the toast and cheese just to cover, and allow to sit for a minute so that the soup and toast and cheese get firmly acquainted.

Serve to those needing comfort.

Fig Walnut Tart

24 Aug

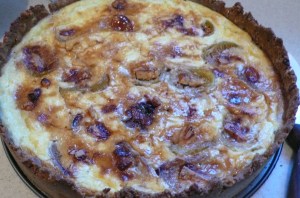
This tart was something I dreamed up in my imagination, and it turned out better than I could ever have imagined! I made it for my sister’s birthday feast, but it would be phenomenal as a meal on its own – perhaps with a simple side salad of arugula + tomato. It would also be a stunning first course – served either in slices or in little individual tartlets – you could use muffin pans. Its savoury and sweet, incredibly rich, and yet surprisingly light. If you like figs, this is nirvana.

My sister’s husband, BSA, and I were chatting about how I would incorporate all the fresh purple figs that are growing on their tree into my sister’s feast. They are beautiful, and really needed to be used up … I also found some pretty green Calamyrna figs at Whole foods, and I added those too! BSA suggested walnuts – I have to admit I am not a huge fan of the nut in and of itself. I find it bitter and powdery in a funny way. But incorporated into a crust, now thats a different story!

And the figs had to sit in something. I first thought of smearing the base of the tart with blue cheese, but the blue goat’s cheese I found wasnt really blue, and didnt meet my fancy. So instead, I mixed together fresh mascarpone, ricotta and a touch of creme fraiche, with a few eggs. The eggs and ricotta lightened the base – it became almost fluffy, and yet retained a beautiful clean sweetness. Bland, but a perfect counterfoil for the rich luscious figs. I think I was inspired by the wonderful open faced ricotta and fig sandwich I had at Le Pain Quotidien!

I poached the figs in a bit of sweet dessert wine and then reduced the poaching liquid to a thick syrup. I sliced the figs in half, and stuffed each of them with strong soft goat’s cheese and literally tucked them into the pillowy bed of ricotta and mascarpone. They sunk in a little, and I baked the whole thing until the filling was puffed, and the centre didnt jiggle any more. About ten minutes before I thought it would be done, I poured over the poaching syrup and let it bake in.

This was wonderful at room temperature, and really superb the next day, cold. This tart will keep, and the figs are transformed by their bedmates. This is a sensualist’s meal – textural, full of tastes, layers of flavour, and silky smooth. Serve it to those you love. They will be wowed.

I baked the tart in a 9 3/4 inch springform cake pan, and just released the edges when serving. It made for a rustic beautiful tart, but use whatever you have!

Serves 8 – 12 people

For the walnut crust

  • 1 cup chopped walnuts
  • 1 cup whole wheat pastry flour (for extra nuttiness, but if you only have regular flour – use that!)
  • 1/2 – 3/4 tsp salt
  • 1 tsp cracked black pepper
  • 1/2 stick (4 tbsp) butter
  • 1 egg

In a food processor (or, as I did, in the wonderful attachment mini processor that came with my sister’s new immersion blender!) pulverise the walnuts until they are a fine coarse meal. In a small bowl, mix together the walnut meal and the flour, and add salt and pepper. Use your judgement when it comes to the salt – I eventually added about 3/4 of a teaspoon, but I was using unsalted butter… you might find you need less if you are using salted.

Grate the butter into the flour mixture, and using your fingers, mix until you have sandy pebbles.

Crack an egg into the bowl, and using your fingers, combine the egg into the flour-butter mixture. You will get a slightly sticky dough. Knead this a couple times in the bowl, and then refrigerate to allow all to come together for about 10 minutes or so.

Preheat the oven to 190 C.

Take the dough out of the fridge, and on a floured surface, roll out. You might find this is difficult, but do your best. The dough will be crumbly. Transfer to a tart pan, or a 9 – 10 inch springform cake pan. Use your fingers to spread out the dough across the bottom of the pan, and up the sides. Its okay if the dough tears, just use slightly wet fingers to patch it up again.

Put the pan in the fridge for 5 minutes to let the dough set, and then prick the dough all over with the tines of a fork.

Bake for 15 – 20 minutes until the pastry is lightly browned. The butter will have foamed up on the surface of the pastry – this is okay, it will incorporate back in once you take the pastry out of the oven. Cool for at least 20 minutes before assembling.

For the filling + assembly

  • 1/2 cup sweet dessert wine (or port wine, or red wine, or white wine, or if youre not into wine, grape or apple juice!)
  • 1/2 cup water
  • 1 tbsp honey
  • 10 – 12 ripe fresh figs, whole
  • 1 cup mascarpone
  • 1 cup fresh ricotta
  • 2 heaping tbsp creme fraiche or sour cream
  • 2 eggs
  • 1/2 cup or so soft goat’s cheese (or blue cheese if you would rather – Cashel Blue might be wonderful here!)

Place wine, water, honey and figs in a medium saucepan that will fit all the figs snugly. Over medium heat, bring the wine to a boil, and then turn heat down, and simmer for about ten minutes. Remove the figs from the wine and allow them to cool separately.

Bring the wine mixture to the boil, and boil steadily until reduced to a very thick syrup. Set aside.

Beat the mascarpone, ricotta, and creme fraiche together until just combined. Beat the eggs into the mixture, and taste. You might want to add a little salt and pepper, but I didnt think it needed it.

Preheat the oven to 190 C

Pour the mascarpone mixture into the cooled walnut tart shell.

Chop the goat’s cheese into bite sized chunks, slice each fig in half from stem to bottom, and stuff the centres with a piece of goat’s cheese. Lay the figs into the mascarpone mixture gently, cut face side up.

Bake the tart for about 30 – 45 minutes, or until the centre does not wobble any more. About ten minutes before it is done (when you see a bare wobble), pour the reserved wine syrup over.

I really liked this cooled to room temperature before serving, particularly in the hot summer night, but if you want to serve it warm or hot, please let it sit for at least 10 – 15 minutes before slicing and devouring!

Enjoy!!!

Tomato Water

10 Aug

Tomato WaterYes, it seems I have tomatoes on the brain. When they are in season, local, bright red, juicy and fresh, there is absolutely nothing better. This fruit, which is commonly treated like a vegetable, is the base of so many gorgeous dishes. I love tomatoes, and I would have them every day, in so many different ways, if I could. But I have always been fascinated with one tomato preparation. A soup of a sort, tomato water, clear and lightly yellow in colour, but completely imbued with the scent and taste of tomato. You can serve this cold or hot, as a clear vegetarian consomme. You can also use it as a drink, adding it to gin and vermouth in a dirty martini, or with vodka, for a bloodless Mary!

I have always been fascinated by the science of this preparation. You use egg whites as a filter – boiling the egg whites with tomato puree. The egg whites become thick and pink, and suck up all the colour in the tomato puree while at the same time leaving behind all the flavour. When making the tomato water, I used the egg yolks to make a phenomenal garlic aioli which I used as a base for an open faced grilled cheese sandwich. Suddenly, grilled cheese and tomato soup have a whole new presentation – and its amazing! Your taste buds recognise what you are eating, and enjoy it, but this is not your old school dish. Its new, and fresh, and totally delicious.

This takes only a few minutes to put together. Its really fun to do with young people because they are very pleased with the alchemy and magic of the cooking. Easy, and haute. A perfect synergy 🙂

For about 2 – 3 cups of tomato water, you will need:

  • About 3 lbs / 1.2 kg / 6 – 7 cups chopped tomatoes (I used a mixture of ripe roma and plum) – seeds and skins and all
  • 1 tsp salt
  • 4 egg whites, beaten a little

Chop your tomatoes well, and then puree them, using your food processor, immersion blender, or blender.

Place the tomatoes, salt and egg whites in a medium saucepan. Over medium high heat, whisk the egg white – tomato mixture until it all comes to a boil.

Immediately reduce the heat to low, and allow to simmer for five minutes. Dont touch it, mix it, stir it or annoy it in any way.

While the tomato mixture is simmering, prepare a bowl, with a sieve over it. Line the sieve with very fine damp cheese cloth.

After about five minutes of simmering, you will see a thick, foamy, white crust over the water. Pour everything into the sieve, and allow to drain for at least 15 – 30 minutes.

You will have a perfectly clear tomato consomme. Delicious, healthy and a joy to present to those you love.

Make a fantastic grilled cheese and tomato soup that will blow people’s minds!

The tomato water will keep for up to 1 week, covered, in the fridge.

Port Wine Poached Figs Oven Roasted with Cashel Blue

25 Jul

Figs roasted in port wine with Cashel BlueAs I have written before, I am being inspired by things all around me. Recently, I read a post on Facebook about oven roasted figs with a gorgonzola sauce and thought, hmmmm, I want to do that! But of course, I wanted to work with what I had, and I wanted to make it perfect for my taste. This dish seems to be “high-falutin gourmet food” (as my friend Jobby said), but actually, its so easy to make, and so dramatic and beautiful to present. I adore figs – they have a luscious, sensual earthy appeal. They are perfect just as they are, but add port wine, a touch of spice, and some deep oven roasting and you get ambrosia. These can be served as starters or main courses, and one per person with a bitter green salad is perfection. Though the greedy ones in your family might demand more, so be prepared!

You could actually make these with dried figs, especially because of all the poaching in wine. But I prefer fresh figs… there is something so inspiring about these deep purple swollen fleshy fruits. And obviously, something downright sexy. I used to really dislike figs, but as I grew older, they somehow just grew on me. I am still not a fan of dried figs – the intensity of all that flesh and sugarsweet is just not for me. But fresh figs have a unique place amongst fruit, and they are surprisingly good for you too – a rich source of potassium, dietary fibre, and manganese. That, and they are yummmmmmy.

This recipe is really easy. You dont even need measurements, though if you are a stickler, I have given you some broad strokes. Work with what you have. Port wine for me, juice for you and red wine for someone else. Add or subtract things you like and dont like. Figs are precious. Make them as YOU want them, not someone else!

For 4 people you will need:

  • 4 – 8 figs
  • 4 cups (2+1+1) port wine (you could make this up in a variety of ways – port wine + red wine + a berry based fruit juice or use all of one or a mix)
  • 1 cup water
  • 1/2 tsp mixed spice (or cinnamon or nutmeg)
  • 1 tbsp butter
  • 2 tbsp old balsamico vinegar
  • 1 tsp Cashel blue (or other blue cheese) per fig

In a large saucepan or frying pan, over medium-high heat, poach the figs in 2 cups of port wine and 1 cup of water for about 20 minutes. You want the figs to plump up and the port wine to reduce by at least half. If you are using dried figs, add about half an hour of poaching time, at a slightly lower heat. You can leave them largely unattended, though it is nice manners to go over a few times, and bathe them in juices 🙂 About 10 minutes in, sprinkle over the mixed spice.

When the figs look lovely and thick and plump, take them out, and transfer to a heatproof serving pan. Try and get the figs to fit just nicely in the pan – something too big will make the gorgeous juices dissipate and possibly burn. Leave to cool for a moment.

Meanwhile, pour another cup of port wine, or some juice, into the bubbling thickened juices from the poaching. Boil this down to a very thick jammy sauce. As it thickens, stir in the butter to give more body, and taste – you might want it a bit peppery or slightly more spicy. If so, adjust accordingly. Set aside to serve with the figs.

Using a kitchen scissors, cut the figs open from the top. I usually cut them with one “half” bigger than the other, and then split this “half” in two, so I have a three petaled fig. Open up the fig, and drizzle some very old very delicious balsamic vinegar in the centre. Pour the remaining port wine into the pan, and oven roast the figs for about 30 minutes, in a 180C preheated oven.

Take the figs out of the oven, and switch on the broiler. Stuff the figs with a teaspoon (or more if youre feeling wealthy!) of Cashel blue (or Stilton or other blue cheese), and broil for 5 minutes or so or until the cheese is melted and bubbling.

Serve with a walnut and rocket salad, with the port wine sauce on the side.

Divinity.

Review – Nathalie’s Gourmet Studio

28 Jun

My friend, goddessmoments, had posted a photo on her FB page which showed what looked like an amazing restaurant that has just opened in Solaris Dutamas, Nathalie’s Gourmet Studio. We decided that we wanted to try it out and made plans to go today. They are open from 9 – 6pm, breakfast being baked goods and from 3pm onwards, tea and cakes. There was not a huge lunchtime crowd there (yet) but once people get to know the quality and level of cooking thats available, you will probably have to end up making reservations! Its a small place – about 6 – 8 tables, with seating outside that is not prime at the moment because of the construction going on next door. There is also a huge open plan kitchen where Nathalie runs cooking classes (AngelKitten and I are going for a macaron class soon!) as well as an organised professional kitchen which you can see from the seating area.

When we arrived at 2pm, we were greeted and seated quickly. The menu is simple – 5 or so of each starters, main courses and desserts, as well as a small children’s menu. I love reading menus, and this one did not disappoint. You can see the mind of the chef working in the menu, and it was intriguing. The place settings are beautiful and simple, yet elegant and functional. It made us feel welcome, and everything we needed was accessible immediately.

Nana and AngelKitten ordered juice, which came in beautiful little individual carafes. AngelKitten had orange (which I think may have been blood orange) and it was superb – the essence of orange, tart, sweet, sour, perfection. Nana had pineapple, which was sweet and gorgeous. I love the care and thought that has gone into the presentation here. It makes you feel special.

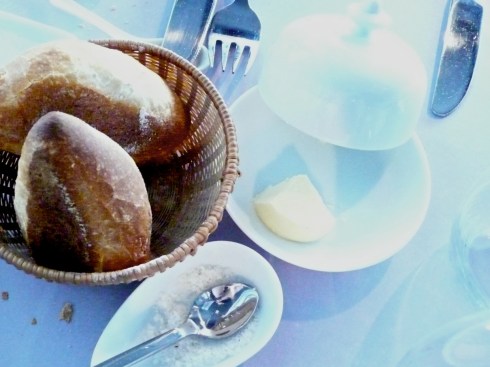
They served us gorgeous, crusty baked rolls, with sweet butter sprinkled with sea salt. I think you can tell the quality of a chef’s kitchen by their attention to details like the bread – and this one was perfect.

I had a starter for my mains – the eggplant three ways. It was wonderful! First there was a little toast with savoury eggplant and raw tuna. Just an astonishingly lovely combination of flavour. Then there was an eggplant ice cream – savoury, cold, a hint of sweetness, silky on the tongue and wonderfully challenging for those of us who think of icecream as dessert. For me as a cook, it was a great exploration of seeing eggplant in a different way. And finally, there was a beautiful eggplant jelly, with an eggplant and cream espuma or foam. It was my favourite. The creamy dusky flavour was essence of eggplant, and made me think of making an eggplant soup that would have those flavours in it. Not only was this a mouthwatering dish, but it was visually stunning.

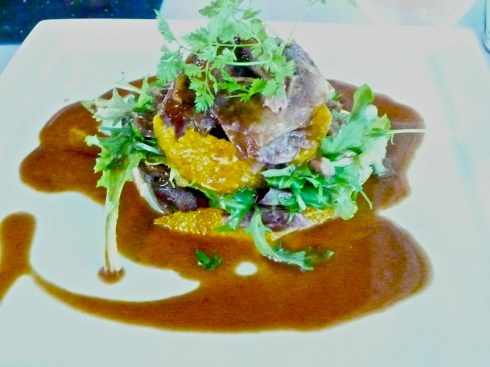
Nana’s main course was the duck confit. He said it was delicious. Beautifully cooked duck, orange, and caramelised onions. He loved the balance of flavours, and the satisfaction of a hearty meal that was presented absolutely beautifully.

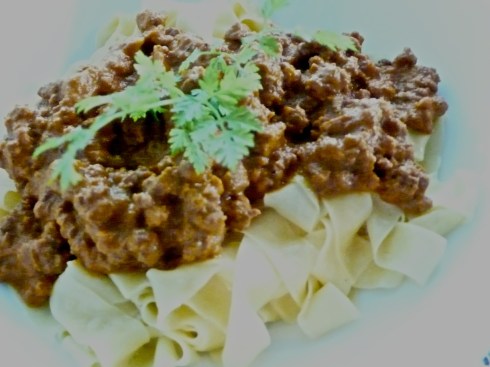
AngelKitten was looking for a simple main course so she could concentrate on dessert. She ordered from the children’s menu (since she is 12 plus 8!) and had the bolognaise tagliatelle. It was a very large portion for a child’s size! But she said it was really good – tomato-y but not too much so, meaty and flavourful without being too complex. Exactly what a child’s palate wants. She really wanted to try the chicken nuggets reimagined, but they did not have them, so we will have to go back again!

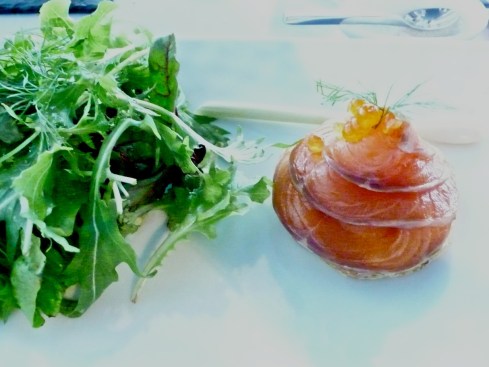
And finally there was another starter, salmon blini with lemon grass cream and a salad. Beautiful, simple, light – the lemongrass cream was sparkling – such a taste sensation with the silky unctuous salmon! Stunning presentation too.

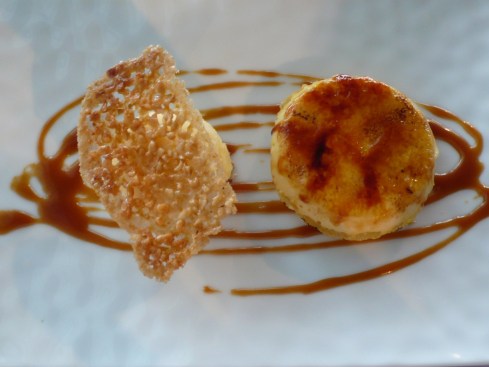
And then… came dessert! AngelKitten and I had done what we always do – check out the dessert menu first, and then thought about the main course! She had an utterly superb orange creme brulee with caramel sauce, and a blood orange sorbet. Such lovely contrasts – the icey cool sharpness of the sorbet – light and airy – sweet yet tangy – and the creamy sweet meltingness of the creme brulee. The whole plate was so well thought out. Everything complemented and contrasted in interesting ways. A delightful crunchy tuile sat atop the sorbet, sharp and crackly and sweet, light and icy and tangy. The creme brulee sat on a vanilla cookie crust – the texture of the crust the perfect balance to the richness and wobbly delights of the creme. So very very very good, and so satisfying.

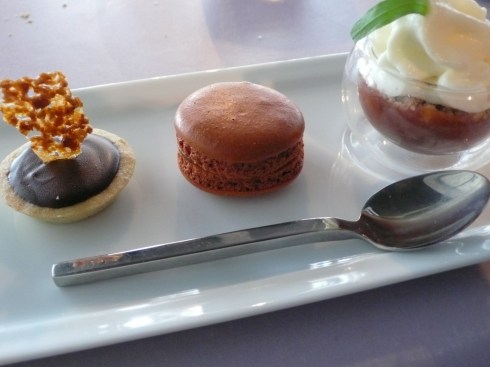
I had the trio of desserts – a consideration of how different chocolate can be! First there was a rhubarb and tarragon crumble with a white chocolate espuma. The rhubarb crumble was tart and soursweet, the crumble with hints of cinnamon. The chocolate here only highlighted the different taste sensations of the fruit, and was definitely a supporting character. Then there was a  macaron – I chose the caramel, though I should have probably chosen the chocolate for unity of plate! I didnt regret it though – the caramel macaron was astonishing – a delight, a whisper of macaron, and a bold flavourful bittersweetsalty caramel licked in the centre. I could bathe in that caramel and be happy. And finally, a tiny, delicate chocolate tart, with a fragile vanilla crust. But it had a huge chocolate flavour – intense dark smoky notes. Wonderful.

All in all a brilliant meal. As a cook, it inspired me to think of different balances and ways to present food. As an eater, it appealed to the sensualist in me.

Was there anywhere we could find fault in this lovely new restaurant? Well, yes actually. The only uncomfortable note of the entire meal was the seating – outside seats were very low, and we could not sit there because of the noise and pollution from the construction. Inside was beautiful, but they had inexplicably chosen high, sharp bar seats and high tables. Very uncomfortable and difficult to get in and out of. The seats were the only thing in the restaurant that did not encourage you to stay a while and enjoy. Honestly, after an hour or so of sitting, they were painful.

Nathalie’s Gourmet Studio changes its menu every month, so we will definitely be back next month to try more mouthwatering delicacies. It is exciting and very happy making to see such a high level gourmet space opening up in KL. Its wonderful to be able to explore the food mind of a serious chef through her menu. Thank you Nathalie for creating such a sumptuous gourmet experience!

PS – Try the macarons! We brought back a large box – couldnt resist!

Nathalie’s Gourmet Studio – Unit 4-1-5 – Solaris Dutamas – Jalan Dutamas – 50480 Kuala Lumpur – Tel : 03.62 07.95 72

http://www.nathaliegourmetstudio.com