Tag Archives: garlic

Tapenade with French Bread Toasts

26 Feb

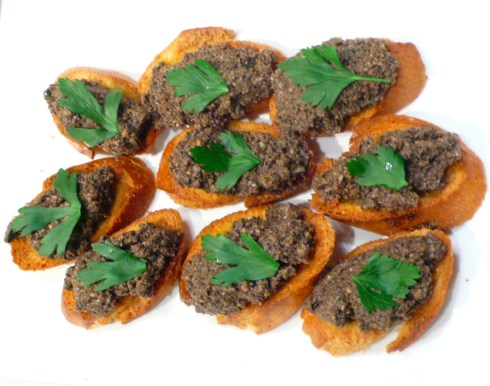
I made this tapenade for a wine tasting at O’Gourmet Food Hall. It was paired with a Santanegro Syrah 2008 – a light red wine. I think tapenade is one of the most delightful of the vegan/vegetarian starters – its so easy to make, and yet has such complex flavours, particularly if you get the balance right. Because its so simple, its important to ensure that all the components are beautifully presented.

I used a really good quality french bread for the toasts – sliced on the diagonal, and then brushed with a mixture of virgin olive oil, Maldon salt and a few cloves of garlic. Baked in the oven until golden brown, they were then covered with the tapenade, and a small sprig of parsley. Obviously, the parsley isnt neccessary, but it makes it look so pretty and elegant.

I love the lemon in this tapenade. It brightens the dark complexity of the olives and oil, and brings a freshness and clarity to the taste of the paste. You could use this as a starter, or in so many other things – a few tablespoons mixed with angel hair pasta gives you a quick and satisfying dinner; a teaspoon or so spread on bread is the basis for a sandwich with intriguing depth, and as a dip for crudites, this is strong and delicious.

This recipe makes about 2 – 2 1/2 cups. I made 20 appetisers and had enough left over for a snack later!

Tapenade with French bread toasts

For the Tapenade

  • 2 cups black olives (drained and pitted if needed)
  • 1 cup green olives (drained and pitted if needed)
  • 1/4 cup extra virgin olive oil (organic if you can find it)
  • 1 lemon
  • 2 cloves of garlic
  • 2 – 3 tbsp caper berries

In a large bowl, combine the olives, about half the olive oil, the grated zest of the lemon (I use a Microplane lemon grater), the garlic cloves cut in half, and the caper berries. You can use a food processor to blitz everything, but I actually like using my immersion blender. It gives much more control, and you can decide when the tapenade is of the consistency that you prefer. I personally like it a little chunky, but you can process until almost smooth.

Squeeze the juice of half the lemon into the mixture, and stir well. Taste and adjust flavourings. You shouldnt need salt as the the olives are usually quite salty, but if you really want it, add. I usually adjust the lemon a little, or the caper berries.

Cover the tapenade with the remaining olive oil, and set aside for at least 2 hours, or overnight to let all the flavours meld.

For the toasts and to serve

  • 2 small (or 1 large) loaves fresh, crusty French bread
  • 3 – 4 tablespoons extra virgin olive oil
  • large pinch of Maldon Salt
  • 2 cloves of garlic, sliced thickly
  • Small bunch of Italian parsley

Preheat your oven to 180C (350F). Line a large baking sheet with parchment or baking paper.

Slice the loaves on the diagonal, and place the sliced bread on the baking sheet.

Mix the olive oil, salt and garlic together in a small bowl, and using a pastry brush, brush the bread with the olive oil mixture. Add extra olive oil if needed, but you dont want it too oily.

Bake the toasts in the oven for approximately 5 – 10 minutes until light golden.

Can be prepared up to 2 days in advance.

To serve, spoon about a tablespoon of tapenade on each toast. Top with a small sprig of parsley, and serve.

Enjoy!

O’Gourmet Truffled Macaroni and Cheese

6 Dec

I love macaroni and cheese, the beautiful pasta, coated with a creamy blanket of cheesy indulgence. The crispy top, making way for a melting interior. Whats not to love? Well, some varieties of mac and cheese are plainly unappetising, made from over processed, pasturised ingredients that have all the life and soul taken out of them (once youve seen that orange glow, you will never forget it!). I wanted to make a different kind of macaroni and cheese – a sensuous, indulgent meal, ripe with scent, taste, texture and balance. This macaroni and cheese is slightly wicked, a tad naughty, and very memorable. It can be served at a celebration – birthday, New Years, holidays of every kind – or just because you want to say I love you. Honestly, they will get the message!

A dish like this needs to be in part based on thought and consideration, and in part on pure inspiration. So I wandered the O’Gourmet Food Hall to see what might present itself. First under consideration was the pasta. I decided on La Collina Toscana pasta, made in Italy, and rather than macaroni, a conchiglie shape – like a small conch or sea shell. Gorgeous, naturally dried, hand crafted pasta, with a shape that has the same benefits of macaroni (the curved tubular shape catches and holds sauce well), and yet has a more elegant look to it. But of course, I dont want to be proscriptive, so use whichever pasta strikes your fancy!

I feel that macaroni and cheese can sometimes be a tad overwhelmingly rich, and I noted some gorgeously fresh organic baby spinach, so I decided to include a surprise nestled in the depths of the pasta – bright clean spinach, sauteed with white onion, and candied, caramelised garlic. I wanted to make the garlic a little differently from the original Ottolenghi recipe I used, and so decided that instead of water, I would use wine! But then, I saw Fre wines – alcohol-removed wine. Yes, honestly!

I read the taste tests, and while there is definitely something missing (the alcohol!), there is a unanimous agreement that the taste is still there… somewhat! I thought that it might be very interesting to try cooking with this non-alcoholic wine. Would you get the same taste, roundness of flavour, haunting notes of fruit and honey and sunshine, as with regular wine? I decided I would use the Fre premium white wine in the sauce, and the Fre premium red wine in creating the caramelised garlic (in place of water in the original recipe). I found that there was certainly a hint of winey flavour to the sauce and garlic, but that depth of flavour, the resonance of the wine, the layers of scent and taste, were not as fully realised. I think the next time I make this pasta, I will use regular wine, but when I am cooking for those who have issues with alcohol in their food, I would most certainly go back to the Fre. And again, if you prefer cooking with wine, please, go ahead and give in to the urge 😉

And finally, truffles. I felt that truffles added to the cheese sauce would elevate this dish into a celebratory, special meal. I looked around, and decided to layer the different truffle tastes – starting with the amazingly hedonistic truffle oil from Vom Fass, which I used to permeate everything from the spinach to the garlic to the cheese sauce. I seasoned everything with truffle sea salt, and finally, I found Himalayan truffles (tuber indicum), an inexpensive (relatively) jar of black truffles from the Himalayas. I loved these truffles. They were easy to work with, and imbued the pasta with their own truffled scent – not quite as all inclusive as European truffles, which seem to have the reach and depth of durian, but with their own nutty, dark, rich flavour.

And when I spoke to M. Sebastien in the cheese room, he suggested that I use a Brillat-Savarin (a triple cream, soft, brie-like cheese) which had been layered, and thus completely permeated, with truffles. I used organic white cheddar and a beautiful aged crumbly parmesan as well, but I promise you, when I sliced open that Brillat-Savarin, and saw the thick soft melting consistency, and smelled that unique combination of cheese and truffle… well, I wanted to rub it all over me! Incredibly luxurious and such a beautiful addition to the pasta.

This dish looks like a lot of work, and it certainly will take a couple of hours of cooking. But a lot can be done ahead of time – the garlic can be candied and caramelised in about half an hour or so, and can be stored in the fridge for about 2 weeks. The spinach can be sauteed and kept, covered, in the fridge for 3 days. Even the cheese sauce can be made the day before (though I would whisk in the egg at the last minute), and combined with the pasta just before baking. I served the dish with a simple salad of bitter arugula (rocket) and ribboned organic carrots, with a dressing of balsamic, truffle oil and soy sauce. It was a bright counterpoint to the luxury of the main course.

This truffled macaroni and cheese is worth the work and the care, the loving sourcing of beautiful ingredients. The result is a gift to the people you love, and to yourself.

Serves 6 – 8 people

Candied Caramelised Garlic (adapted from Yotam Ottolenghi’s Plenty)

  • 2 cups Fre premium red wine (or a good red wine)
  • 1 1/2 cups garlic cloves (about 2 heads – 30 cloves or so)
  • 2 tbsp + 1 tsp truffle oil
  • 1 tbsp caster sugar or light brown sugar
  • 2 tbsp best quality balsamic vinegar (I used a 25 year old balsamic from Vom Fass – it was astonishing!)
  • 1 tsp herbes de Provence or mixed Italian/French herbs
  • 1/2 tsp truffle salt (if you have it – otherwise a good sea salt is fine)

Combine the red wine and garlic cloves in a medium saucepan. Bring to the boil over medium low heat, and simmer for about 5 minutes.

Drain the red wine from the garlic cloves, reserving the red wine for later. Clean the saucepan well and dry it, and place the garlic cloves and the truffle oil into the saucepan together.

Saute the garlic in the oil for about 5 minutes or so, on medium high heat, or until the garlic has softened, released its intrinsic garlic scent, and become lightly browned.

Measure out about 1 1/2 cups of the red wine, and combine with the sugar, balsamic, herbs and salt. Pour over the garlic in the saucepan. Be careful, because it will splatter a bit.

Simmer on medium high heat for about 15 – 20 minutes, or until the liquid has almost completely reduced, and the garlic is dark red, sticky, candied and caramelised. Take off the heat, and pour over the remaining 1 tsp of truffle oil.

This candied garlic will keep in the fridge, covered for at least 2 weeks, but you will probably eat it before then! It can be an astonishing addition to salads, soups, risottos, pastas, sandwiches – just about anything you can imagine!

Sauteed Spinach

  • 2 tbsp + 1 tsp truffle oil
  • 1 cup finely chopped white onion (1 small onion or 1/2 large)
  • Truffle salt and pepper to taste
  • 3 – 4 cups organic baby spinach, washed and roughly chopped

In a medium sized pan, over medium heat, combine the 2 tbsp of truffle oil and the white onion. Saute for 5 – 10 minutes, or until the onion goes glossy, soft and shiny. You dont want it to burn, but you do want it to reach that moment just before it caramelises!

Season with truffle salt and pepper, and add the baby spinach. Raise the heat a little, and saute quickly. The spinach will turn bright green, and will release some of its liquid. This is perfect. Remove from heat, taste and adjust seasonings, and pour over the final teaspoon of truffle oil.

You can reserve this spinach for up to 3 days, covered in the fridge. It also makes a sublime side dish!

Truffled Three Cheese Sauce

  • 1 cup cream
  • 1 cup whole milk
  • Truffles – as much as you want or can afford! I used a 100 g jar of Himalayan truffles plus 2 tbsp of truffle oil plus 1/2 tsp of truffle salt
  • 3 tbsp butter
  • 2 tbsp truffle oil
  • 3 tbsp flour
  • 1 + 1 cup Fre premium white wine (or regular white wine – or even sparkling wine!)
  • 1/2 tsp (or less – to your taste) English mustard powder or Dijon mustard
  • 8 oz (about 2 cups) grated white organic cheddar
  • 200 g (about 7 oz) truffled Brillat Savarin
  • 1/2 cup grated best quality parmesan
  • Truffle salt and pepper to taste

In a medium large saucepan, combine the cream and milk. Grate over the truffles (I used a Microplane zester to shave the truffles very small and fine), and add the truffle oil and truffle salt, if using. Over low heat, warm the cream/milk/truffle mixture until it is just steaming – about 75C or 165F. Stir often. Once the mixture reaches the steaming stage, remove from heat, and let steep for at least an hour. This infusion step is important! It makes sure that the taste of the truffles is all over that sauce.

In a medium large saucepan, melt the butter and truffle oil over medium low heat. Once the butter has melted completely, add the flour, and stir well. This roux will form the basis of your sauce, so make sure that you take your time and cook it well. You want it the colour of light teak – keep your nerve. Dont burn it, but dont let it stay too pale either. I would cook for at least 5 minutes, up to 10, depending on the heat source.

Once the roux has cooked to your liking, lower the heat a bit, and add 1 cup of the white wine, whisking constantly. The mixture will immediately seize up and become very thick. Whisk in all of the steeped milk/cream/truffle mixture, and continue to whisk well. Taste. Add the remaining 1 cup of white wine, tasting every 1/4th cup or so. You dont need to add it all if the mixture becomes too heavily winey.

Sprinkle over the mustard powder or the Dijon mustard, and whisk well to combine.

Bring the heat up to medium low, and sprinkle over the cheddar. Continue whisking the sauce as you incorporate the cheddar into the mix. Taste and adjust seasonings again.

Slice the bottom rind off the Brillat Savarin, and using a teaspoon, scoop it out of its rind. Add to the sauce, and whisk well to combine.

Sprinkle over the parmesan, and whisk well, until the cheese is melted and well mixed.

Remove the sauce from the heat and allow to cool to tepid bathwater heat. Whisk in the egg yolks to enrich the sauce, and adjust for seasoning.

The cheese sauce can be made up to a day of time, before adding the egg yolks. Keep tightly covered in the fridge, and bring to room temperature before whisking in the egg yolks and assembling the main dish.

This sauce would be wonderful served as is, not baked, with angel hair pasta or linguine!

Truffled Macaroni and Cheese – Assembly

You can serve this in individual small ceramic baking pots, bake it in loaf tins (it will fill three tins), or a large enameled baking dish. Your choice – I think it depends on how and who you are going to serve! Individual pots are a very elegant presentation, but loaf tins or a large baking dish bring a casual luxury to the meal.

  • 500 g macaroni, elbow, conchiglie, or other tubular pasta
  • Truffled Three Cheese Sauce
  • Caramelised Garlic
  • Sauteed Spinach
  • Handful of Italian parsley, finely minced
  • 1/2 cup breadcrumbs (I used Panko)
  • 1/2 cup parmesan
  • A few teaspoons of truffle oil to finish

Preheat the oven to 160C (325F), and have your baking pans ready.

Prepare macaroni or other tubular pasta according to the packet directions, in a large saucepan or pot, over high heat, in heavily salted boiling water, but taste a few minutes shy of the time indicated on the packaging. I cooked conchiglie pasta, and the packet said 15 minutes. I cooked it for 11 minutes, to just before al dente.

Drain the pasta, and place in a large mixing bowl. Pour over about three quarters of the cheese sauce and stir well to combine. Taste for salt and pepper and adjust.

Place about half of the pasta in your baking pots/tin/dish. Press down to ensure that the pasta is snug. Ladle about half of the remaining sauce over the pasta. Using your hands, squeeze out the liquid from the reserved spinach, and place it in an even layer over the pasta, leaving about 1/2 inch rim free around the edge of the dish. Stud the spinach with the caramelised garlic – as much or as little as you wish, though i went easy on it. I wanted a spark of intense flavour, but I did not want to overwhelm the delicacy of the pasta. Add the rest of the pasta to the dish, and ladle over the remaining sauce.

In a small bowl, mix together the Italian parsley, breadcrumbs and parmesan, and sprinkle evenly over the pasta.

Bake in the oven for 45 minutes to an hour, or until the pasta is bubbling and hot, and a crisp, golden crust has formed.

Just before serving, sprinkle lightly with the truffle oil to really bring out the scent.

Enjoy the love.

Comfort Food

5 Dec

Angel Kitten has taken a 1 month vow of vegetarianism. I am so proud of her, I just cant even begin to tell you. She was so moved by information she found on the PETA website, that she took a pledge to be a vegetarian for a month. I think thats amazing, and I truly believe she will feel wonderful after that month is over – so much so, that may be it will inspire her to eat vegetarian once a week or so. We have had several discussions about the choice to live a vegetarian life. I dont really try and “convert” people, but I do strongly believe that living a life of love and gentleness often includes making a choice not to eat animals.

However, I also believe strongly that if one chooses a carnivorous life, then thats OK too — especially if the choices about what meats one eats are made with care and forethought. For example, choosing to eat at the Golden Arches or the like, where the meat and chicken have lived largely painful lives, and been processed in a way that is wholesale, rather than respectful, is very different from choosing to occasionally eat meat that is free range and fed organic, non steriod, non hormone food. I would posit that the latter is much more delicious, even if much more expensive. I think if one wants to or has to eat a carnivorous diet, the logical, kind and respectful choice is to eat meat that has been treated with kindness and respect. May be not as often as highly processed meats and chickens, unless one is rich beyond the need to consider such things, but with much more satisfaction and enjoyment.

Anyway, thats me off my hobbyhorse 😉 As part of my support of AngelKitten’s choice, I really wanted to make her food that will encourage her to see how satisfying eating a vegetarian diet is. This meal is one of her all time favourites, and we often order it in restaurants together, as a conglomeration of side dishes which we share. It could be completely vegan if you mashed the potatoes with olive oil instead of butter and cream… but I leave that choice to you 😉 For us, we used organic cream and butter and were very happy with that choice.

For dinner last night, we had sauteed spinach and french beans with garlic, roasted broccoli with soy and balsamic (which Ezril said tasted meaty and immensely satisfying), and mashed potatoes with roasted garlic. It was sublime. So simple, so easy, so delicious. It was ultimate comfort food for us, and got me to thinking about what comfort food really is. Its not fancy, overly thought through, complex food. Rather, its simple, well cooked, well sourced ingredients that are cooked so their essential deliciousness shines through. We used organic spinach, french beans and broccoli – and organic milk and cream in the potatoes. If you wanted more protein in this meal, you could add some toasted almonds to the vegetables, but I dont think its necessary. I think that if you eat a balance of food through a week or so, high in protein sometimes, high in greens others, youre fine. Balance is as much about listening to what your body wants and needs at a given time as following strictures and formulas.

And by the way, these are not so much recipes, as memories of what we ate that night, in celebration of AngelKitten’s pledge. We love the juxtaposition of the clean bright freshness of the spinach and beans, the roasted dark stickiness of the broccoli, and the pure decadence of the potatoes. Its all about balance isnt it? 🙂 So here are the three recipes we put together for our comfort dinner. I am glad to say that AngelKitten took the leftovers home, and hopefully, they will nurture her and feed her for a few days more to come 🙂

Serves 4 – 6 people (with leftovers of the potatoes, most definitely)

with Garlic!

Sauteed Spinach and French Beans

  • 1 tbsp olive oil
  • 1 tbsp butter (or additional olive oil for vegan)
  • 3 + 3 minced garlic cloves
  • Salt and pepper to taste
  • 1 – 2 cups washed, topped and tailed and chopped French beans
  • 2 – 3 cups washed and roughly chopped spinach

In a large saucepan or frying pan, over medium low heat, combine the olive oil and butter, and gently heat until the butter melts. Add 3 minced garlic cloves, and cook, stirring gently, until the garlic releases its unique scent, and goes glossy and soft. Add a bit of salt and pepper to the garlic, and toss in your prepared French beans.

Stir the beans until completely coated with garlic and oil, and continue cooking until the beans change colour – they will go bright green. Taste and adjust salt and pepper.

Throw in the spinach. Its OK if a little water still clings to the leaves, but you dont want the spinach to be soaking wet. I usually squeeze it to dry it, then chop it and add it to the pan.

Stir until the spinach wilts and turns bright green, which should finish cooking the beans perfectly. Add the remaining 3 cloves of minced garlic, stir and taste for salt and pepper.

Place in a large serving bowl, and set aside. Can be served hot or at room temperature. Its even delicious, in large spoonfuls, straight from the fridge.

Mmmmmmm

Roasted Garlic Mashed Potatoes

  • 1 tbsp olive oil
  • 1 tbsp balsamic vinegar
  • 1 tsp white wine vinegar
  • 1 tsp mixed herbs or herbes de Provence
  • Salt and pepper
  • Cloves from 3 heads of garlic (about 30 – 35 cloves)
  • 8 – 10 large potatoes (I usually use a mix)
  • 1 stick of butter (or 4 – 6 tbsp extra virgin olive oil)
  • 1/2 cup cream (optional)

Preheat oven to 200C (400F). Line a baking sheet or pan with parchment paper.

Place olive oil, balsamic vinegar, white wine vinegar, herbs, salt and pepper to taste and garlic cloves in a bowl. Toss to combine.

Place the garlic on the baking sheet in a single layer, and pour over any remaining liquid.

Roast the garlic in the oven until it is soft, burnt, glossy and slightly caramelised, about 20 minutes or so. Remove from the oven, and set aside.

Peel and chop the potatoes roughly. Place in a large saucepan or pot, and just cover with water. Over medium high heat, bring the water to a boil, and simmer until the potatoes are soft. Depending on your potatoes, and how small the chop is, this will take between 20 – 40 minutes.

Drain the potatoes, and place back in the pot. Slice butter over the potatoes, and pour over cream. Using a hand masher, ricer, or immersion blender (as I do), mash the potatoes. Taste for salt and pepper, and adjust.

Add all the garlic, and mash into the potatoes. Use a spoon or spatula to combine thoroughly, and taste and adjust for seasonings.

This can be prepared a few hours ahead, and reheated over a very low flame. It can keep warm, covered for an hour or two.

Sticky Green Goodness

Roasted Broccoli

  • 3 – 4 tbsp soy sauce
  • 1 – 2 tbsp balsamic vinegar
  • 1 – 2 tbsp roasted sesame oil (or olive oil if you dont have it)
  • Pepper (and salt if you wish to taste, but the soy should make it salty enough)
  • 1 head of broccoli, broken down into small florets, with the larger stalk peeled and chopped into batons – about 3 – 4 cups total

Preheat oven to 200C (400F). Line a baking sheet or pan with parchment paper.

Combine the soy, balsamic, oil, and pepper in a large bowl. Toss in the prepared broccoli, and using your hands, toss well to combine. Taste the mixture and adjust seasonings if you wish.

Place the broccoli in an even layer on the baking sheet and reserve any additional liquid for later. Roast in the oven for about 20 minutes. Remove, and flip each piece of broccoli over, dipping the broccoli in the remaining liquid. Pour over any additional liquid and continue roasting in the oven for another 5 – 10 minutes or until the broccoli is sticky, browny-green and delicious.

Serve hot or at room temperature.

Stuffed Mushrooms

8 Nov

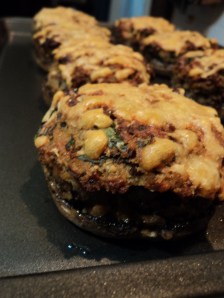
Cheesy GloriousnessSo, now that I am re-inspired, what do I cook? I thought about it last night, and I knew that some beloved people were coming over for a spot of watching BBC’s Sherlock. We needed some good, hearty hungry people food. And I remembered… one of the first things I ever “made up” inside my head were these stuffed mushrooms. A little twee, I know, and very, very retro. However, classic dishes never ever go out of style, and at the time I first created these, I was on a second hand cookbook kick, and reading books from the 50’s and 60’s – jellied avocado salad and things like that.

The section in these old school cookbooks that really tweaked my interest was the hors d’oeuvres – wonderful things like  puff pastry cheese twists, sour cream onion dip, and mushrooms in just about every form possible. Mushrooms on toast, pickled mushrooms, grilled mushrooms, mushroom jellies. And of course, stuffed mushrooms. Stuffed with everything from spinach to simple breadcrumbs. I have to say here, I adore mushrooms. I think they are fantastic, delicious, easy and incredibly varied. Mushrooms are definitely amongst my favourite things to eat in the world. And I love love love this recipe because it, like mushrooms, is so infinitely adaptable.

I am giving you a basic infrastructure here. This recipe will make 8 large stuffed mushroom caps. If you only have small mushrooms, adapt. If you want larger still – like a big beefy portobello, adapt. If you want to add a certain ingredient (spinach, oven dried tomatoes, roasted peppers, for example), then do so by all means! I would hazard to guess that 8 largish mushrooms might serve 4 rather polite people as a main course – and they are definitely main course material. My nephew turned to me and said, “I wouldnt need meat if I could eat these all the time!” Music to a vegetarian’s ears 😉

Stuffed mushrooms are also fantastic as part of a feast or larger spread – they would be great as a side dish, or the stuffing part of a vegetarian Thanksgiving or Christmas or New Years – or any other big celebratory party. They can be made in advance, held up to 2 days in the fridge, and brought to room temperature to serve. You could even warm them up a bit in the oven if you like. The stuffing must be cooked before refrigerating though because it has raw egg in it – and raw egg mixed with bread and mushrooms and other good things, sitting in the fridge, is a bad accident waiting to happen.

To be honest, I usually prep the mushrooms, saute the duxelles, and refrigerate that and prepare fresh on the day. Otherwise, I would be way too tempted to eat them all up before the party! They are that good. And leftovers (if youre lucky) make a sublime breakfast, cold from the fridge even, the next day.

Serves 4 as a main course, 8 as a side dish

  • 12 large mushrooms (Swiss brown or portobello) – very fresh and firm. About 2kg (1lb) or so
  • 2 tbsp olive oil (or olive oil and truffle oil if you have it) plus additional for mushroom caps
  • 3 – 4 minced garlic cloves (or minced shallots if you prefer)
  • Salt and pepper
  • 1 tbsp butter
  • 2 tbsp balsamic vinegar or white wine
  • 2 – 3 tbsp + 1 – 2 tbsp heavy cream
  • 2 tsp Dijon mustard
  • 2 cups breadcrumbs – I use Panko (Japanese) breadcrumbs, but use what you like – brown bread is really gorgeous and rustic in this recipe
  • 1/2 – 1 cup roughly grated parmesan plus additional for topping if you want (and I always do!)
  • 1/2 cup fresh herbs, minced – I used Italian parsley, rosemary and oregano – but you could add basil, rocket, thyme – whatever you feel like
  • 2 eggs

First comes the preparation of the mushrooms, and you really need to focus here. Examine all your mushrooms, and put aside your favourite eight. These will be the mushroom caps that will be stuffed. Peel and finely chop the remaining four mushrooms and stems. Place finely chopped mushrooms in a large bowl.

Peel your remaining eight mushrooms and stem them. Chop the stems finely and add to the bowl. Slice a thin slice off the top of the mushroom so that it will lay flat on the baking pan. Using a melon baller, scoop out as much mushroom flesh from the interior of the mushroom as you wish. With Swiss browns this tends to be quite a lot. Finely dice the scooped and sliced flesh. Place the scooped out mushroom caps in a small bowl, cover with a cloth and set aside.

You should have about 5 – 6 cups of diced mushrooms. Take a large non-stick frying pan, over medium high heat, and warm the olive and truffle oils. Saute the garlic lightly until it just softens. Add the diced mushrooms in three lots of about 2 cups each. You dont want to crowd the mushrooms in the pan – otherwise they will begin to steam, and wont saute well. Add one lot of mushrooms, and stir well, coating the mushrooms with the oil and garlic. Add salt and pepper, and allow the mushrooms to saute until lightly browned.

Only then should you add the second lot of mushrooms. Stir well, add a little more salt and pepper, and allow to saute again. They will begin to let go of some liquid. This is good. Each lot may take up to five minutes or more to cook through. Once the second lot has been sauteed to your liking, add the final lot of diced mushrooms, stir well to combine, and slice the butter thinly over all the mushrooms. Allow the heat of the mushrooms to melt the butter – this will flavour the mushrooms, encourage a little sauce to form, and add a bit of oil to the pan.

Let the mushrooms cook for a few minutes, and then pour over the balsamic vinegar. Stir well to combine, and then add the cream and Dijon. Stir, taste and adjust salt and pepper. You should have a pile of gorgeously sauteed mushrooms, with a little bit of thick mushroomy sauce.

Take the pan off the heat and transfer the mushrooms back to the large bowl. You should have about 2 – 3 cups of cooked duxelles.

Stir the mushrooms well and add the breadcrumbs immediately. Stir well, and allow the breadcrumbs to soak up all the wonderful mushroom juices.

Add the parmesan and stir well again. Taste and adjust for seasoning.

Mince your herbs of choice very fine, and add to the bowl, mix to combine.

Whisk together the eggs and a further tablespoon or two of heavy cream. Pour this mixture over the mushrooms and stir lightly to create a stuffing. You really dont want to make a dense stuffing – just use the eggs and cream as a binder to get everything nice and cohesive. If you want to add anything else (a bit of spinach, some roasted peppers, a few shards of sun dried tomatoes), you can do so now. Set the stuffing aside for a moment while you prepare the mushroom caps.

Preheat the oven to 200C (400F). Prepare a large baking sheet by lining it with parchment paper.

Take the mushroom caps, and pour a teaspoon or so of olive oil into your hands. Using your hands, rub each mushroom cap well, and place it on the baking sheet. This will ensure the mushroom caps bake through and dont dry out in the heat of the oven. You may need to add a bit more oil to your hands to really oil all eight mushroom caps.

Still using your hands, divide the stuffing between the eight prepared mushroom caps. Dont over stuff, and dont let the stuffing overflow too much. As the mushrooms bake, the caps will shrink, and the stuffing will fluff up – you dont want a huge difference between the two in the end product!

Grate a bit of parmesan and sprinkle over the stuffing – I used about half a cup in total. Bake the mushrooms in the hot oven for about 25 to 30 minutes, rotating the baking pan about 15 minutes into the baking.

Allow the mushrooms to cool down a little bit once removed from the oven, or serve at room temperature.

Beyond delicious. Enjoy!

Savoury Polenta Tart Tatin

3 Nov

Tart TatinOne of the things I love about reading great recipes is that they inspire me to create unique dishes of my own. For a long time now, I have been fascinated by tart tatin, the great French creation where you pour caramel into the bottom of a cake tin, layer over caramelised apples, and then top it all off with puff pastry. The pastry bakes at the top, becoming crispy and light, and the apples caramelise even further. When the tart is done, you flip it out of the cake pan, et voila! A perfectly crisp bottom, and sensuously caramelised apple.

I have always wanted to make a tart tatin that was savoury… but part of the trick is that sweet caramel sauce that you pour in first. How to make something savoury with that? And then… I read Yotam Ottolenghi’s recipe for a caramelised garlic tart – with goats cheese and puff pastry. I read the actual recipe for the caramelised garlic and realised that there is a sweet savoury caramelised sauce that coats those gorgeous garlic pieces. And then… I read a recipe for polenta with sauteed mushrooms. I do love mushrooms, and polenta is another obsession of mine. I fell asleep last night daydreaming of a perfect dish… and this morning, when I woke up, I knew what I needed to make a savoury polenta tart tatin.

I cant tell you how happy this makes me. Its like I have figured out some remarkable puzzle. It may have been made before (after all, in cooking, relatively little is new), but I have never read a recipe like this. I loved it from the moment it popped into my head, and I was determined to make it!

It took me more than 3 hours to make this today. Its a hell of a recipe, but … you could definitely do it in stages. Almost everything (even the polenta) can be made in advance and refrigerated until needed (though I would make the spinach mixture on the day). If you spend a day or two caramelising garlic, sauteeing some mushrooms and burnishing them with old thick balsamic, preparing some polenta, thickened with parmesan and butter … well, then this recipe would probably take you about 40 minutes from assembly to final stages of cooking.

And I am here to tell you… Its damn worth it! It is so good. Outrageously good. Celebration, birthday, vegetarian Thanksgiving, dinner party good. Its gorgeous and dramatic, and the layers of flavour are unbelievable. Fluffy yet creamy and cheesy polenta, with a crisp crust, is topped with creamy spinach, which in turn is topped with balsamic mushrooms and caramelised garlic. Its a beautiful tart, and very dramatic. If you want to add a bit of flair, you could probably decorate it with a few sliced cherry tomatoes stuffed strategically into place, but it really does not need it. This tart is a tour de force of flavours and textures … It is sublime, if I say so myself.

Feeds 6 – 8

Caramelised Garlic (from Yotam Ottolenghi’s Plenty)

  • 3 medium heads of garlic
  • 1 tbsp olive oil
  • 1 tsp balsamic vinegar
  • 220 ml (about 1 1/4 cup) water
  • 3/4 tbsp caster sugar
  • 1 tsp chopped rosemary
  • 1 tsp chopped thyme (I did not have any fresh thyme, so I used about 1/2 tsp dried herbes de Provence)
  • 1/4 tsp salt

Break the heads of garlic up, and peel the cloves. I realised I had many different sizes of garlic cloves, so I chopped the larger pieces in half to make them all approximately the same size.

Place the garlic cloves in a small saucepan and cover with water. Place over medium-high heat and bring to the boil. Lower heat so the water is simmering, and blanch the garlic for 3 minutes. Drain well.

Wipe out the saucepan (make sure you do this well – oil and water sputter badly), and place the olive oil in the saucepan. Over high heat, saute the garlic for 2 – 3 minutes. You want the garlic just to begin to brown around the edges.

Add the balsamic and the water (be careful, it will spit and spew at you as the water hits the hot oil), and bring to the boil. Simmer, stirring occasionally, for 10 minutes. Then add the sugar, rosemary, thyme and salt, and mix well. Simmer on medium heat for a further 10 – 20 minutes, or until most of the liquid has evaporated, and you have a thick  dark caramel sauce and deep dark soft garlic.

Take off heat and set aside. If you are only cooking the tart in the next day or so, transfer to a bowl or container, cover and refrigerate. Bring to room temperature before assembly.

Balsamic Mushrooms

  • 1 tbsp olive oil
  • 1/2 tbsp truffle oil (if you have it – if not, use olive oil or any other flavouring oil that you like)
  • About 8 medium to small portobello mushrooms (about 250 g – 1/2 lb) peeled and sliced thickly
  • About 3 – 4 Swiss brown mushrooms, peeled and sliced thickly
  • Salt and pepper
  • 1 tbsp balsamic vinegar
  • 2 tbsp butter

In a large non stick frying pan, heat the olive oil and truffle oil over medium high heat. Add all the portobello mushrooms, and stir well to combine, and to ensure that most of the mushrooms have been slicked with a little oil. Leave the mushrooms in the pan, not stirring, and allow them to brown and caramelise on their own. The heat and the olive oil will do the trick – you just have to NOT stir! Once you start smelling a wonderful mushroomy smell (about 3 – 5 minutes – possibly longer if your heat isnt that high), flip the mushrooms over. You should see that the bottom side is well browned.

Add the Swiss browns, mix again, and allow to saute, undisturbed for another few minutes. Salt and pepper well, stir, and then add the balsamic all at once. It will immediately begin to bubble and coat the mushrooms completely. Slice the butter directly over the mushrooms, and allow it to melt into the mixture. The butter will flavour the mushrooms as well as adding a bit of needed oil to the balsamic coating.

Taste, adjust seasonings, and once you are happy with the mushrooms (they should be slightly burnt, sticky, gooey, balsamic-y and intensely mushroom flavoured), tip out into a bowl and set aside. Transfer to a bowl or container if you are making the tart in a day or two, and refrigerate. Bring to room temperature before assembly.

Creamed spinach

  • 2 cups baby spinach, tightly packed
  • 2 heaping tbsp cream cheese
  • 1 tbsp cream
  • 1 egg
  • 1/4 tsp salt
  • Lots of black pepper
  • 1/2 cup (or more, depending on your cheesiness) grated cheddar – I used an organic white cheddar which was phenomenal here

Wash the baby spinach very well, and then roughly chop it. Add the spinach to a large non stick pan over medium heat. You still want a bit of the water to be clinging to the leaves – this will help it cook. Saute the spinach briefly – a minute or two will do it – until it turns dark green. Remove the spinach from the heat, and place it in a sieve to drain the liquid from it. Allow to cool a little.

In a small bowl, combine the cream cheese, cream and egg. Add the spinach (squeeze it with your hands before adding to the mix to make sure youve gotten rid of as much moisture as possible). Using an immersion blender (or you could transfer the lot to a blender or food processor), cream the spinach until it has completely integrated into the cream cheese mixture. Add salt and pepper, and mix well.

Add the grated cheddar, and mix well. Taste and adjust for seasoning. Set aside until ready to assemble the tart.

Cheesy Polenta

  • 2 cups water
  • 1/2 cup whole milk (low-fat will do, but its better with whole milk)
  • 1 cup polenta (cornmeal grits)
  • 1/2 cup mixed water and milk if you are making as below (optional)
  • 1/2 tsp salt
  • Loads of black pepper
  • 1/2 cup grated parmesan
  • 2 tbsp butter

Polenta is usually made in a saucepan, but I actually like the quickness and control I get from making it in a large, non stick, frying pan. You need a good spatula or wide flat wooden spoon.

Place a large non stick frying pan over medium heat and pour in the water and milk. Bring just to the boil, and once it boils, reduce the heat to a gentle simmer. Pour in the polenta in a steady stream, mixing constantly as you do so. This will ensure that the polenta is smooth and creamy and without lumps.

Keep stirring, the polenta should begin to thicken almost immediately. I usually use an almost scooping motion – circular, and right at the end, I scoop some polenta, and flip it over itself. Almost like folding egg whites gently into cake batter. Keep stirring and scooping for about 5 – 10 minutes. If the polenta gets too thick, add the water and milk mixture in gentle dribs and drabs.

Taste the polenta – it should be uniformly creamy. Any grittiness, and you need to continue cooking.

Once the polenta has reached a creamy consistency of thick oatmeal, and there is no grittiness, add the salt and tons of black pepper. Stir well and combine. Add the parmesan and butter, and combine well. Taste and adjust seasonings.

Set the polenta aside (in the pan if you like) until it comes to room temperature. The polenta will firm up quite a bit but this is fine. Refrigerate if you are not making the tart immediately, but bring to room temperature when you assemble.

Polenta Tart Tatin – Assembly

  • Caramelised Garlic
  • Balsamic Mushrooms
  • Creamed Spinach
  • Cheesy Polenta
  • 1/2 cup grated parmesan
  • Butter for the cake pan

Preheat the oven to 180C (350F), and prepare a 9 – 10 inch round cake tin. Butter the cake tin, and place a circle of grease proof wax paper in the bottom. Butter this as well.

Pour the syrup from the caramelised garlic, and cover the entire bottom of the cake tin with the sauce. Tilt to make sure you coat the wax paper completely. Arrange about half (or all if youre greedy – I like to keep some back for other uses!) of the garlic on the syrup, and arrange the balsamic mushrooms over the garlic. With the garlic and mushrooms, you will cover the entire bottom of the pan. Dont mix them up though, they should remain quite insular.

Pour over the creamed spinach, and use a spatula or knife to ensure that the spinach completely covers the garlic and mushrooms.

Bake the tart in the oven for about ten minutes, or until the spinach has firmed up and puffed a little – it will bronze a bit. Take out of the oven and allow to cool for about ten minutes or so.

Prepare the polenta. Sccop up a handful of polenta, and flatten it between your hands. It should be less than 1/2 inch thick. You will have a polenta patty – place this gently onto the baked spinach in the tin. Keep doing this until the spinach is completely covered. You can patch up the polenta if there are small holes or bits youve missed.

Grate the parmesan over the polenta, and bake again in the oven for about 20 minutes, or until the parmesan has burnished and become a gorgeous burnt mass on top of the polenta.

YumRemove from oven and allow to cool for about 5 to 10 minutes, in the pan, on a cake rack.

Run a sharp knife around the edges of the pan to make sure that nothing is sticking to the sides. Place a serving plate over the cake pan, and using oven gloves (as the pan may still be hot), flip the tart over in one smooth move. Remove the cake pan, and the wax paper, and adjust any bits of garlic or mushroom that may have fallen off.

Serve warm, at room temperature, or even cold the next day. Any which way, its mind-blowing-ly deeeeeee-licious!

Enjoy!

Roasted Tomato Tart

18 Oct

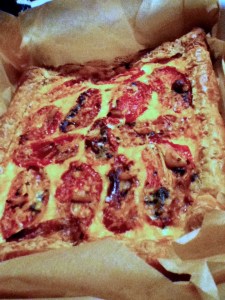
Tart!Tonight’s dinner was a work in progress during the day. It was one of those meals that you find a bit of time for, leave, and then come back to. Slow roasting the tomatoes for the tart took a while, and they really benefitted from being left in a hot oven (that I turned off) when we went out for the day.

I also roasted butternut for a soup – but that one was so simple, a recipe is kind of silly. I basically peeled and seeded a butternut, chopped it up, added a few tablespoons of olive oil and some spice – paprika, ginger, cinnamon and nutmeg – salt and pepper, and roasted it in a hot oven (225 C / 450 F) until it was soft. I mashed it, put it in a pot, poured a cup of water over, and brought to the boil. Blended it to a puree, and added a touch of milk and adjusted spices. Pure butternut heaven!

I must admit, I used Whole Foods bought puff pastry (from Dufour – amazing stuff!) for the tart. You could use best quality puff pastry, or make a cheese pastry as per the spinach pie I did the other day. Either way, you want a flat pie – almost a pizza but better 😉

I roasted these tomatoes in a very hot oven for about 20 – 25 minutes – until they were very soft, slightly burnt and caramelised, but still holding their shape and size. I then flipped them over, turned the oven off, and went out – and when we got back home, the tomatoes were slightly dried – almost like semi-sun-dried tomatoes. They had intensified in colour and flavour, without losing their shape or size. Absolutely gorgeous. I recommend this if you can – roast for half an hour in the morning, and then just leave them there. When you get home, you will have an amazing tomato dinner waiting for you! These are soooo good in pasta, in a grilled cheese, in salad, soup, just about anywhere you need a pure shot of tomato flavour.

Roasted Semi Dried Tomatoes

You will definitely have extra left over. Seems a shame to roast these tomatoes for just the one tart! Anoint your extras with a bit of olive oil and save in the fridge.

  • 10 – 12 juicy red tomatoes
  • 1 – 2 tbsp olive oil
  • Salt and pepper to taste
  • Basil (fresh or dried)
  • 1 tsp light brown sugar
  • 8 – 10 garlic cloves, sliced

Preheat oven to 225C (450F). Prepare a baking sheet with parchment paper.

Wash and dry the tomatoes. Slice them thickly (about 3 – 4 slices per fruit), destem if you feel the need, and arrange in a single layer on your baking sheet. Sprinkle olive oil judiciously over all.

Sprinkle with salt, pepper, basil and sugar. Add sliced garlic (I usually stick one or two on top of each tomato slice).

Bake for 20 – 25 minutes until the tomatoes are oozing juice, blistered a bit, but still holding their shape and size.

Take the baking sheet out of the oven, switch off the oven, and flip the tomatoes over. Put back into oven and leave for at least 2 hours if not the whole day.

Roasted Tomato Tart

  • 1 large sheet puff pastry (or cheese crust pastry to line a baking sheet)
  • 2 tbsp sour cream
  • 2 tbsp ricotta or cottage cheese
  • 1 tbsp cream cheese
  • 2 garlic cloves, crushed or minced
  • 1 egg
  • Salt and pepper to taste
  • 1/4 + 1/4 cup grated cheddar cheese
  • Roasted tomatoes

Preheat oven to 180C (375F). Line a baking sheet or pan with parchment paper.

Remove parchment paper from the baking pan, and place flat on table. Place a sheet of puff pastry (or a square of your own made cheese pastry) onto the parchment.

Roll out the pastry to to a rectangle about 18″ by 12″ and then fold over the edges by about 2 inches all around. Pinch to make sure the folded over edges stick, and using a fork, prick holes in the centre of the pastry. Slide onto your baking sheet or pan, and bake for about 25 minutes, or until the pastry has puffed up and is a light golden brown.

If you are using puff pastry, remove from the oven, and dig out about half of the centre layers. You will have very puffed edges, and a crisp centre.

Beat together the sour cream, ricotta, cream cheese, garlic, egg, salt and pepper and 1/4 cup of grated cheese. Pour into the centre of the pastry.

Arrange the roasted tomatoes on top of the mixture, and sprinkle with the remaining grated cheese, making sure you dont cover the tomatoes completely.

Bake in the oven for a further 20 minutes or so, or until the centre is puffed and browned.

Slice into pieces and enjoy! This can be served at room temperature, or even from the fridge the next day and is still very scrummy.


Kind-of-Ratatouille-a-la-Karo

14 Oct

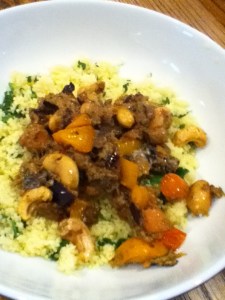
with Spinach Couscous!Tonight’s dinner may not be much to look at but it sure was delicious! And it was an intersection of different food thoughts that have been running through my head in the last few weeks. Inspired by so many things – my friend Karo’s post about the grated courgettes (zucchini), the Medjool dates at Per Se, and Karo’s link to Ottolenghi’s website.

Dinner needed to be fast and yet different tonight. Suddenly, autumn is upon us. I think we had our last 80 degree day a few days back, and now the crisp chill of cold is in the air around us. So dinner needed to be a response to that – warm and hearty, yet with echoes of sunshiney places. I didnt really think I wanted to do a ratatouille (though that often speaks of sunshine and warmth), mainly because I didnt have enough tomatoes. And I wanted to do the zucchini grated, and see what happened.

I started cooking with the thought that I was going to grate everything – but it didnt work out that way. Im pretty glad about that because I think I would have had a dark brown looking sludge by the end of it! Some stuff was grated, some stayed basically intact. You could serve this kind-of-ratatouille with french bread, rice, pasta – or as I did, with spinach couscous for a lush hint of colour and raw spinach flavour.

This is an example of my favourite free-form cooking – starting with a few ideas, and some beautiful ingredients, and seeing what happens. The end result was pretty damn tasty, completely vegan, rich and complex. The spice choices leant a hint of sunshine to the dark cold night, and we all went to bed happy and satisfied. All is right with the world 🙂

Serves 4

  • 1 tbsp plus more as needed olive oil
  • 1 small onion grated (mostly liquid)
  • 2 cloves garlic (or more as is your preference), grated
  • 1 small eggplant (aubergine) – diced
  • 1/2 tsp paprika
  • 1/2 tsp oregano
  • 1/2 tsp red pepper flakes
  • Pinch (or more) cinnamon
  • Salt and pepper to taste
  • 2 portobello mushrooms, peeled and minced
  • 1 zucchini (courgette) grated
  • 1 Medjool date, pitted and chopped very small
  • 1 cup carrots, peeled and chopped into rounds
  • 1/2 orange sweet pepper
  • 1/2 cup roughly chopped tomatoes (I used baby heirloom)
  • 1/2 cup or so water
  • 1/2 cup cashew nuts (toasted)
  • Spinach couscous

First off, toast your cashew nuts if they are raw. Use a non stick frying pan, dont add any oil, and toast over a medium fire until lightly browned. Pour off into a small bowl and set aside.

Add about 1 tablespoon olive oil to the frying pan. You might need to add more oil as you go through the various ingredients, but try to be miserly with the oil – you dont want an overly greasy end dish. Instead, use more or less heat (and eventually water) to control the cooking process.

Grate a small onion directly into the pan. The onion I grated ended up being quite watery – this is fine. If you have lovely little grated shards of onion, this is good too. Saute for a few minutes until the onion is glossy and soft. Grate in the garlic and stir to combine. Lower the heat and let the onion and garlic get acquainted.

While the onion and garlic are bubbling together gently, dice the eggplant into small cubes, keeping the skin intact. Bring the heat up a little (and add a touch of olive oil if you think it needs it), and add all the eggplant, mixing well.

Season the eggplant and onion mixture with the paprika, oregano, pepper, cinnamon and salt and pepper. Taste and adjust if needed.

Cook for about 5 minutes on high-ish heat. You want to burn the eggplant a little bit, and allow the onions to melt into the mix. When you start smelling that wonderful eggplant roasted burnt scent (its unmistakable) add the next part.

Add the mushrooms and mix extremely well. The mushrooms will let go of their liquid – encourage this by mixing thoroughly.

Lower the heat to medium, and let everything simmer together while you grate the zucchini. Squeeze most of the liquid out of the grated zucchini, and add to the pan. Sautee together, and mix very well. The zucchini will act as a paste and start to incorporate everything together. Taste and adjust for seasoning. add the minced date, and mix together. Allow everything to saute on medium heat for a few minutes.

Add carrots, sweet pepper and tomatoes to the pan, bring the heat to high, and stir to combine. As soon as everything starts to pop and sizzle, add the water, and allow the mixture to bubble. Taste for seasoning and adjust.

Add the cashews, and taste everything to make sure its a singular whole. Serve over spinach couscous or a grain of your choice!


Butternut Couscous

23 Sep

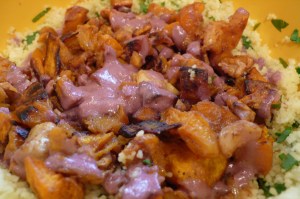
With Walnuts + Goats Cheese + Red Wine SauceToday we started getting in gear for Queen Z’s 1st Birthday Party. Did most of the shopping and I prepared the butter cookies for baking tomorrow morning. So tonight, we wanted a good and simple meal that would nourish us and keep us going! I decided to cook the butternut that has been sitting on the table looking at me friendly like for the last couple of days. My friend, Floating Lemons, posted a recipe on my Facebook page that inspired me.

I decided to make roasted butternut and combine it with toasted spiced walnuts and some gorgeous blue goat’s cheese I found at the market. I wanted to serve it with spinach couscous, which I have made before. As the recipe was coming together, I decided that the butternut and couscous together would be a bit dry – so I made a red wine orange sauce on the fly! I combined the butternut with the walnuts and cheese, placed them on the green flecked couscous, and drizzled the wine sauce over. It was delicious! And a great example of how a recipe can expand as you make it.

This may seem a little complex, but to be honest, I made the whole thing in one small saucepan (with a tight fitting lid!), and a roasting dish. We all have too much on our plates for me to start cooking with a thousand pots, so the recipe will reflect the step by step process I went through. It feels and sounds quite complicated, but if you read the recipe a few times, you will see that its really easy peasy!

I started the butternut roasting and then got on with the rest – toasted the walnuts, chopped the cheese (which you can omit easily if you are vegan), made the sauce and the couscous. By the time the butternut was ready, the other ingredients were just waiting to be combined!

This meal will serve 4 hungry greedy people or 6 refined ones. You can easily cut it in half as well, or double it if needed. Enjoy!

Roasted Butternut

  • 1 medium butternut, peeled, seeded and chopped
  • 9 – 12 cloves of garlic, peeled
  • 1 tbsp olive oil
  • Salt and pepper

Preheat the oven to 200C (400F).

In a large bowl, using your hands, combine the butternut, garlic and olive oil. The oil should lightly coat the butternut, not overwhelm it. Salt and pepper lightly and mix again with your hands to combine.

Line a jelly roll pan or cookie sheet with parchment paper. Arrange the butternut and garlic in a single layer on the pan, and roast for at least 30 minutes (it can go up to about 45) or until the butternut are soft, and slightly caramelised around the edges.

Once the butternut has roasted to your preference, take out of the oven and set aside to cool a little.

Toasted Walnuts

  • 1/2 cup walnuts
  • 1 tsp (or more) paprika
  • 1/2 tsp red pepper flakes
  • 1/2 tsp salt
  • A few drops (literally) of olive oil

Chop the walnuts into small chunks, and put them into a non stick saucepan.

Place saucepan over medium heat, and start to toast the walnuts. You need to watch quite carefully so they dont burn, and stir often with a wooden spoon. If you are worried, lower the heat a bit. The oils in the walnuts will release and you will smell the wonderful, unmatchable scent of toasted nuts. Gorgeous.

Once the walnuts have just started to toast, sprinkle the paprika, red pepper and salt over the walnuts and stir to combine. Wait for the spicy scent to hit you and then drop a few drops of olive oil over all, and stir. The olive oil will help the spices adhere to the walnuts.

Toast for about a minute or so more – and taste to see if its to your liking. If so, take off the heat, and set the walnuts aside. I put them in a teacup!

Red Wine Orange Sauce

  • 1/2 cup good red wine
  • 1/4 cup orange juice – fresh squeezed is best but if you only have orange juice from a carton thats fine too – it will be a bit sweet, and you might have to adjust accordingly.
  • 1 tbsp butter (or Earth Balance margarine if you are vegan)
  • Salt to taste (I only used a tiny pinch)
  • 2 tbsp sour cream (or heavy cream – or if youre vegan, use coconut cream or soy creamer/milk – oat milk would be good here too) – optional

This is not tons of sauce, its just a lick to give moisture and flavour.

Clean out the saucepan, and combine the red wine and orange juice together. Over high heat, bring the mixture to the boil, and boil quite rapidly until reduced by at least a third, and up to half.

Whisk in the butter or margarine, and add salt to taste. You should have quite a thick winey sauce – almost a glaze – with a strong orange flavour. Orange goes beautifully with butternut, so this will only brighten its amazing taste.

Whisk in the sour cream, if using, until the sauce is smooth. Taste and adjust salt. You could add some pepper as well, though I chose not to.

Pour into a teacup or mug (or small bowl, if youre fancy!) and set aside.

Spinach Couscous

  • 10 oz (about 280 g) box of couscous
  • 1 3/4 cup water
  • 1 tbsp butter or olive oil
  • 1/2 tsp salt, or to taste
  • 1 cup raw baby spinach, minced

Clean out your saucepan again, and  heat water, butter or olive oil and salt until the water comes to a full boil. Stir in the couscous, and take the saucepan off the heat. Cover with lid, and allow to sit for five minutes.

Mince the spinach very fine.

Remove the lid from the saucepan, and using a fork, fluff the couscous. Add the spinach all at once and mix thoroughly to combine. Taste and adjust seasoning.

Assembly

  • Roasted Butternut and Garlic
  • Toasted Walnuts
  • 1/2 cup blue goat’s cheese or chevre (optional)
  • Red Wine Orange Sauce
  • Spinach Couscous

The roasted butternut should have cooled a bit to room temperature.

In the roasting tin, combine the butternut, walnuts and cheese (if youre using). Mix well. Drizzle about half of your red wine sauce over and toss gently to combine.

Arrange the spinach couscous on a serving platter or in a large bowl. Make a well in the centre, and place the butternut mixture into the well. Drizzle the rest of the red wine sauce over, and serve. Enjoy with loved ones.

PS – the leftovers are divine for lunch the next day, tossed together as a salad – or you could bring the whole thing on a picnic as a salad – its good cold too!

Spinach Croquettes with Tomato Garlic Mushroom Sauce

18 Sep

With Tomato Garlic Mushroom SauceThe Tiny Queen Z (M’s baby) was having a tough day today. She is teething AND has a cold! Poor thing! But it also meant that my sister was completely exhausted, having been up every hour on the hour with the baby last night, and having to be with her all day today. I wanted to make dinner that would really feel like an indulgence, but be easy to eat, quick and extremely tasty. First I thought of a simple tomato and garlic pasta, but pasta can sometimes be too heavy. We have huge amounts of spinach in the fridge (and its so good for energy and strength) – so I thought spinach croquettes!

These arent the “traditional” croquette, made with mashed potato and rolled in breadcrumbs. To be honest, thats quite an involved recipe, and I wanted to get dinner on the table in under an hour. This actually took about 30 minutes all told, and it was really good. Simple, bold flavours, hot and comforting, the indulgence of fried foods, and yet the healthiness of spinach, mushrooms and tomatoes – simply cooked, without too much fuss.

This is easily convertible to a vegan dish. In the croquettes, substitute almond meal or ground almonds for the parmesan (they give the same wonderfully nutty hit) and a few tablespoons of soy milk to bring it all together instead of the eggs. In the sauce, you could either leave the vegetables clean, or you could substitute wine or soy or coconut milk for the sour cream. Any which way, this is a wonderful meal — it makes people feel comforted and happy. We needed that today!

Serves 4 people. Makes approximately 10 croquettes / patties.

Spinach Croquettes

  • 2 tbsp olive oil (plus a drizzle of truffle oil or roasted sesame oil if you have it for depth of flavour – but not neccessary) plus more for the frying
  • 1 small onion, diced
  • 1/2 tsp salt
  • 1/2 tsp pepper
  • 1 tsp dried basil
  • 1 tbsp balsamic vinegar or red wine or vegetable stock
  • 4 – 6 cups raw baby spinach, rinsed, and then chopped fine
  • 1 1/2 cups bread crumbs (I used Panko crumbs, but you can really use anything – whole wheat would be lovely, as would sour dough)
  • 2 eggs (vegan substitution: 2 – 4 tbsp soy milk or coconut milk)
  • 1/2 cup grated parmesan (vegan substitution: ground almonds)

In a medium saucepan, over medium high heat, saute the onion until it is soft and glossy, about 5 minutes. Season with salt, pepper and dried basil, and mix to combine. Add the balsamic or wine to the onions, and mix well. This will just soften the onions a little bit more, and add even more flavour to the dish.

Add the baby spinach in 2 batches, stirring until the spinach is just wilted, a few minutes. There will be some liquid in the bottom of the pan – this is great! You want it 🙂

Once all the spinach has been added, and lightly cooked, transfer the entire contents of the pan to a heatproof bowl.

Tip in the breadcrumbs and eggs and stir very gently just to combine. The mixture should come together easily. If not, add water, a tablespoon at a time. You want the mixture to bind together, but lightly – you dont want it mushy and wet.

Add the parmesan or ground almonds and mix lightly.

Put in the fridge to firm up while you make the sauce.

Once you are ready to eat (about 10 – 15 minutes before hand), preheat your oven to 100C (200F), and place a pan in the oven. Sprinkle a medium to large non stick frying pan with a touch of olive oil and place on medium heat. Make palm sized patties of the spinach mixture, and saute for about 4 – 5 minutes on the first side. You should be able to get 3 – 4 croquettes in a frying pan.

Flip the croquettes and saute for about 3 – 4 minutes on the second side. As you make the croquettes in batches, transfer the cooked croquettes to the pan in the oven to keep warm. Otherwise, place on serving platter, and cover with a dishtowel or paper napkin.

Tomato Garlic Mushroom Sauce

This is wonderful with the spinach croquettes. It is wonderfully tomato-ey, sweet and slightly gooey. The mushrooms give it depth of flavour too … I use this sauce on everything – on toasted bread for bruschetta, with pasta, as a filling for a decadent omelette. Its a great sauce to have on hand and it gets put together in a matter of minutes.

  • 1 1/2  tbsp olive oil
  • 5 – 7 garlic cloves, sliced
  • 1 cup mushrooms (I used portabello), peeled and sliced thinly
  • Salt and pepper to taste
  • 1 – 2 cups baby tomatoes (I used a mix of baby heirloom tomatoes which were amazing!), chopped
  • 2 tbsp sour cream or soy milk (optional)
  • Pinch of sugar (optional)

In a small frying pan, over medium low heat, saute the sliced garlic cloves in the olive oil. Let the garlic saute for about 5 minutes or so. You want it to get soft and slightly sticky, and lose its bitterness. This extended cooking time really allows the garlic flavours to bloom and soften. Its critical. Be patient. Everything else goes quite quickly.

Bring up the heat, and add the mushrooms in two batches. You want to encourage the mushrooms to lose their liquid, and just start to brown a little on the edges. They will go slightly caramel and sticky in the pan. They wont do this if you put too many in at the same time, which is why you are doing this in two batches. This should be the work of minutes, and watch carefully – you dont want the mushrooms to burn, but rather to brown.

Once the mushrooms have browned, season with salt and pepper to taste. Add the baby tomatoes all at once. They will immediately start to melt in the high heat, and their liquid will bubble and start forming a lovely sauce. Mix everything together well and taste. Add sour cream or soy milk if you want a creamier sauce, and add a tiny pinch of sugar if the tomatoes are not very sweet, to bring out their tomato essence.

Serve the sauce over the spinach croquettes. YUMMY.

Mushroom, Leek + Zucchini with Spinach Couscous

15 Sep

mushrooms leeks and zucchiniI dont know what it is, but the last couple of days I have been completely enveloped by colour when I cook… Yesterday, I made a green spinach pie, before that a green pasta, and a few days before a bright pink-fuschia raspberry pie. Today, I was also thinking about colour, but I wanted something bright and sunny because all of us were sad to say goodbye to Essia. I came up with a quick and easy meal that tastes amazing – sauteed leeks, mushrooms and zucchini, all tinged yellow with turmeric, and couscous, its sunniness modified by the addition of bright green spinach.

It was a happy meal – and its flavours while mellow, had a slight zing to palate. This combination can easily be made into a vegan dish by the exclusion of the sour cream (or substitution with some soy milk). I was looking for spices and herbs to accent the dark notes of the mushrooms and the roasted sweetness of the leeks – turmeric has an earthy quality, and paprika a mild sweetness. Combined with the tang of basil and the rounded richness of dijon mustard, they added layers of flavour to this meal that elevated it into specialness.

I added a few sliced tomatoes right at the end for their spark of colour and their finishing sweetness. Please do as you wish, though if you do have some beautiful small tomatoes around, they are a summery addition to this perfect stew. I also minced and added about a cup of raw spinach to the couscous. You cant really taste it, but it is so good for you that sliding it into the buttery perfection of couscous is a good idea – getting some raw green vegetables into the system without any fuss or effort at all.

This recipe will serve 4 people

Leek, Mushroom + Zucchini Stew

  • 2 tbsp olive oil (if you want added flavour, add a few drops of your favourite oil to the olive oil base)
  • 3 – 5 cloves of garlic, sliced fine
  • 1 medium leek, chopped
  • 1 small to medium zucchini, halved and sliced
  • Salt and pepper
  • 1 tsp paprika
  • 1 tsp turmeric
  • 1 tsp dried or fresh basil
  • 1/2 cup pistachios (or cashews or almonds – pistachios just worked in this for me, but go with what you like!)
  • 2 – 3 tbsp balsamic vinegar or wine
  • 1 cup mushrooms (I used portobello), peeled, sliced and chopped
  • 1 tbsp Dijon mustard
  • 2 – 3 tbsp sour cream or soy creamer/milk OR about 1/4 – 1/2 cup vegetable stock or wine
  • 1  cup baby roma tomatoes, sliced

In a large, non stick pan, over medium high heat, saute the garlic until just softened. Add the leek, and lower the heat. Sautee for about 5 minutes, or until the leek has turned glossy and softened quite a bit. Add the zucchini and sauté until softened. Add the salt, pepper, paprika, turmeric and basil, and stir well to combine. Scute for another few minutes to enable the spices and herbs to bloom.

Add the pistachios (or other nut) and stir well. Saute for another minute or two. Add the balsamic and allow the mixture to simmer down.

Add the mushrooms, and stir well. Cook for about 3 – 5 minutes, or until the mushrooms have let go of their liquid. Add the dijon mustard, and the sour cream (or vegetable stock), and simmer for at least 5 minutes, or until the liquid has bubbled down and reduced to a thick coating over the vegetables.

Take off heat, and add the sliced tomatoes, and mix well. The tomatoes will soften in the heat of the stew, but will not cook down and become mushy.

Taste for seasonings, and adjust.

Set aside while you make the couscous.

Spinach Couscous

  • 10 oz (about 280 g) box of couscous
  • 1 3/4 cup water
  • 1 tbsp butter or olive oil
  • 1/2 tsp salt, or to taste
  • 1 cup raw baby spinach, minced

In a saucepan, with a tight fitting lid, heat water, butter or olive oil and salt until the water comes to a full boil. Stir in the couscous, and take the saucepan off the heat. Cover with lid, and allow to sit for five minutes.

Mince the spinach very fine.

Remove the lid from the saucepan, and using a fork, fluff the couscous. Add the spinach all at once and mix thoroughly to combine. Taste and adjust seasoning.

To serve, plate the couscous in a large bowl. Ladle the stew over. Eat and be comforted 🙂